LiftMaster 61LM Owners Manual - Page 152
Indoor/Outdoor Wire-in Light Control
 |
View all LiftMaster 61LM manuals
Add to My Manuals
Save this manual to your list of manuals |
Page 152 highlights
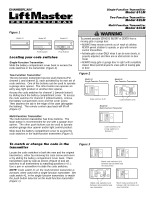
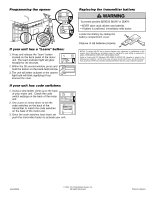
INSTALLATION AND OPERATION INSTRUCTIONS Remove light bulb from fixture. Screw top of Control into socket. Place washer over neck of bulb. Screw into the bottom of Control, compressing washer slightly. Turn on any manual switch which would normally control the light and leave it in the ON POSITION. Press remote push button. Light should turn on. Press again and light will turn off. If light does not operate, check to be sure: 1. All manual switches are turned on. 2. Control and lamp are firmly screwed in. 3. There is power to circuit (check fuse box or circuit breakers). 4. The bulb works. If remote control does not operate, check to be sure: 1. Receiver and remote have matching codes. 2. You are pressing the push button selected to operate Control (on 2-channel or Multi-Function remotes). 3. Remote control battery has power. NOTE: Test light on the remote should glow when push button is pressed. NOTE: If two or more Light Products are installed, they must be located at least 10 feet apart to prevent electronic interference. NOTE: No user serviceable parts. If Control needs repair, call Toll Free Number 1-800-528-9131. ACCESSORIES Model 772CB Indoor/Outdoor Wire-in Light Control Controls interior or exterior lights. Wires into electrical socket like a dimmer switch. Model 753CB Multi-Function Remote Control Controls Garage Door Openers and Light Control Products. Model 774CB Plug-In Light Control Control interior lights. Plugs into a wall receptacle.
-
 1
1 -
2
-
3
-
4
-
5
-
6
-
7
-
8
-
9
-
10
-
11
-
12
-
13
-
14
-
15
-
16
-
17
-
18
-
19
-
20
-
21
-
22
-
23
-
24
-
25
-
26
-
27
-
28
-
29
-
30
-
31
-
32
-
33
-
34
-
35
-
36
-
37
-
38
-
39
-
40
-
41
-
42
-
43
-
44
-
45
-
46
-
47
-
48
-
49
-
50
-
51
-
52
-
53
-
54
-
55
-
56
-
57
-
58
-
59
-
60
-
61
-
62
-
63
-
64
-
65
-
66
-
67
-
68
-
69
-
70
-
71
-
72
-
73
-
74
-
75
-
76
-
77
-
78
-
79
-
80
-
81
-
82
-
83
-
84
-
85
-
86
-
87
-
88
-
89
-
90
-
91
-
92
-
93
-
94
-
95
-
96
-
97
-
98
-
99
-
100
-
101
-
102
-
103
-
104
-
105
-
106
-
107
-
108
-
109
-
110
-
111
-
112
-
113
-
114
-
115
-
116
-
117
-
118
-
119
-
120
-
121
-
122
-
123
-
124
-
125
-
126
-
127
-
128
-
129
-
130
-
131
-
132
-
133
-
134
-
135
-
136
-
137
-
138
-
139
-
140
-
141
-
142
-
143
-
144
-
145
-
146
-
 147
147 -
 148
148 -
 149
149 -
 150
150 -
 151
151 -
 152
152 -
 153
153 -
 154
154 -
 155
155 -
 156
156 -
 157
157 -
158
-
159
-
160
-
161
-
162
-
163
-
164
-
165
-
166
-
167
-
168
-
169
-
170
-
171
-
172
-
173
-
174
-
175
-
176
-
177
-
178
-
179
-
180
-
181
-
182
-
183
-
184
-
185
-
186
-
187
-
188
-
189
-
190
-
191
-
192
-
193
-
194
-
195
-
196
-
197
-
198
-
199
-
200
-
201
-
202
-
203
-
204
-
205
-
206
-
207
-
208
-
209
-
210
-
211
-
212
-
213
-
214
-
215
-
216
-
217
-
218
-
219
-
220
-
221
-
222
-
223
-
224
-
225
-
226
-
227
-
228
-
229
-
230
-
231
-
232
-
233
-
234
-
235
-
236
-
237
-
238
-
239
-
240
-
241
-
242
-
243
-
244
-
245
-
246
-
247
-
248
-
249
-
250
-
251
-
252
-
253
-
254
-
255
-
256
-
257
-
258
-
259
-
260
-
261
-
262
-
263
-
264
-
265
-
266
-
267
-
268
-
269
-
270
-
271
-
272
-
273
-
274
-
275
-
276
-
277
-
278
-
279
-
280
-
281
-
282
-
283
-
284
-
285
-
286
 |
 |
