Linksys EFSP42 User Guide
Linksys EFSP42 - EtherFast PrintServer Print Server Manual
 |
UPC - 745883549108
View all Linksys EFSP42 manuals
Add to My Manuals
Save this manual to your list of manuals |
Linksys EFSP42 manual content summary:
- Linksys EFSP42 | User Guide - Page 1
Instant EtherFast© Series EtherFast 10/100 PrintServers Use this User Guide to install the following Linksys products: • EtherFast 10/100 2-Port Switched PrintServer (EFSP42) • EtherFast 10/100 3-Port Print Server (EPSX3) • EtherFast 10/100 1-Port Print Server (PPSX1) User Guide - Linksys EFSP42 | User Guide - Page 2
2000 Linksys, All Rights Reserved. Instant EtherFast 10/100 PrintServer is a registered trademark of Linksys. Microsoft, Windows, and the Windows logo are installation. This equipment generates, uses, and can radiate radio frequency energy and, if not installed and used according to the instructions - Linksys EFSP42 | User Guide - Page 3
II- Windows NT 4.0 Port Configuration 23 NetWare Driver Setup 29 Pure IP NetWare 5.x Setup 31 IPX Printing in NetWare 5.x, 4.x, 3.x 35 Bi-Admin: PrintServer Management 37 Installing Bi-Admin 37 Starting Bi-Admin 38 Using Bi-Admin 39 Troubleshooting 44 Appendix 57 DHCP Support 57 - Linksys EFSP42 | User Guide - Page 4
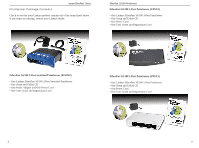
EtherFast 10/100 2-Port Switched PrintServer (EFSP42) • One Linksys EtherFast 10/100 2-Port Switched PrintServer • One Setup and Utility CD • One Power Adapter and One Power Cord • One User Guide and Registration Card EtherFast 10/100 1-Port PrintServer (PPSX1) • One Linksys EtherFast 10/100 1-Port - Linksys EFSP42 | User Guide - Page 5
Hardware • Simultaneously Supports Multiple Print Jobs • Runs with Virtually All Laser, Ink Jet, Bubble Jet, Color, and Dot Matrix Printers • All PrintServer Ports Support Parallel and Bidirectional Printers • Stand-Alone Unit - No Dedicated PrintServer PC Required • Easy-to-Use Management Utility - Linksys EFSP42 | User Guide - Page 6
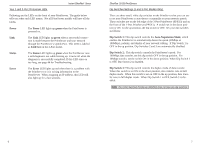
Troubleshooting. Error The Error LED lights up red when there is a problem with the PrintServer or it is writing information to the PrintServer. When assigning an IP address, this LED will also light up for a few seconds. EtherFast 10/100 PrintServers Dip Switches Settings (1 and 3-Port Models - Linksys EFSP42 | User Guide - Page 7
to your printers. Uplink Port The Uplink Port, which is shared with Port 1, connects to a standard RJ-45 port on another switch, hub, or router to expand your network. Ports 1 to 4 These four ethernet RJ-45 Ports connect to your network devices, such as PCs, other print servers, remote hard - Linksys EFSP42 | User Guide - Page 8
Linksys Instant EtherFast® Series PrintServer Hardware Installation Overview The following instructions will get your PrintServer hardware installed and powered on your network. Before starting your physical installation, be sure to find the PrintServer's Default Name and Node Address first. The - Linksys EFSP42 | User Guide - Page 9
your printer(s). Your PrintServer hardware installation is now complete, and you are now ready to install your PrintServer software. • If you are running Windows 98, 95 or NT 4.0, go to page 13. • If you are running NetWare, go to page 29. EtherFast 10/100 PrintServers Part I - Windows Driver Setup - Linksys EFSP42 | User Guide - Page 10
D:\Driver\Win9xnt\Setup.exe. Click OK. EtherFast 10/100 PrintServers 4. The Select Components window appears. If your computer is the network administrator's computer, check Install TCP/IP Setup Program (System Administrator only). Otherwise, select the default, Install Linksys PrintServer Driver - Linksys EFSP42 | User Guide - Page 11
copied to your computer. EtherFast 10/100 PrintServers 7. On the network administrator computer only, click Start, Programs, Linksys PrintServer Driver, and TCPIP Setup to set up your PrintServer's IP address. 6. Before the file copy finishes, the Configure PrintServer window will pop up again as - Linksys EFSP42 | User Guide - Page 12
EtherFast® Series Part II - Windows 98 and 95 Port Configuration Overview This section configures your Windows 98 or 95 computers to give them printing abilities to the PrintServer. At this point, you must have: • the PrintServer hardware installed on your network. If not, see page 10. • TCP/IP - Linksys EFSP42 | User Guide - Page 13
appears, choose the Details tab. Click on the Add Port button. EtherFast 10/100 PrintServers 8. Click OK. The Configure PrintServer window appears, shown below. The Add Port window will appear, shown below. 9. Enter the IP address or the Default Name of the PrintServer in the Device Name field - Linksys EFSP42 | User Guide - Page 14
windows. Your PrintServer installation is now complete, and you can print as you do normally. To change the PrintServer's internal setup or configuration, see page 37. Note: For 3-Port PrintServers (EPSX3) and 2-Port Switched PrintServers (EFSP42), you must add a port each time you add a printer - Linksys EFSP42 | User Guide - Page 15
. 3. After the printer driver is installed, click on the printer to be configured, then right-click to select Properties. EtherFast 10/100 PrintServers 4. When the Properties window with the name of your printer appears, click on Ports and then Add Port. 5. The Printer Ports window appears listing - Linksys EFSP42 | User Guide - Page 16
. Select the PrintServer you want to configure and click OK. EtherFast 10/100 PrintServers 9. A Output Select window appears. Select the port that your printer is attached to and click OK. Click OK again when the Configure PrintServer window appears. 8. Enter the Default Name on page10 for your - Linksys EFSP42 | User Guide - Page 17
PrintServers (EFSP42), you must add a port each time you add a printer to your PrintServer and each time you add an additional PrintServer to your network. 28 EtherFast 10/100 PrintServers NetWare Driver Setup Overview The EtherFast PrintServer provides fully functional printing services in - Linksys EFSP42 | User Guide - Page 18
driver last. This applies to pure IP NetWare under the 5.x version only. • for NetWare 5.x, 4.x, 3.x IPX Printing Mode: - Print Server Mode, see page 35 - Remote Printer Mode, see page 36 30 EtherFast 10/100 PrintServers Pure IP NetWare 5.x Setup These instructions set up the PrintServer to work - Linksys EFSP42 | User Guide - Page 19
numbered logical ports if necessary. 9. Click Finish. A window will appear, asking you to select drivers. 10. When you are asked to select drivers for Windows 3.1, Windows 95/98 and Windows NT 4.0, select None. The new Printer Agent "S_Printer" now appears in the Printer Agent List window. 32 33 - Linksys EFSP42 | User Guide - Page 20
. 2. Click Add. 3. Select the available printer and click Install, e.g.: S_Printer. Click Close. The printer (e.g., S_Printer) now appears in the main Printer Manager window, ready for print jobs. EtherFast 10/100 PrintServers IPX Printing in NetWare 5.x, 4.x and 3.x Print Server Mode To set up the - Linksys EFSP42 | User Guide - Page 21
, then Run. Type D:\utility\biadmin\disk1\setup in the pro- vided window and hit Enter. 3. When the title screen of the setup program appears, click Next. 4. Enter the directory name where you want the Bi-Admin program to be installed. The default directory of C:\ProgramFiles\linksys\printserver is - Linksys EFSP42 | User Guide - Page 22
in a read-only window, and gives you the following information: Hardware ID: 0620103428 Firmware Version: 6010 Protocol ID: 003F Default Name: SCE02282 Server Name: RHINO NetWare Info: Master File Server: NDS Tree Name: NDS Tree Context: Print Server Mode Status: Remote Printer Mode Status - Linksys EFSP42 | User Guide - Page 23
configure some printers' settings within the Printer Status window. Your PrintServer only shows as many parallel port icons as it has ports. For example, if you have the 2-Port model, only two parallel port icons will show. Because Linksys PrintServers do not support serial printing, the serial port - Linksys EFSP42 | User Guide - Page 24
you want to reset, followed by Init Device, then Reset Device.You can also reset it by pressing the Reset button on the left edge of the unit, (3-Port model only), or by unplugging its power cord. Restoring Factory Default If you have made irreversible changes in configuration that have rendered - Linksys EFSP42 | User Guide - Page 25
the PrintServer by unplugging the power supply or by turning off you printer(s) and pushing the Reset button. Problem 4: Solution 4: I am using DHCP, and the PrintServer gets an IP Address conflict involving the PrintServer. If the PrintServer is left on when the DHCP Server is turned off, the - Linksys EFSP42 | User Guide - Page 26
Instant EtherFast® Series inspecting your printer, contact Linksys Tech Support. Note: Windows-only printers may not print the diagnostic page. 2. Print a test text file and a test graphic file. If the text file prints correctly but the graphic file prints garbage, then specify /NT (no tabs) option - Linksys EFSP42 | User Guide - Page 27
Problem 3: Solution 3: Instant EtherFast® Series My PrintServer is configured as a NetWare PrintServer, and cannot log in to a file server. Try the following: 1. Get the PrintServer information using PSCONFIG or Bi-Admin. If the device is configured as a NetWare print server, the information will - Linksys EFSP42 | User Guide - Page 28
PrintServer. 2 = parallel port 3 of the PrintServer 5. Check to see if the PrintServer is a static queue server to the queue. Run PCONSOLE and select Print Server Information. Then select Print Server Configuration and select Queues Serviced by Printer. Then select your desired printer and check if - Linksys EFSP42 | User Guide - Page 29
to NetWare Remote Printer Mode. Enter the correct NetWare print server names in the print server name fields, then select Execute Setup. 52 EtherFast 10/100 PrintServers Windows Printing Issues Problem 1: Solution 1: When printing from some software applications such as Power Point, it takes - Linksys EFSP42 | User Guide - Page 30
the factory default using Bi-Admin's configuration menu. Problem 6: Solution 6: Some DOS-based programs do not work on a Windows 95/98 peer-to-peer network. Some DOS application require an LPT port to print. You can enable the NetBEUI protocol and capture a port. You must have NetBEUI installed - Linksys EFSP42 | User Guide - Page 31
Admin program. To install the PrintServer driver, see page 13 for Windows 95, 98, and NT installation. Note: For help with the Internet Mail Printing Configuration features, see the guide in D:\Not_supp\Manual directory on the PrintServer Setup CD. Linksys does not provide technical support for this - Linksys EFSP42 | User Guide - Page 32
: 255.255.255.0 58 EtherFast 10/100 PrintServers The following instructions are provided as examples for reference only. For complete instructions on installing and troubleshooting TCP/IP and IPX, consult your Windows operating system documentation. TCP/IP Setup for Windows 98 and 95 1. Click - Linksys EFSP42 | User Guide - Page 33
prompted. TCP/IP has now been successfully installed. 60 EtherFast 10/100 PrintServers IPX Setup for Windows NT 4.0 1. Click on Start, Settings, and Control Panel. Double-click on the Network icon. 2. When the Network window appears, click on the Protocols tab. Click on the Add button. 3. Find the - Linksys EFSP42 | User Guide - Page 34
Types of Cabling Instant EtherFast® Series There are different grades, or categories, of twisted-pair cabling. Category 5 is the most the floor. When looking down on the coppers, wire 1 will be on the far left. EtherFast 10/100 PrintServers Straight Through Cabling Crossed Over Cabling 62 63 - Linksys EFSP42 | User Guide - Page 35
To printer Ground 64 EtherFast 10/100 PrintServers Manual NetWare 5.x and 4.x in Windows With IPX Print Server Mode The instructions below explain how to establish communication between the PrintServer unit and the rest of your NetWare 4.x network in a mostly Windows environment. 1. First, install - Linksys EFSP42 | User Guide - Page 36
Create Print Server window will appear. 3. In the Print Server Name field, enter the name you gave the PrintServer in step 5 on page 65. 4. Click on the Create button. The newly created PrintServer should appear in the current context on the left. 66 EtherFast 10/100 PrintServers Creating a Printer - Linksys EFSP42 | User Guide - Page 37
queues. Double-click on it to show it in the Print Queues field. Click OK. EtherFast 10/100 PrintServers Directing the Printer to the Printer Resource 1. Double-click on the Print Server object in the context. The Print Server window will appear. Click on Assignments, followed by Add. 2. The - Linksys EFSP42 | User Guide - Page 38
install and run Bi-Admin if you haven't already). 2. When the Bi-Admin program runs, it automatically scans the network for available Linksys PrintServer hardware. Any hardware found on the network will appear in the Default Name, Device Name, Printer Port chart. Bi-Admin will ask for the password - Linksys EFSP42 | User Guide - Page 39
running print server resource service down, then bring it back up. The setup is complete. Refer to your NetWare documentation to see the PrintServer on the network using PSERVER or another NetWare printer utility. 72 EtherFast 10/100 PrintServers Adding More Than One Printer (for EPSX3 and EFSP42 - Linksys EFSP42 | User Guide - Page 40
74 EtherFast 10/100 PrintServers 5. Make sure the Port is set to the correct PrintServer device port. 6. The Location item should be set to Auto Load. When you finish configuring the printer, press Esc. Assigning Queues to Printers 1. When the Configuration menu re-appears, arrow down to the Print - Linksys EFSP42 | User Guide - Page 41
EtherFast® Series Configuring the Print Server Hardware 1. Run the PSCONFIG program located in the D:\Utility\DOS directory on the Linksys PrintServer CD. 2. The program will display an Active Device List table with a list of active PrintServers on the network. Each PrintServer has a name, default - Linksys EFSP42 | User Guide - Page 42
the previous page). 5. After selecting the desired printer, press Enter. 6. Press Esc repeatedly until you exit the program. Configuring the Print Server Hardware 1. Run the PSCONFIG program located in the D:\UTILITY\DOS directory on the Linksys PrintServer CD. 2. The program will display an Active - Linksys EFSP42 | User Guide - Page 43
in the list of available print servers. Highlight it and press Enter. 20. Select Printer Configuration and press Enter. 21. A table of configured printers will appear. The first column shows the names of the configured printers; the second column shows the LPT ports on the PrintServer device. Zero - Linksys EFSP42 | User Guide - Page 44
's connection. Remote Printer Mode The instructions below explain how to configure the PrintServer for Remote Printer Mode, and establish communication between it and your NetWare 3.x network. Manual Setup 1. Run the PSCONFIG program under the D:\UTILITY\DOS directory of the Linksys PrintServer CD - Linksys EFSP42 | User Guide - Page 45
see a checkmark on it with the IP address and the printer or print queue name, e.g., 10.0.0.1:L1. 9. Your LPR Port setup is now complete. 84 EtherFast 10/100 PrintServers Tips on Using the 2-Port Switched PrintServer (EFSP42) Switching Advantages Your EtherFast 10/100 Switch boosts your network - Linksys EFSP42 | User Guide - Page 46
. If you are using the uplink port, you will lose any connection on port 4. Be sure to disconnect any cabling in port 4 before using the uplink function. When connecting to other hubs and switches, you must use the uplink port. Linksys does not provide any technical support for connections made with - Linksys EFSP42 | User Guide - Page 47
guide. TCP/IP instructions are provided on page 56. Please be aware that although Linksys provides instructions for the setup of the TCP/IP protocol, these instructions are provided for reference only. Linksys will not provide technical support for the configuration and troubleshooting of the TCP/IP - Linksys EFSP42 | User Guide - Page 48
the Linksys website to download an Adobe Acrobat PDF version. Customer Support Fax Email Website FTP Site 800-326-7114 949-261-1288 949-261-8868 [email protected] http://www.linksys.com ftp.linksys.com Extended Technical Support The 2-Port Switched PrintServer (EFSP42) supports the NetBEUI and - Linksys EFSP42 | User Guide - Page 49
http://www.linksys.com © Copyright 1999 Linksys, All rights reserved. Printed in the U.S.A.
-
 1
1 -
 2
2 -
 3
3 -
 4
4 -
 5
5 -
 6
6 -
 7
7 -
8
-
9
-
10
-
11
-
12
-
13
-
14
-
15
-
16
-
17
-
18
-
19
-
20
-
21
-
22
-
23
-
24
-
25
-
26
-
27
-
28
-
29
-
30
-
31
-
32
-
33
-
34
-
35
-
36
-
37
-
38
-
39
-
40
-
41
-
42
-
43
-
44
-
45
-
46
-
47
-
48
-
49
 |
 |

Instant EtherFast
©
Series
EtherFast 10/100
PrintServers
Use this User Guide to install the following Linksys products:
• EtherFast 10/100 2-Port Switched PrintServer (EFSP42)
• EtherFast 10/100 3-Port Print Server (EPSX3)
• EtherFast 10/100 1-Port Print Server (PPSX1)
User Guide