Linksys EFSP42 User Guide - Page 6
Dip Switch 1, Auto-Negotiation Mode, Dip Switch 2, Dip Switch 3, Power, green, Link/Act, Status, - manual
 |
UPC - 745883549108
View all Linksys EFSP42 manuals
Add to My Manuals
Save this manual to your list of manuals |
Page 6 highlights
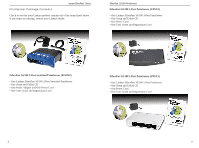
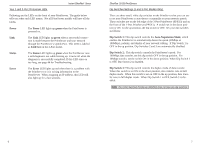
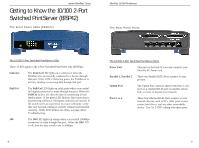
Instant EtherFast® Series Your 1 and 3-Port Printserver LEDs Following are the LEDs on the front of your PrintServer. The guide below tells you what each LED means. Not all PrintServer models will have all the LEDs. Power The Power LED lights up green when the PrintServer is powered on. Link The Link LED lights up green when a successful connection is made between the PrintServer and your network through the PrintServer's Uplink Port. This LED is labeled as Link/Act on the 2-Port model. Status The Status LED lights up green when the PrintServer runs a self-diagnostic test while booting up. It turns off when the diagnosis is successfully completed. If this LED stays on too long, see page 44 for Troubleshooting. Error The Error LED lights up red when there is a problem with the PrintServer or it is writing information to the PrintServer. When assigning an IP address, this LED will also light up for a few seconds. EtherFast 10/100 PrintServers Dip Switches Settings (1 and 3-Port Models Only) There are three small, white dip switches on the PrintServer that you can use to set your PrintServer to auto-detect or manually set your network speeds. These switches are on the left edge of the 3-Port PrintServer (EPSX3) and on the front of the 1-Port PrintServer (PPSX1). A switch set in the down position is ON. In the up position, the dip switch is OFF. Set your dip switches as follows: Dip Switch 1: This dip switch controls the Auto-Negotiation Mode, which enables the PrintServer to automatically detect the speed (10Mbps or 100Mbps), polarity, and duplex of your network cabling. If Dip Switch 1 is OFF in the up position, Dip Switches 2 and 3 are automatically disabled. Dip Switch 2: This dip switch controls the PrintServer's speed. For 100Mbps data transfer, set this dip switch OFF in the up position. For 10Mbps transfer, set the switch ON in the down position. When Dip Switch 1 is OFF, Dip Switch 2 is disabled. Dip Switch 3: This dip switch controls the duplex mode of data transfer. When this switch is set ON in the down position, data transfer runs in half duplex mode. When this switch is set on OFF in the up position, data transfer runs in full duplex mode. When Dip Switch 1 is OFF, Switch 3 is disabled. Note: The 2-Port Switched PrintServer (EFSP42) does not have any dip switches. 6 7
-
 1
1 -
 2
2 -
 3
3 -
 4
4 -
 5
5 -
 6
6 -
 7
7 -
 8
8 -
 9
9 -
 10
10 -
 11
11 -
 12
12 -
13
-
14
-
15
-
16
-
17
-
18
-
19
-
20
-
21
-
22
-
23
-
24
-
25
-
26
-
27
-
28
-
29
-
30
-
31
-
32
-
33
-
34
-
35
-
36
-
37
-
38
-
39
-
40
-
41
-
42
-
43
-
44
-
45
-
46
-
47
-
48
-
49
 |
 |