Linksys EFSP42 User Guide - Page 18
create a NDPS Manager, Nwadmn32.exe, Create, New Object, Create NDPS Manager, Object, At this point - hardware version 2 5
 |
UPC - 745883549108
View all Linksys EFSP42 manuals
Add to My Manuals
Save this manual to your list of manuals |
Page 18 highlights
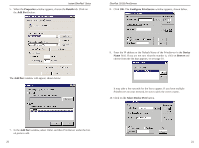
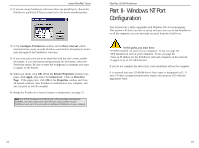
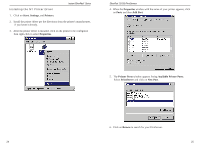
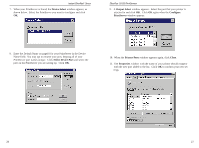
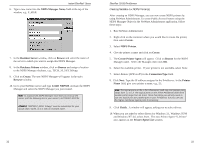
Before You Begin Instant EtherFast® Series At this point, you must have: • The PrintServer hardware completely installed. • Your NetWare network fully operational. • Administrator or Supervisor rights on the file server(s), or be logged on as an Administrator or Supervisor. • Access to your server's administrative utilities like NWADMIN and PCONSOLE. • the PrintServer Setup CD in the CD-ROM drive. To begin the installation, choose a mode of printing operation and turn to the correct page for instructions: • for NetWare 5.x Pure IP Printing Mode, see page 31 Note: To set up DHCP on the PrintServer, install Bi-Admin first (see page 37), then install DHCP (see page 57), and install the printer driver last. This applies to pure IP NetWare under the 5.x version only. • for NetWare 5.x, 4.x, 3.x IPX Printing Mode: - Print Server Mode, see page 35 - Remote Printer Mode, see page 36 30 EtherFast 10/100 PrintServers Pure IP NetWare 5.x Setup These instructions set up the PrintServer to work in a pure IP NetWare 5.x environment. Consider the following example: Tree Name: Novell Organization: TeSupp CN: Admin.TeSupp Server Name: TECH_50 CD-ROM Drive: D PrintServer IP: 192.168.0.3 Throughout the directions, replace these settings with your own, since these parameters are given as an example only. To set up IP addresses, see page 58. To enable printing from your PrintServer on a pure IP NetWare 5.x network: • First, create a NDPS Manager on your server. This only needs to be done once, even if you create more than one NDPS printer. • Create NDPS printers with NetWare Administrator. • Configure Public Access Printers for your computers to print from. Creating a NDPS Manager 1. Log on to a NetWare 5.x file server as an Administrator. 2. Run the NetWare Administrator application Nwadmn32.exe, which should be located in F:\public\win32 on your network. Otherwise, see your NetWare user guide or your network administrator to find the file location. 3. When the program runs, select the organization on NetWare Administrator in which you want the NDPS Manager object to reside, e.g., TeSupp. 4. Click on Create and select Object from the menu bar. The New Object window appears. 5. Select NDPS Manager, which will bring up the Create NDPS Manager Object window. 31
-
 1
1 -
2
-
3
-
4
-
5
-
6
-
7
-
8
-
9
-
10
-
11
-
12
-
 13
13 -
 14
14 -
 15
15 -
 16
16 -
 17
17 -
 18
18 -
 19
19 -
 20
20 -
 21
21 -
 22
22 -
 23
23 -
24
-
25
-
26
-
27
-
28
-
29
-
30
-
31
-
32
-
33
-
34
-
35
-
36
-
37
-
38
-
39
-
40
-
41
-
42
-
43
-
44
-
45
-
46
-
47
-
48
-
49
 |
 |
