Linksys EFSP42 User Guide - Page 32
Setting Up TCP/IP and IPX Protocols
 |
UPC - 745883549108
View all Linksys EFSP42 manuals
Add to My Manuals
Save this manual to your list of manuals |
Page 32 highlights
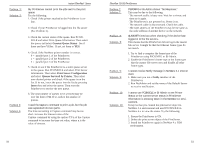
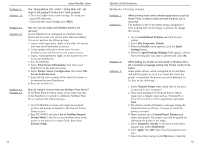
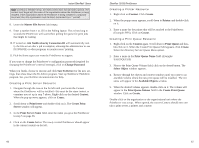
Instant EtherFast® Series Setting Up TCP/IP and IPX Protocols Setting Up TCP/IP in Windows Before a computer can communicate with the PrintServer, it must be configured with the TCP/IP protocol. If you know how to set up TCP/IP on your computers, do so now. Otherwise, use the guidelines below to help get TCP/IP installed on all of the computers that need PrintServer access. If you are unable to successfully install TCP/IP on one or more computers after following the directions, contact the manufacturer of your computers' network operating system for further assistance. Check with your network administrator for your TCP/IP settings. The directions below provide general guidelines for coming up with IP addresses and subnet masks. Check with your network administrator to see if you need to use specific IP addresses or DHCP settings. First, each computer on the network will require an IP address, which is a series of numbers, separated by periods, identifying the PC on the network. To make things simple, it is recommended you use the following numbering scheme: 10.0.1.X where X is a unique, arbitrarily assigned number from 1 to 255. Each computer must have its own unique X number. Note: Never use 127 or 255 for X -- these numbers are reserved by TCP/IP for other uses. For example, if you have three computers, you could number them as follows: 10.0.1.17 10.0.1.44 10.0.1.126 In this case, 17, 44, and 126 are arbitrary numbers between 1 and 255. Each computer will also require a subnet mask, which is a numerical "filter" that tells a computer what kinds of TCP/IP data packets to accept. If you're not sure which mask to use, the following mask is recommended: 255.255.255.0 58 EtherFast 10/100 PrintServers The following instructions are provided as examples for reference only. For complete instructions on installing and troubleshooting TCP/IP and IPX, consult your Windows operating system documentation. TCP/IP Setup for Windows 98 and 95 1. Click on Start, Settings, then Control Panel. Double-click on the Network icon. 2. If the TCP/IP Protocol is listed for your network adapter, go to step 4. Otherwise, click on the Add button. 3. When the Component Type window appears, click on Protocol, then Add. 4. Select Microsoft in the Manufacturers list, then choose TCP/IP in the Network Protocols list. Click OK. 5. When the Network window reappears, click once on TCP/IP, followed by the Properties button. 6. Click on Specify an IP Address. 7. Enter an IP Address for the computer, along with a Subnet Mask. Click OK. If you do not have these values, consult your network administrator. 8. When the Network window reappears, click OK. Choose to restart your machine. TCP/IP has now been successfully installed. IPX Setup for Windows 98 and 95 1. Click on Start, Settings, then Control Panel. Double-click on the Network icon. 2. If the TCP/IP Protocol is listed for your network adapter, go to step 4. Otherwise, click on the Add button. 3. When the Component Type window appears, click on Protocol, then Add. 4. Select Microsoft in the Manufacturers list, then choose IPX/SPX protocol in the Network Protocols list. Click OK. 59
-
 1
1 -
2
-
3
-
4
-
5
-
6
-
7
-
8
-
9
-
10
-
11
-
12
-
13
-
14
-
15
-
16
-
17
-
18
-
19
-
20
-
21
-
22
-
23
-
24
-
25
-
26
-
 27
27 -
 28
28 -
 29
29 -
 30
30 -
 31
31 -
 32
32 -
 33
33 -
 34
34 -
 35
35 -
 36
36 -
 37
37 -
38
-
39
-
40
-
41
-
42
-
43
-
44
-
45
-
46
-
47
-
48
-
49
 |
 |
