Linksys EFSP42 User Guide - Page 8
PrintServer Hardware Installation - drivers
 |
UPC - 745883549108
View all Linksys EFSP42 manuals
Add to My Manuals
Save this manual to your list of manuals |
Page 8 highlights
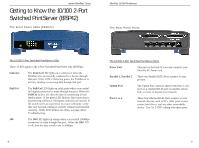
Linksys Instant EtherFast® Series PrintServer Hardware Installation Overview The following instructions will get your PrintServer hardware installed and powered on your network. Before starting your physical installation, be sure to find the PrintServer's Default Name and Node Address first. The information may be hard to access after the PrintServer is completely installed in your network and surrounded by wires and computers. Finding the PrintServer's Default Name On the back or bottom of your PrintServer, there is a white bar code sticker with a SC number printed on it (example: SC123456). This number is the PrintServer's Default Name, which you'll use in the PrintServer driver installation. Since it is written in hexadecimal form, the SC number may include letters as well as numbers. Write it in the box below for future reference. Finding the PrintServer's Node Address To find the node address of the PrintServer, add 00C002 to your PrintServer's Default Name. The resulting combined number is your PrintServer's Node Address. Write it in the box below for future reference. (example: 00C002123456). For example, if your PrintServer's Default Name is SC123456, then your PrintServer's Node Address is 00C002123456. PrintServer Default Name PrintServer Node Address: 00C002 EtherFast 10/100 PrintServers Connecting Your PrintServer to your Network Connecting the Power The PrintServer does not have an ON/OFF power switch. Whenever its AC power adapter is plugged into a power supply, your PrintServer is powered on. The PrintServer can be powered on before, during, or after your network. Only use the power adapter packaged with the PrintServer. Using a different power adapter could damage your PrintServer. 1. Plug the power adapter into your PrintServer's Power Port (on the back of the unit). If you have a Switched PrintServer (EFSP42 only), connect the its power cord to the power adapter, which is larger than the cord, and then plug the power cord into the Switched PrintServer. 2. Plug the power adapter into the wall. The PrintServer's Power LED should light up green. Connecting Your Printserver to Your Network If you have a 1 or 3-Port PrintServer (PPSX1 or EPSX3), connect your PrintServer with a Cat 5 UTP cable from the RJ-45 port to a standard port on your switch or hub. If you have a 2-Port Switched PrintServer, complete steps 1 through 4 below. 1. After powering on the PrintServer, plug one end of a Category 5 UTP cable into the PrintServer's Uplink Port (EFSP42 only). 2. Connect the other end of the cable into a networked hub or switch. The distance between your Printserver and the second device should not exceed 328 feet (100 meters). 3. The Link and Status LEDs will both become active. If the Link LED does not light up or the Status LED stays on for a long time, see page 44 for Troubleshooting. 4. You can network other computers or peripherals through the PrintServer's Switched RJ-45 Ports 1 through 4 (EFSP42 only) at any time. When the PrintServer is powered on, the Switched Ports are always active and will accept new network connections. 11
-
 1
1 -
2
-
 3
3 -
 4
4 -
 5
5 -
 6
6 -
 7
7 -
 8
8 -
 9
9 -
 10
10 -
 11
11 -
 12
12 -
 13
13 -
14
-
15
-
16
-
17
-
18
-
19
-
20
-
21
-
22
-
23
-
24
-
25
-
26
-
27
-
28
-
29
-
30
-
31
-
32
-
33
-
34
-
35
-
36
-
37
-
38
-
39
-
40
-
41
-
42
-
43
-
44
-
45
-
46
-
47
-
48
-
49
 |
 |