Linksys EFSP42 User Guide - Page 21
Bi-Admin: PrintServer Management - - setup
 |
UPC - 745883549108
View all Linksys EFSP42 manuals
Add to My Manuals
Save this manual to your list of manuals |
Page 21 highlights
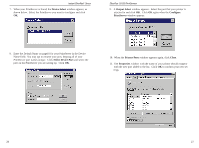
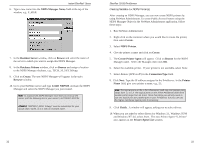
Instant EtherFast® Series quickset SC0C8A02 /un=PS /q1= epson The above example installs the PrintServer SC0C8A02 as a NetWare PrintServer in the current location. Its name is now "PS," and "epson" is the name for the first printer queue. Remote Printer Mode The instructions below configure the PrintServer for Remote Printer Mode, and establish communication between it and your NetWare 4.x network. Before you begin, make sure you have already set up a NetWare print server resource on a file server or elsewhere and have its name handy. See page 29 for more information about print server resources. You can automatically set up the PrintServer under NetWare 4.x or 3.x with QUICKSET, a small one-time program run from either DOS with simple command-line arguments, or manually through the PrintServer's PSCONFIG or Bi-Admin programs. To set up the PrintServer manually, see page 40. Log in as an Administrator or a user with Administrator's rights. Run the QUICKSET program in the D:\Utility\DOS directory of the PrintServer CD. The program must run from a MS-DOS prompt. The syntax of the program's command-line arguments must be entered as one long command, as below: Quickset Unit_Name R (/UN=P) (/Q1=W) (/Q2=X) (/Q3=Y) Unit_Name is the PrintServer's Default Name you copied onto page 10 from the PrintServer's white bar code sticker. P is a user-friendly name you can give the PrintServer. Example: /UN=MARKETING R is the name of the print server resource on the file server that the PrintServer device will log into. W, X and Y are the queues names for parallel ports 1, 2, and 3, respectively. Queues 2 and 3 apply only to the 2 and 3-Port model. If you do not use these options, then the NDS mode uses the following default queue names: NDS_Q1, NDS_Q2 and NDS_Q3 (for parallel ports 1, 2, and 3, respectively.) In the binary mode, Q1, Q2, and Q3 will be the default names. 36 EtherFast 10/100 PrintServers Bi-Admin: PrintServer Management Overview The PrintServer is managed by a utility program called Bi-Admin on the PrintServer CD. Fully compatible with Windows 98, 95, NT, and Novell NetWare, Bi-Admin allows you to change the PrintServer's internal settings, check on the unit's status, and perform basic diagnostic tests. Note that the Bi-Admin program must only be installed on the network administrator's computer. Also, Bi-Admin requires that the IPX/SPX protocol be installed initially, which you can always remove later. Bi-Admin is a Windows-based program, so if you are using the PrintServer in a NetWare DOS-only environment, you must use a program other than BiAdmin to manage the PrintServer. See page 40 for the PrintServer setup and maintenance under your NetWare version. Installing the Bi-Admin Management Utility 1. Insert the PrintServer CD into your CD-ROM drive. 2. Click on Start, then Run. Type D:\utility\biadmin\disk1\setup in the pro- vided window and hit Enter. 3. When the title screen of the setup program appears, click Next. 4. Enter the directory name where you want the Bi-Admin program to be installed. The default directory of C:\ProgramFiles\linksys\printserver is recommended. Click Next. 5. Continue with the setup program's instructions. Setup will copy the necessary files to your system. Click Finish to complete the setup. 37
-
 1
1 -
2
-
3
-
4
-
5
-
6
-
7
-
8
-
9
-
10
-
11
-
12
-
13
-
14
-
15
-
 16
16 -
 17
17 -
 18
18 -
 19
19 -
 20
20 -
 21
21 -
 22
22 -
 23
23 -
 24
24 -
 25
25 -
 26
26 -
27
-
28
-
29
-
30
-
31
-
32
-
33
-
34
-
35
-
36
-
37
-
38
-
39
-
40
-
41
-
42
-
43
-
44
-
45
-
46
-
47
-
48
-
49
 |
 |
