Linksys EFSP42 User Guide - Page 19
NDPSM P_MGR.TeSupp - printer port
 |
UPC - 745883549108
View all Linksys EFSP42 manuals
Add to My Manuals
Save this manual to your list of manuals |
Page 19 highlights
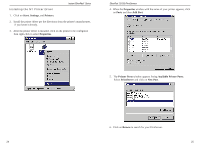
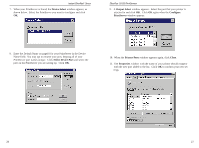
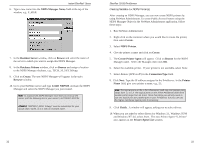
Instant EtherFast® Series 6. Type a new name into the NDPS Manager Name field at the top of the window, e.g., P_MGR. 7. In the Resident Server window, click on Browse and select the name of the server to which you want to assign this NDPS Manager. 8. In the Database Volume window, click on Browse and assign a location to the NDPS Manager database, e.g., TECH_50_SYS.TeSupp. 9. Click on Create. The new NDPS Manager will appear in the main Browser window. 10. Go to your NetWare server and type LOAD NDPSM. Activate the NDPS Manager and select the NDPS Manager you just created. Note: To autoload the NDPS Manager each time you boot up the server, add the following line to your server's AUTOEXEC.NCF file: LOAD NDPSM P_MGR.TeSupp Attention! "NDPSM P_MGR. TeSupp" must be substituted for your actual object name, as it is only an example name. EtherFast 10/100 PrintServers Creating NetWare 5.x NDPS Printer(s) After creating an NDPS Manager, you can now create NDPS printers by using NetWare Administrator. To create Public Access Printers using the NDPS Manager Object in the NetWare Administrator application, follow these steps: 1. Run NetWare Administrator. 2. Right-click on the container where you would like to create the printer, then select Create. 3. Select NDPS Printer. 4. Give the printer a name and click on Create. 5. The Create Printer Agent will appear. Click on Browse for the NDPS Manager name. Select the Manager, then click OK. 6. Select the available printer. If your printer is not available, select None. 7. Select Remote (LPR on IP) in the Connection Type field. 8. Click Next. Type the IP address assigned to the PrintServer. In the Printer Name field, give your printer a name, e.g., L1. Note: The logical ports on the 1-Port PrintServer (with only one parallel port) range from L1 to L3 The logical ports on the 3-Port PrintServer (with three parallel ports) range from L1 to L8. More than likely you will only need to use one logical port per parallel port on your PrintServer, but you can use the higher numbered logical ports if necessary. 9. Click Finish. A window will appear, asking you to select drivers. 10. When you are asked to select drivers for Windows 3.1, Windows 95/98 and Windows NT 4.0, select None. The new Printer Agent "S_Printer" now appears in the Printer Agent List window. 32 33
-
 1
1 -
2
-
3
-
4
-
5
-
6
-
7
-
8
-
9
-
10
-
11
-
12
-
13
-
 14
14 -
 15
15 -
 16
16 -
 17
17 -
 18
18 -
 19
19 -
 20
20 -
 21
21 -
 22
22 -
 23
23 -
 24
24 -
25
-
26
-
27
-
28
-
29
-
30
-
31
-
32
-
33
-
34
-
35
-
36
-
37
-
38
-
39
-
40
-
41
-
42
-
43
-
44
-
45
-
46
-
47
-
48
-
49
 |
 |
