Linksys EFSP42 User Guide - Page 31
Appendix - print server driver
 |
UPC - 745883549108
View all Linksys EFSP42 manuals
Add to My Manuals
Save this manual to your list of manuals |
Page 31 highlights
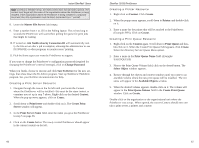
Instant EtherFast® Series 12. Click on the Details tab. 13. Change the Print to the LPT port number you selected in step 8 of these instructions. 14. Click Apply, then OK to finish. Finally, reboot your PC. Note: Linksys does not provide any technical support for problems with NetBEUI. Consult your operating system documentation if you need help. EtherFast 10/100 PrintServers Appendix DHCP Support for the PrintServer To use DHCP, which assigns non-static IP addresses, you must have a DHCP server and DHCP management software. Otherwise, the PrintServer's IP address will remain unknown, and connecting to it will impossible. In this case, ignore DHCP and configure the Printserver for a static IP address as described in previous sections. To enable DHCP, you must run the Bi-Admin program (see page 40 for the Bi-Admin installation). When Bi-Admin loads, it scans the network for PrintServers and displays a list of PrintServers. Highlight the PrintServer to be set up, enter the PrintServer's password if one has been assigned, and click OK. After entering the program and selecting the PrintServer to be configured, click on Configuration in the menu and choose TCP/IP from the drop-down field. The TCP/IP Configuration window will appear. Select Enable to enable DHCP, then click Save to Device. You can exit the Bi-Admin program. To install the PrintServer driver, see page 13 for Windows 95, 98, and NT installation. Note: For help with the Internet Mail Printing Configuration features, see the guide in D:\Not_supp\Manual directory on the PrintServer Setup CD. Linksys does not provide technical support for this option. 56 57
-
 1
1 -
2
-
3
-
4
-
5
-
6
-
7
-
8
-
9
-
10
-
11
-
12
-
13
-
14
-
15
-
16
-
17
-
18
-
19
-
20
-
21
-
22
-
23
-
24
-
25
-
 26
26 -
 27
27 -
 28
28 -
 29
29 -
 30
30 -
 31
31 -
 32
32 -
 33
33 -
 34
34 -
 35
35 -
 36
36 -
37
-
38
-
39
-
40
-
41
-
42
-
43
-
44
-
45
-
46
-
47
-
48
-
49
 |
 |