Linksys EFSP42 User Guide - Page 13
Con PrintServer, Device, Browse, Select Device Port, Properties, Details, Add Port - default ip
 |
UPC - 745883549108
View all Linksys EFSP42 manuals
Add to My Manuals
Save this manual to your list of manuals |
Page 13 highlights
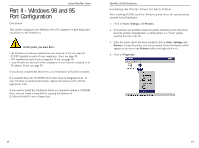
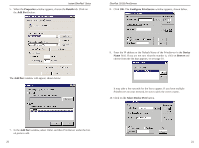
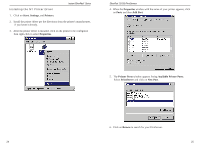
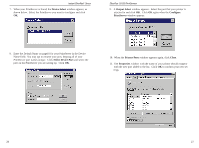
Instant EtherFast® Series 5. When the Properties window appears, choose the Details tab. Click on the Add Port button. EtherFast 10/100 PrintServers 8. Click OK. The Configure PrintServer window appears, shown below. The Add Port window will appear, shown below. 9. Enter the IP address or the Default Name of the PrintServer in the Device Name field. If you are not sure what the number is, click on Browse and choose from the list that appears, or see page 10. It may take a few seconds for the list to appear. If you have multiple PrintServers on your network, be sure to pick the correct name. 10. Click on the Select Device Port button. 7. In the Add Port window, select Other and then PrintServer under the listed ports to add. 20 21
-
 1
1 -
2
-
3
-
4
-
5
-
6
-
7
-
 8
8 -
 9
9 -
 10
10 -
 11
11 -
 12
12 -
 13
13 -
 14
14 -
 15
15 -
 16
16 -
 17
17 -
 18
18 -
19
-
20
-
21
-
22
-
23
-
24
-
25
-
26
-
27
-
28
-
29
-
30
-
31
-
32
-
33
-
34
-
35
-
36
-
37
-
38
-
39
-
40
-
41
-
42
-
43
-
44
-
45
-
46
-
47
-
48
-
49
 |
 |

EtherFast 10/100 PrintServers
21
Instant EtherFast
®
Series
20
8. Click
OK
. The
Configure PrintServer
window appears, shown below.
9.
Enter the IP address or the Default Name of the PrintServer in the
Device
Name
field. If you are not sure what the number is, click on
Browse
and
choose from the list that appears, or see page 10.
It may take a few seconds for the list to appear. If you have multiple
PrintServers on your network, be sure to pick the correct name.
10. Click on the
Select Device Port
button.
5. When the
Properties
window appears, choose the
Details
tab. Click on
the
Add Port
button.
The
Add Port
window will appear, shown below.
7. In the
Add Port
window, select
Other
and then
PrintServer
under the list-
ed ports to add.