Magellan Triton 400 Manual - English - Page 43
Creating a Custom Waypoint Using the Triton Menu, Viewing Waypoints, Viewing a Saved Waypoint
 |
UPC - 763357117769
View all Magellan Triton 400 manuals
Add to My Manuals
Save this manual to your list of manuals |
Page 43 highlights
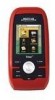
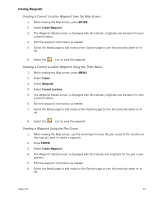
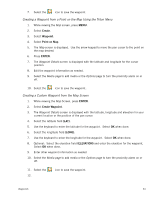
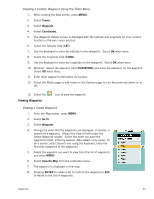
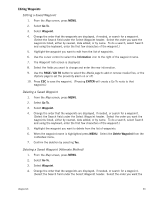
Creating a Custom Waypoint Using the Triton Menu 1. While viewing the Map screen, press MENU. 2. Select Create. 3. Select Waypoint. 4. Select Coordinates. 5. The Waypoint Details screen is displayed with the latitude and longitude for your current location or the pan cursor position. 6. Select the latitude field (LAT). 7. Use the keyboard to enter the latitude for the waypoint. Select OK when done. 8. Select the longitude field (LONG). 9. Use the keyboard to enter the longitude for the waypoint. Select OK when done. 10. Optional: Select the elevation field (ELEVATION) and enter the elevation for the waypoint. Select OK when done. 11. Enter other waypoint information as needed. 12. Select the Media page to add media or the Options page to turn the proximity alarm on or off. 13. Select the Viewing Waypoints icon to save the waypoint. Viewing a Saved Waypoint 1. From the Map screen, press MENU. 2. Select Go To. 3. Select Waypoint. 4. Change the order that the waypoints are displayed, if needed, or search for a waypoint. (Select the Search field under the Select Waypoint header. Select the order you want the waypoints listed, either by nearest, date added, or by name. To do a search, select Search and using the keyboard, enter the first few characters of the waypoint.) 5. Select the waypoint you want to view from the list of waypoints and press MENU. 6. Select View On Map from the contextual menu. 7. The waypoint is displayed on the map. 8. Pressing ENTER to create a Go To route to the waypoint or ESC to return to the list of waypoints. Waypoints 35
-
 1
1 -
2
-
3
-
4
-
5
-
6
-
7
-
8
-
9
-
10
-
11
-
12
-
13
-
14
-
15
-
16
-
17
-
18
-
19
-
20
-
21
-
22
-
23
-
24
-
25
-
26
-
27
-
28
-
29
-
30
-
31
-
32
-
33
-
34
-
35
-
36
-
37
-
 38
38 -
 39
39 -
 40
40 -
 41
41 -
 42
42 -
 43
43 -
 44
44 -
 45
45 -
 46
46 -
 47
47 -
 48
48 -
49
-
50
-
51
-
52
-
53
-
54
-
55
-
56
-
57
-
58
-
59
-
60
-
61
-
62
-
63
-
64
-
65
 |
 |