Magellan Triton 400 Manual - English - Page 58
Trails, Creating a Trail, Creating a Trail (Alternate method) - create trail
 |
UPC - 763357117769
View all Magellan Triton 400 manuals
Add to My Manuals
Save this manual to your list of manuals |
Page 58 highlights
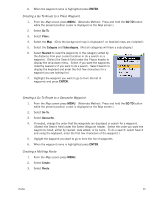
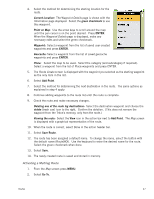
Trails As you travel with the Magellan Triton on and computing your position, the Magellan Triton automatically drops electronic breadcrumbs to record your travels. These breadcrumbs are temporary waypoints that are created and stored while you travel. You can set the intervals that they are created in the Tracks Option function described in this chapter. The common term for these breadcrumbs is track. You may be familiar with this term from other navigation devices you've used. A trail is taking the current track and saving it into memory. This trail can be used again like any other saved route. An important safety feature of a trail is the Backtrack option. Since the Triton is recording your movement, it can be used to reverse this track and provide navigation information back to your starting point, following the same path you have just taken. Tip: Whenever beginning a hike that you might want to use backtrack route with, clear the track memory (described in this chapter) before beginning the hike. Trails are displayed on the Map screen as dotted lines. Creating a Trail Once you begin traveling with the Magellan Triton, it will begin to store track information. If you want to save this track to be used again, you need to follow the steps provided here. 1. From the Map screen press MENU. 2. Select Create. 3. Select Trail. 4. Use the keyboard to enter a name for the trail or use the default name supplied. 5. Select the green checkmark to accept and save your track as a trail. 6. You will be prompted to confirm that you want to clear the track after saving. Creating a Trail (Alternate method) 1. From the Map screen press MENU. 2. Select View. 3. Select Tracks. 4. Select Save Track. 5. Use the keyboard to enter a name for the trail or use the default name supplied. 6. Select the green checkmark to accept and save the trail. Activating a Trail 1. From the Map screen press MENU. 2. Select Go To. 3. Select Trail. Trails 50
-
 1
1 -
2
-
3
-
4
-
5
-
6
-
7
-
8
-
9
-
10
-
11
-
12
-
13
-
14
-
15
-
16
-
17
-
18
-
19
-
20
-
21
-
22
-
23
-
24
-
25
-
26
-
27
-
28
-
29
-
30
-
31
-
32
-
33
-
34
-
35
-
36
-
37
-
38
-
39
-
40
-
41
-
42
-
43
-
44
-
45
-
46
-
47
-
48
-
49
-
50
-
51
-
52
-
 53
53 -
 54
54 -
 55
55 -
 56
56 -
 57
57 -
 58
58 -
 59
59 -
 60
60 -
 61
61 -
 62
62 -
 63
63 -
64
-
65
 |
 |