McAfee AVM85M User Guide - Page 23
Configuring the On-Access scanner, Table 3-2, Advanced Preferences for On-Demand scanner
 |
UPC - 731944564609
View all McAfee AVM85M manuals
Add to My Manuals
Save this manual to your list of manuals |
Page 23 highlights
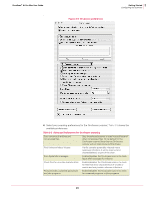
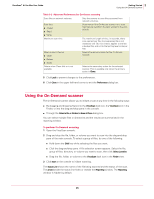
VirusScan® 8.6 for Mac User Guide 3 Getting Started Configuring the scanners Table 3-2 Advanced Preferences for On-Demand scanner When a virus is found: „ Clean Selects the primary action for the On-Demand scanner. „ Delete „ Notify Delete when Clean fails or is not available Selects the secondary action for the On-Demand scanner. This is available only when the primary action is Clean. 5 Click Lock to prevent changes to the preferences. 6 Click Close in the upper left-hand corner to exit the Preferences dialog box. Configuring the On-Access scanner The On-Access scanner continually monitors all files that are in use to determine if a virus or other malware is present. An On-Access scan takes place whenever a file is read from the disk, written to the disk, or both, depending on the preferences you set for this scanner. You configure the On-Access scanner advanced scanner preferences using options available in the lower pane of the Preferences dialog. To configure the On-Access scanner: 1 Click Preferences on the tool bar to display the Preferences dialog box. 2 Click More Options in the lower right-hand corner of the dialog box to reveal Advanced Preferences. 3 Select On-Access Scanner from the drop-down menu (if not already selected) to display the On-Access scanning version of this dialog box. 23
-
 1
1 -
2
-
3
-
4
-
5
-
6
-
7
-
8
-
9
-
10
-
11
-
12
-
13
-
14
-
15
-
16
-
17
-
 18
18 -
 19
19 -
 20
20 -
 21
21 -
 22
22 -
 23
23 -
 24
24 -
 25
25 -
 26
26 -
 27
27 -
 28
28 -
29
-
30
-
31
-
32
-
33
-
34
-
35
-
36
-
37
-
38
-
39
-
40
-
41
-
42
-
43
-
44
-
45
-
46
-
47
-
48
-
49
-
50
-
51
-
52
-
53
-
54
-
55
-
56
-
57
-
58
-
59
-
60
-
61
-
62
-
63
-
64
-
65
-
66
-
67
-
68
 |
 |
