McAfee AVM85M User Guide - Page 25
Using the On-Demand scanner, Close, Preferences, VirusScan
 |
UPC - 731944564609
View all McAfee AVM85M manuals
Add to My Manuals
Save this manual to your list of manuals |
Page 25 highlights
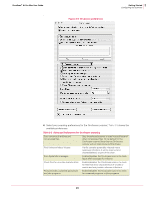
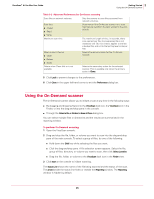
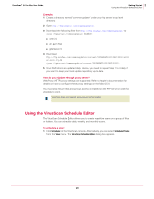
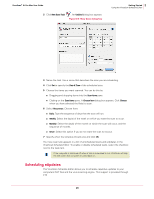
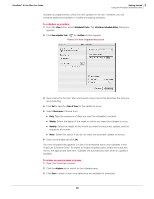
VirusScan® 8.6 for Mac User Guide 3 Getting Started Using the On-Demand scanner Table 3-3 Advanced Preferences for On-Access scanning Scan files on network volumes Sets the scanner to scan files accessed from network volumes. Scan files: „ Always „ Read Determines if the On-Access scanner is to scan files that are read from the disk, written to the disk, or both. „ Write Maximum scan time The maximum length of time, in seconds, that a scan can last per file. (A compressed file is not treated as one file; this timeout applies to the last individual file, and not to the last top level container file). When a virus is found: „ Clean Selects the primary action for the On-Access scanner. „ Delete „ Notify Delete when Clean fails or is not available Selects the secondary action for the selected scanner. This is available only when the primary action is Clean. 5 Click Lock to prevent changes to the preferences. 6 Click Close in the upper left-hand corner to exit the Preferences dialog box. Using the On-Demand scanner The On-Demand scanner allows you to initiate a scan at any time in the following ways: „ By dragging and dropping file(s) into the VirusScan dock icon, the VirusScan icon in the Finder, or into the drag-and-drop pane in the console. „ Through the Select a file or folders to Scan & Clean dialog box. You can select multiple files or directories and the results are summarized in the reporting window. To perform On-Demand scanning: 1 Open the VirusScan console. 2 Drag and drop the file, folder, or volume you want to scan into the drag-and-drop pane of the main console. To select a group of files, do one of the following: „ Hold down the Shift key while selecting the files you want. „ Click the drag-and-drop pane. A file selection screen appears. Select the file, group of files, directory, or volume you want to scan, then click Select Location. „ Drag the file, folder, or volume to the VirusScan dock icon in the Finder view. 3 Click Start on the console to initiate scanning. The Status Line shows the name of the file being scanned and the status of the scan. The arrow beside the status line hides or reveals the Reporting window. The Reporting window is hidden by default. 25
-
 1
1 -
2
-
3
-
4
-
5
-
6
-
7
-
8
-
9
-
10
-
11
-
12
-
13
-
14
-
15
-
16
-
17
-
18
-
19
-
 20
20 -
 21
21 -
 22
22 -
 23
23 -
 24
24 -
 25
25 -
 26
26 -
 27
27 -
 28
28 -
 29
29 -
 30
30 -
31
-
32
-
33
-
34
-
35
-
36
-
37
-
38
-
39
-
40
-
41
-
42
-
43
-
44
-
45
-
46
-
47
-
48
-
49
-
50
-
51
-
52
-
53
-
54
-
55
-
56
-
57
-
58
-
59
-
60
-
61
-
62
-
63
-
64
-
65
-
66
-
67
-
68
 |
 |
