Netgear EVA9150 EVA9150 User Manual - Page 42
Pull out the tray., Press to release the latch. - locks up
 |
UPC - 606449063677
View all Netgear EVA9150 manuals
Add to My Manuals
Save this manual to your list of manuals |
Page 42 highlights
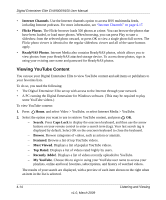
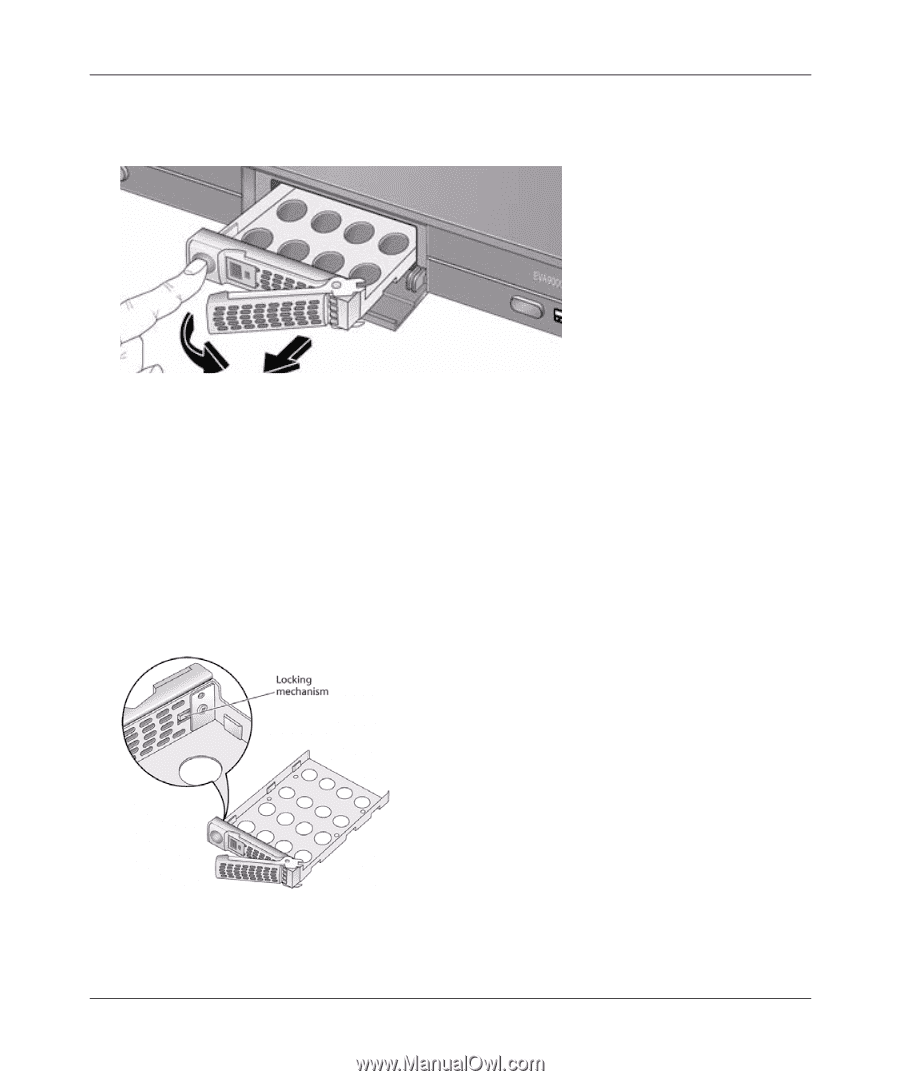
Digital Entertainer Elite EVA9000/9150 User Manual 1. Power off the Digital Entertainer Elite using the on/off switch on the back of the unit. 2. Remove the disk tray as shown in the following figure. Figure 4-2 a. Swing open the front cover. b. Press to release the latch. c. Pull out the tray. 3. For the EVA9150 only, remove the pre-installed hard disk from the tray. a. Loosen and remove the four screws that secure the hard disk. b. Set the four screws aside, and put the just-removed hard disk in a safe place. 4. For greater security, set the lock inside the tray before installing the new hard disk into the tray (optional). Figure 4-3 4-10 v1.0, March 2009 Listening and Viewing
-
 1
1 -
2
-
3
-
4
-
5
-
6
-
7
-
8
-
9
-
10
-
11
-
12
-
13
-
14
-
15
-
16
-
17
-
18
-
19
-
20
-
21
-
22
-
23
-
24
-
25
-
26
-
27
-
28
-
29
-
30
-
31
-
32
-
33
-
34
-
35
-
36
-
 37
37 -
 38
38 -
 39
39 -
 40
40 -
 41
41 -
 42
42 -
 43
43 -
 44
44 -
 45
45 -
 46
46 -
 47
47 -
48
-
49
-
50
-
51
-
52
-
53
-
54
-
55
-
56
-
57
-
58
-
59
-
60
-
61
-
62
-
63
-
64
-
65
-
66
-
67
-
68
-
69
-
70
-
71
-
72
-
73
-
74
-
75
-
76
-
77
-
78
-
79
-
80
-
81
-
82
-
83
-
84
-
85
-
86
-
87
-
88
-
89
-
90
-
91
-
92
-
93
-
94
-
95
-
96
-
97
-
98
-
99
-
100
-
101
-
102
-
103
-
104
 |
 |
Digital Entertainer Elite EVA9000/9150 User Manual
4-10
Listening and Viewing
v1.0, March 2009
1.
Power off the Digital Entertainer Elite using the on/off switch on the back of the unit.
2.
Remove the disk tray as shown in the following figure.
a.
Swing open the front cover.
b.
Press to release the latch.
c.
Pull out the tray.
3.
For the EVA9150 only, remove the pre-installed hard disk from the tray.
a.
Loosen and remove the four screws that secure the hard disk.
b.
Set the four screws aside, and put the just-removed hard disk in a safe place.
4.
For greater security, set the lock inside the tray before installing the new hard disk into the tray
(optional).
Figure 4-2
Figure 4-3