Netgear EVA9150 EVA9150 User Manual - Page 43
If the hard disk is not in EVA9000 format, you are prompted to format the drive. This process
 |
UPC - 606449063677
View all Netgear EVA9150 manuals
Add to My Manuals
Save this manual to your list of manuals |
Page 43 highlights
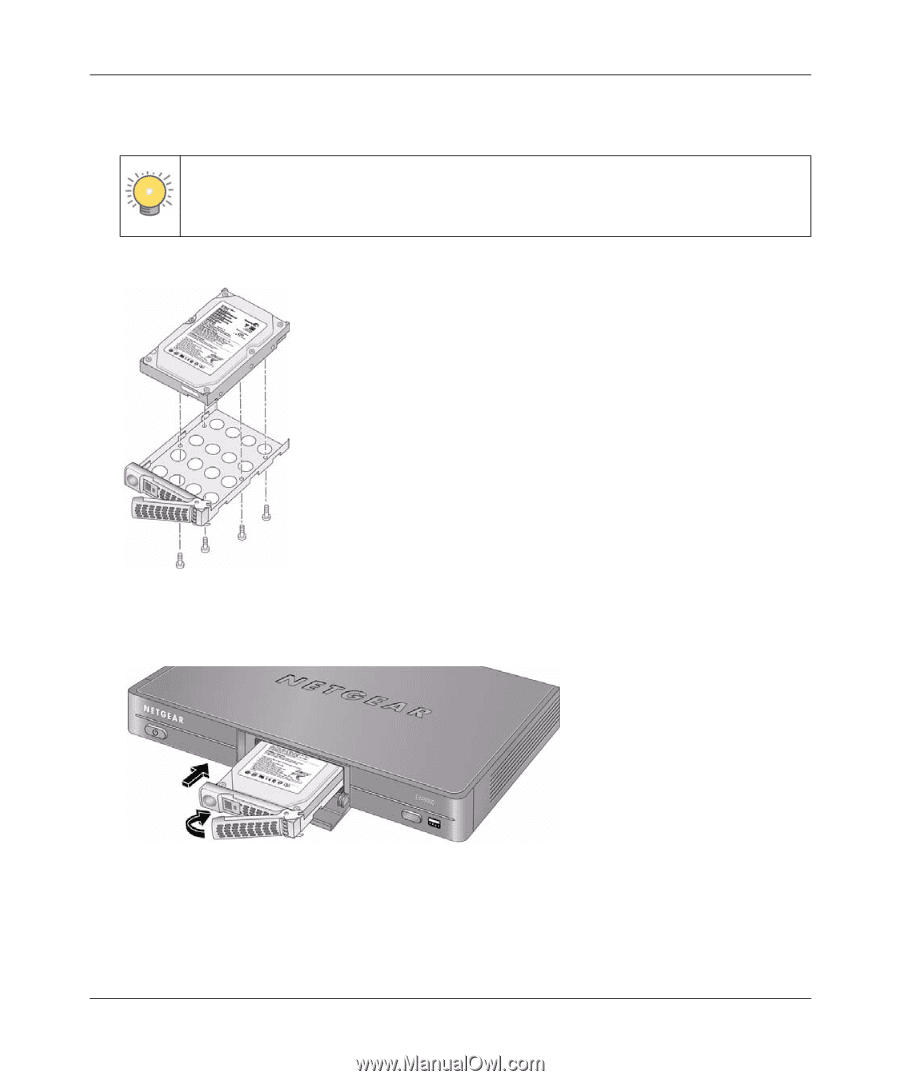
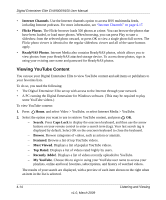
Digital Entertainer Elite EVA9000/9150 User Manual 5. Insert the hard drive into the tray. Position the drive with the bottom facing out from the tray, and the connectors facing away. Tip: If you set the tray lock, insert a push-pin or a paper clip into the round button to release the latch and open the tray (see "Unlocking the Disk Drive Tray" on page 7-11). 6. Use the four screws provided with the unit to secure the drive to the tray. Figure 4-4 7. With the latch in the open position, slide the disk tray into the Digital Entertainer Elite completely, securing the latch and closing the door. Figure 4-5 8. If the hard disk is not in EVA9000 format, you are prompted to format the drive. This process erases all data on the drive. See the following section for more information. Listening and Viewing v1.0, March 2009 4-11
-
 1
1 -
2
-
3
-
4
-
5
-
6
-
7
-
8
-
9
-
10
-
11
-
12
-
13
-
14
-
15
-
16
-
17
-
18
-
19
-
20
-
21
-
22
-
23
-
24
-
25
-
26
-
27
-
28
-
29
-
30
-
31
-
32
-
33
-
34
-
35
-
36
-
37
-
 38
38 -
 39
39 -
 40
40 -
 41
41 -
 42
42 -
 43
43 -
 44
44 -
 45
45 -
 46
46 -
 47
47 -
 48
48 -
49
-
50
-
51
-
52
-
53
-
54
-
55
-
56
-
57
-
58
-
59
-
60
-
61
-
62
-
63
-
64
-
65
-
66
-
67
-
68
-
69
-
70
-
71
-
72
-
73
-
74
-
75
-
76
-
77
-
78
-
79
-
80
-
81
-
82
-
83
-
84
-
85
-
86
-
87
-
88
-
89
-
90
-
91
-
92
-
93
-
94
-
95
-
96
-
97
-
98
-
99
-
100
-
101
-
102
-
103
-
104
 |
 |