Netgear R8900 User Manual - Page 12
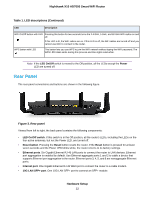
Rear Panel, Table 1. LED descriptions Continued, Rear panel, Hardware Setup
 |
View all Netgear R8900 manuals
Add to My Manuals
Save this manual to your list of manuals |
Page 12 highlights
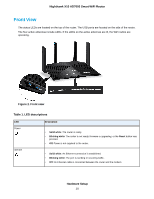
Nighthawk X10 AD7000 Smart WiFi Router Table 1. LED descriptions (Continued) LED Description WiFi On/Off button with LED Pressing this button for two seconds turns the 2.4 GHz, 5 GHz, and 60 GHz WiFi radios on and off. If this LED is lit, the WiFi radios are on. If this LED is off, the WiFi radios are turned off and you cannot use WiFi to connect to the router. WPS button with LED This button lets you use WPS to join the WiFi network without typing the WiFi password. The WPS LED blinks white during this process and then lights solid white. Note If the LED On/Off switch is moved to the Off position, all the LEDs except the Power LED are turned off. Rear Panel The rear panel connections and buttons are shown in the following figure. Figure 3. Rear panel Viewed from left to right, the back panel contains the following components: • LED On/Off switch. If this switch is in the Off position, all the router's LEDs, including the LEDs on the four active antennas, but not the Power LED, are turned off. • Reset button. Pressing the Reset button resets the router. If the Reset button is pressed for at least seven seconds and the Power LED blinks white, the router returns to its factory settings. • Ethernet ports. Six Gigabit Ethernet RJ-45 LAN ports to connect the router to LAN devices. Ethernet port aggregation is enabled by default. Use Ethernet aggregate ports 1 and 2 to cable a device that supports Ethernet port aggregation to the router. Ethernet ports 3, 4, 5, and 6 are nonaggregate Ethernet ports. • Internet port. One Gigabit Ethernet RJ-45 WAN port to connect the router to a cable modem. • 10G LAN SFP+ port. One 10G LAN SFP+ port to connect an SFP+ module. Hardware Setup 12
-
 1
1 -
2
-
3
-
4
-
5
-
6
-
 7
7 -
 8
8 -
 9
9 -
 10
10 -
 11
11 -
 12
12 -
 13
13 -
 14
14 -
 15
15 -
 16
16 -
 17
17 -
18
-
19
-
20
-
21
-
22
-
23
-
24
-
25
-
26
-
27
-
28
-
29
-
30
-
31
-
32
-
33
-
34
-
35
-
36
-
37
-
38
-
39
-
40
-
41
-
42
-
43
-
44
-
45
-
46
-
47
-
48
-
49
-
50
-
51
-
52
-
53
-
54
-
55
-
56
-
57
-
58
-
59
-
60
-
61
-
62
-
63
-
64
-
65
-
66
-
67
-
68
-
69
-
70
-
71
-
72
-
73
-
74
-
75
-
76
-
77
-
78
-
79
-
80
-
81
-
82
-
83
-
84
-
85
-
86
-
87
-
88
-
89
-
90
-
91
-
92
-
93
-
94
-
95
-
96
-
97
-
98
-
99
-
100
-
101
-
102
-
103
-
104
-
105
-
106
-
107
-
108
-
109
-
110
-
111
-
112
-
113
-
114
-
115
-
116
-
117
-
118
-
119
-
120
-
121
-
122
-
123
-
124
-
125
-
126
-
127
-
128
-
129
-
130
-
131
-
132
-
133
-
134
-
135
-
136
-
137
-
138
-
139
-
140
-
141
-
142
-
143
-
144
-
145
-
146
-
147
-
148
-
149
-
150
-
151
-
152
-
153
-
154
-
155
 |
 |
