Netgear WNDR4000 User Manual - Page 13
Verify the Cabling, On/Off - user manual
 |
UPC - 606449077629
View all Netgear WNDR4000 manuals
Add to My Manuals
Save this manual to your list of manuals |
Page 13 highlights
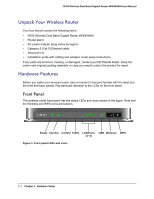
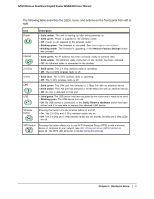
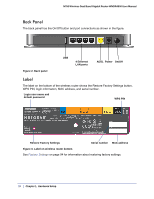
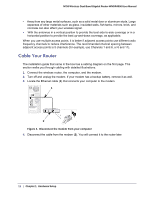
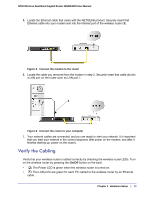
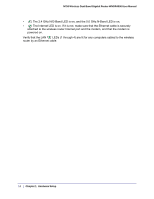
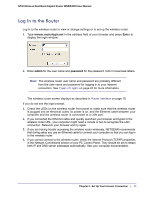
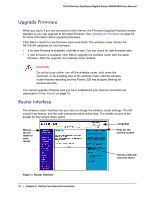
N750 Wireless Dual Band Gigabit Router WNDR4000 User Manual 5. Locate the Ethernet cable that came with the NETGEAR product. Securely insert that Ethernet cable into your modem and into the Internet port of the wireless router (3). Figure 5. Connect the modem to the router 6. Locate the cable you removed from the modem in step 2. Securely insert that cable (4) into a LAN port on the router such as LAN port 1. 4 Figure 6. Connect the router to your computer 7. Your network cables are connected, and you are ready to start your network. It is important that you start your network in the correct sequence (first power on the modem, and after it finishes starting up, power on the router). Verify the Cabling Verify that your wireless router is cabled correctly by checking the wireless router LEDs. Turn on the wireless router by pressing the On/Off button on the back. • The Power LED is green when the wireless router is turned on. • The LAN ports are green for each PC cabled to the wireless router by an Ethernet cable. Chapter 1. Hardware Setup | 13
-
 1
1 -
2
-
3
-
4
-
5
-
6
-
7
-
 8
8 -
 9
9 -
 10
10 -
 11
11 -
 12
12 -
 13
13 -
 14
14 -
 15
15 -
 16
16 -
 17
17 -
 18
18 -
19
-
20
-
21
-
22
-
23
-
24
-
25
-
26
-
27
-
28
-
29
-
30
-
31
-
32
-
33
-
34
-
35
-
36
-
37
-
38
-
39
-
40
-
41
-
42
-
43
-
44
-
45
-
46
-
47
-
48
-
49
-
50
-
51
-
52
-
53
-
54
-
55
-
56
-
57
-
58
-
59
-
60
-
61
-
62
-
63
-
64
-
65
-
66
-
67
-
68
-
69
-
70
-
71
-
72
-
73
-
74
-
75
-
76
-
77
-
78
-
79
-
80
-
81
-
82
-
83
-
84
-
85
-
86
-
87
-
88
-
89
-
90
-
91
-
92
-
93
-
94
-
95
-
96
-
97
-
98
-
99
-
100
-
101
-
102
-
103
-
104
 |
 |
