Nikon COOLPIX S9500 Reference Manual - Page 175
Protect, Rotate Image, Notes on Image Rotation
 |
View all Nikon COOLPIX S9500 manuals
Add to My Manuals
Save this manual to your list of manuals |
Page 175 highlights
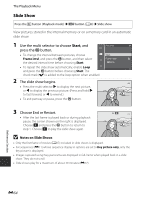
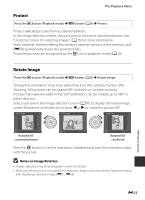
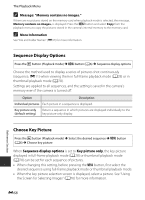
The Playback Menu Protect Press the c button (Playback mode) M d button (A6) M Protect Protect selected pictures from accidental deletion. In the image selection screen, choose a picture and set or cancel protection. See "Using the Screen for Selecting Images" (A76) for more information. Note, however, that formatting the camera's internal memory or the memory card (E78) permanently erases the protected files. Protected pictures are recognized by the s icon in playback mode (A10). Rotate Image Press the c button (Playback mode) M d button (A6) M Rotate image Change the orientation of pictures played back on the camera's monitor after shooting. Still pictures can be rotated 90° clockwise or counterclockwise. Pictures that were recorded in the "tall" orientation can be rotated up to 180° in either direction. Select a picture in the image selection screen (A76) to display the rotate image screen. Rotate the multi selector, or press J or K to rotate the picture 90°. Rotate image Rotate image Rotate image Reference Section Back Rotate Rotated 90° counterclockwise Back Rotate Back Rotate Rotated 90° clockwise Press the k button to set the orientation displayed and save the orientation data with the picture. B Notes on Image Rotation • Images captured using 3D photography cannot be rotated. • While only the key picture of a sequence is displayed, images cannot be rotated. Apply the setting after displaying individual images (E11, E58). E55
-
 1
1 -
2
-
3
-
4
-
5
-
6
-
7
-
8
-
9
-
10
-
11
-
12
-
13
-
14
-
15
-
16
-
17
-
18
-
19
-
20
-
21
-
22
-
23
-
24
-
25
-
26
-
27
-
28
-
29
-
30
-
31
-
32
-
33
-
34
-
35
-
36
-
37
-
38
-
39
-
40
-
41
-
42
-
43
-
44
-
45
-
46
-
47
-
48
-
49
-
50
-
51
-
52
-
53
-
54
-
55
-
56
-
57
-
58
-
59
-
60
-
61
-
62
-
63
-
64
-
65
-
66
-
67
-
68
-
69
-
70
-
71
-
72
-
73
-
74
-
75
-
76
-
77
-
78
-
79
-
80
-
81
-
82
-
83
-
84
-
85
-
86
-
87
-
88
-
89
-
90
-
91
-
92
-
93
-
94
-
95
-
96
-
97
-
98
-
99
-
100
-
101
-
102
-
103
-
104
-
105
-
106
-
107
-
108
-
109
-
110
-
111
-
112
-
113
-
114
-
115
-
116
-
117
-
118
-
119
-
120
-
121
-
122
-
123
-
124
-
125
-
126
-
127
-
128
-
129
-
130
-
131
-
132
-
133
-
134
-
135
-
136
-
137
-
138
-
139
-
140
-
141
-
142
-
143
-
144
-
145
-
146
-
147
-
148
-
149
-
150
-
151
-
152
-
153
-
154
-
155
-
156
-
157
-
158
-
159
-
160
-
161
-
162
-
163
-
164
-
165
-
166
-
167
-
168
-
169
-
 170
170 -
 171
171 -
 172
172 -
 173
173 -
 174
174 -
 175
175 -
 176
176 -
 177
177 -
 178
178 -
 179
179 -
 180
180 -
181
-
182
-
183
-
184
-
185
-
186
-
187
-
188
-
189
-
190
-
191
-
192
-
193
-
194
-
195
-
196
-
197
-
198
-
199
-
200
-
201
-
202
-
203
-
204
-
205
-
206
-
207
-
208
-
209
-
210
-
211
-
212
-
213
-
214
-
215
-
216
-
217
-
218
-
219
-
220
-
221
-
222
-
223
-
224
-
225
-
226
-
227
-
228
-
229
-
230
-
231
-
232
-
233
-
234
-
235
-
236
-
237
-
238
-
239
-
240
-
241
-
242
-
243
-
244
-
245
-
246
-
247
-
248
-
249
-
250
-
251
-
252
 |
 |
