Nikon COOLPIX S9500 Reference Manual - Page 54
Using Quick Effects, Note on Quick Effects - shutter won t open
 |
View all Nikon COOLPIX S9500 manuals
Add to My Manuals
Save this manual to your list of manuals |
Page 54 highlights
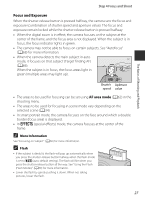
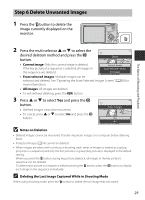
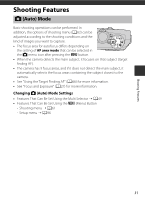
Shooting Features A (Auto) Mode Using Quick Effects When in A (auto) mode, you can apply effects to images immediately after releasing the shutter. • The edited image is saved as a separate file with a different name (E97). 1 Press the k button on the screen displayed after taking a picture in A (auto) mode. • When you press the d button or when no operations are performed for about 5 seconds, the monitor display returns to the shooting screen. • To not display the confirmation screen shown on the right, set Quick effects to Off (A62). 2 Press the multi selector J or K to select an effect and then press the k button. • See "Quick Effects" (E15) for information about the effect types. • Rotate the zoom control toward g (telephoto zoom position) to display a confirmation screen for the applied effect. Rotate the zoom control toward f (wide-angle position) to return to the selection screen for effects. 3 Choose Yes and press the k button. • A new, edited copy is created and the monitor display returns to the shooting screen. • Copies created with the quick effects function are indicated by the V icon displayed during playback (A10). Quick effects Cancel Choose effect Quick effects Painting High key Toy camera effect Low key Soft Cancel Fisheye Save OK? Yes No B Note on Quick Effects If the camera detects eyes that are blinking (not open) when Blink warning in the setup menu (A96) is set to On, the quick effects function cannot be used. 32
-
 1
1 -
2
-
3
-
4
-
5
-
6
-
7
-
8
-
9
-
10
-
11
-
12
-
13
-
14
-
15
-
16
-
17
-
18
-
19
-
20
-
21
-
22
-
23
-
24
-
25
-
26
-
27
-
28
-
29
-
30
-
31
-
32
-
33
-
34
-
35
-
36
-
37
-
38
-
39
-
40
-
41
-
42
-
43
-
44
-
45
-
46
-
47
-
48
-
 49
49 -
 50
50 -
 51
51 -
 52
52 -
 53
53 -
 54
54 -
 55
55 -
 56
56 -
 57
57 -
 58
58 -
 59
59 -
60
-
61
-
62
-
63
-
64
-
65
-
66
-
67
-
68
-
69
-
70
-
71
-
72
-
73
-
74
-
75
-
76
-
77
-
78
-
79
-
80
-
81
-
82
-
83
-
84
-
85
-
86
-
87
-
88
-
89
-
90
-
91
-
92
-
93
-
94
-
95
-
96
-
97
-
98
-
99
-
100
-
101
-
102
-
103
-
104
-
105
-
106
-
107
-
108
-
109
-
110
-
111
-
112
-
113
-
114
-
115
-
116
-
117
-
118
-
119
-
120
-
121
-
122
-
123
-
124
-
125
-
126
-
127
-
128
-
129
-
130
-
131
-
132
-
133
-
134
-
135
-
136
-
137
-
138
-
139
-
140
-
141
-
142
-
143
-
144
-
145
-
146
-
147
-
148
-
149
-
150
-
151
-
152
-
153
-
154
-
155
-
156
-
157
-
158
-
159
-
160
-
161
-
162
-
163
-
164
-
165
-
166
-
167
-
168
-
169
-
170
-
171
-
172
-
173
-
174
-
175
-
176
-
177
-
178
-
179
-
180
-
181
-
182
-
183
-
184
-
185
-
186
-
187
-
188
-
189
-
190
-
191
-
192
-
193
-
194
-
195
-
196
-
197
-
198
-
199
-
200
-
201
-
202
-
203
-
204
-
205
-
206
-
207
-
208
-
209
-
210
-
211
-
212
-
213
-
214
-
215
-
216
-
217
-
218
-
219
-
220
-
221
-
222
-
223
-
224
-
225
-
226
-
227
-
228
-
229
-
230
-
231
-
232
-
233
-
234
-
235
-
236
-
237
-
238
-
239
-
240
-
241
-
242
-
243
-
244
-
245
-
246
-
247
-
248
-
249
-
250
-
251
-
252
 |
 |
