Nikon COOLPIX S9500 Reference Manual - Page 45
Available Shooting Modes, Changing the Settings When Shooting - hdr
 |
View all Nikon COOLPIX S9500 manuals
Add to My Manuals
Save this manual to your list of manuals |
Page 45 highlights
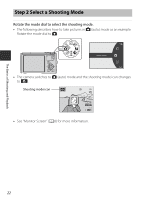
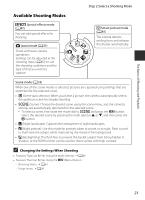
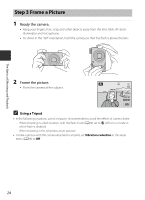
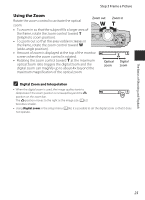
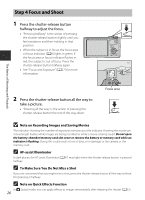
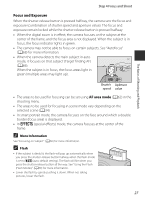
The Basics of Shooting and Playback Step 2 Select a Shooting Mode Available Shooting Modes u Special effects mode (A47) You can add special effects for shooting. A (auto) mode (A31) Shoot with basic camera operations. Settings can be adjusted in the shooting menu (A62) to suit the shooting conditions and the type of shot you want to capture. F Smart portrait mode (A45) The camera detects smiling faces and releases the shutter automatically. Scene mode (A33) When one of the scene modes is selected, pictures are captured using settings that are optimized for the selected scene. • x (Scene auto selector): When you frame a picture, the camera automatically selects the optimum scene for simpler shooting. • y (Scene): Choose the desired scene using the scene menu, and the camera's settings are automatically optimized for the selected scene. - To select a scene, first rotate the mode dial to y and press the d button. Select the desired scene by pressing the multi selector H or I, and then press the k button. • X (Night landscape): Captures the atmosphere of night landscapes. • S (Night portrait): Use this mode for portraits taken at sunset or at night. Flash is used to illuminate the subject while maintaining the mood of the background. • W (Backlighting): The flash fires to prevent the backlit subject from being hidden in shadow, or the HDR function can be used to shoot scenes with high contrast. C Changing the Settings When Shooting • Features That Can Be Set Using the Multi Selector ➝ A49 • Features That Can Be Set Using the d (Menu) Button - Shooting menu ➝ A61 - Setup menu ➝ A96 23
-
 1
1 -
2
-
3
-
4
-
5
-
6
-
7
-
8
-
9
-
10
-
11
-
12
-
13
-
14
-
15
-
16
-
17
-
18
-
19
-
20
-
21
-
22
-
23
-
24
-
25
-
26
-
27
-
28
-
29
-
30
-
31
-
32
-
33
-
34
-
35
-
36
-
37
-
38
-
39
-
 40
40 -
 41
41 -
 42
42 -
 43
43 -
 44
44 -
 45
45 -
 46
46 -
 47
47 -
 48
48 -
 49
49 -
 50
50 -
51
-
52
-
53
-
54
-
55
-
56
-
57
-
58
-
59
-
60
-
61
-
62
-
63
-
64
-
65
-
66
-
67
-
68
-
69
-
70
-
71
-
72
-
73
-
74
-
75
-
76
-
77
-
78
-
79
-
80
-
81
-
82
-
83
-
84
-
85
-
86
-
87
-
88
-
89
-
90
-
91
-
92
-
93
-
94
-
95
-
96
-
97
-
98
-
99
-
100
-
101
-
102
-
103
-
104
-
105
-
106
-
107
-
108
-
109
-
110
-
111
-
112
-
113
-
114
-
115
-
116
-
117
-
118
-
119
-
120
-
121
-
122
-
123
-
124
-
125
-
126
-
127
-
128
-
129
-
130
-
131
-
132
-
133
-
134
-
135
-
136
-
137
-
138
-
139
-
140
-
141
-
142
-
143
-
144
-
145
-
146
-
147
-
148
-
149
-
150
-
151
-
152
-
153
-
154
-
155
-
156
-
157
-
158
-
159
-
160
-
161
-
162
-
163
-
164
-
165
-
166
-
167
-
168
-
169
-
170
-
171
-
172
-
173
-
174
-
175
-
176
-
177
-
178
-
179
-
180
-
181
-
182
-
183
-
184
-
185
-
186
-
187
-
188
-
189
-
190
-
191
-
192
-
193
-
194
-
195
-
196
-
197
-
198
-
199
-
200
-
201
-
202
-
203
-
204
-
205
-
206
-
207
-
208
-
209
-
210
-
211
-
212
-
213
-
214
-
215
-
216
-
217
-
218
-
219
-
220
-
221
-
222
-
223
-
224
-
225
-
226
-
227
-
228
-
229
-
230
-
231
-
232
-
233
-
234
-
235
-
236
-
237
-
238
-
239
-
240
-
241
-
242
-
243
-
244
-
245
-
246
-
247
-
248
-
249
-
250
-
251
-
252
 |
 |
