Olympus C-2040 Zoom C-2040 Zoom Reference Manual - Page 105
Selecting the color tone Preset White Balance
 |
View all Olympus C-2040 Zoom manuals
Add to My Manuals
Save this manual to your list of manuals |
Page 105 highlights
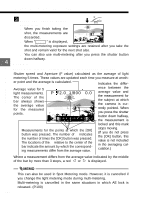
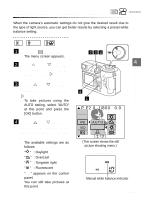
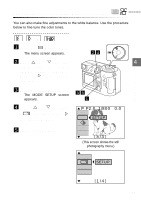
Selecting the color tone (Preset White Balance) When the camera's automatic settings do not give the desired result due to the type of light source, you can get better results by selecting a preset white balance setting. Custom Photography P A/S/M 1 Press the (Menu) button. q The menu screen appears. 2 Use or on the Arrow pad to select "WB" and then press . 3 Press or to select "PRE-SET" and then press . q To take pictures using the AUTO setting, select "AUTO" at this point and press the [OK] button. 4 Press or to select the desired setting (see below) and then press the [OK] button. q The available settings are as follows: " " : Daylight " " : Overcast " " : Tungsten light " " : Fluorescent q "WB" appears on the control panel. q You can still take pictures at this point. 234 A/S/M P OFF POW ER/MODE 4 4 1 P F2.0 1/800 AF/MF DRIVE WB AUTO ISO PRE-SET 0.0 [1/3] (This screen shows the still picture shooting menu.) Control panel Manual white balance indicator 105 DIAL
-
 1
1 -
2
-
3
-
4
-
5
-
6
-
7
-
8
-
9
-
10
-
11
-
12
-
13
-
14
-
15
-
16
-
17
-
18
-
19
-
20
-
21
-
22
-
23
-
24
-
25
-
26
-
27
-
28
-
29
-
30
-
31
-
32
-
33
-
34
-
35
-
36
-
37
-
38
-
39
-
40
-
41
-
42
-
43
-
44
-
45
-
46
-
47
-
48
-
49
-
50
-
51
-
52
-
53
-
54
-
55
-
56
-
57
-
58
-
59
-
60
-
61
-
62
-
63
-
64
-
65
-
66
-
67
-
68
-
69
-
70
-
71
-
72
-
73
-
74
-
75
-
76
-
77
-
78
-
79
-
80
-
81
-
82
-
83
-
84
-
85
-
86
-
87
-
88
-
89
-
90
-
91
-
92
-
93
-
94
-
95
-
96
-
97
-
98
-
99
-
 100
100 -
 101
101 -
 102
102 -
 103
103 -
 104
104 -
 105
105 -
 106
106 -
 107
107 -
 108
108 -
 109
109 -
 110
110 -
111
-
112
-
113
-
114
-
115
-
116
-
117
-
118
-
119
-
120
-
121
-
122
-
123
-
124
-
125
-
126
-
127
-
128
-
129
-
130
-
131
-
132
-
133
-
134
-
135
-
136
-
137
-
138
-
139
-
140
-
141
-
142
-
143
-
144
-
145
-
146
-
147
-
148
-
149
-
150
-
151
-
152
-
153
-
154
-
155
-
156
-
157
-
158
-
159
-
160
-
161
-
162
-
163
-
164
-
165
-
166
-
167
-
168
-
169
-
170
-
171
-
172
-
173
-
174
-
175
-
176
-
177
-
178
-
179
-
180
-
181
-
182
-
183
-
184
-
185
-
186
-
187
-
188
-
189
-
190
-
191
-
192
-
193
-
194
-
195
-
196
-
197
-
198
-
199
-
200
-
201
-
202
-
203
-
204
-
205
-
206
-
207
-
208
-
209
-
210
-
211
-
212
-
213
-
214
-
215
-
216
-
217
-
218
-
219
-
220
-
221
-
222
-
223
-
224
 |
 |
