Olympus C-2040 Zoom C-2040 Zoom Reference Manual - Page 196
Connecting to a computer using the communication cable - camedia usb cable
 |
View all Olympus C-2040 Zoom manuals
Add to My Manuals
Save this manual to your list of manuals |
Page 196 highlights
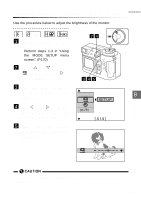
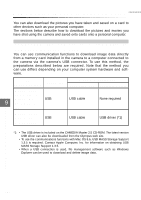
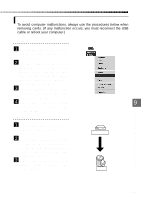
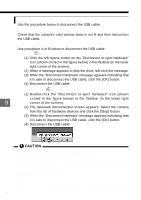
Connecting to a computer using the communication cable This section describes how to connect your camera to a personal computer. Note that the connection method differs depending on your computer hardware and software configuration. (P.198) Connecting via a USB cable - If you are using an IBM PC-compatible computer running Windows 98 or Windows 98 Second Edition, the USB driver must be installed on your computer beforehand. Refer to the CAMEDIA Master installation guide (contained on the Software CD) on installing the driver. - If you are using an Apple Macintosh computer running Mac OS 8.6, check that you are running USB MASS Storage Support version 1.3.5. 1 Open the connector cover 1 on the camera. 2 Insert the plug marked A on the USB cable into the USB port on the computer. 3 Insert the plug marked B on 9 the USB cable into the USB connector on the camera. USB connector 4 Set the camera's Mode dial to " ". q The computer recognizes the 2 To USB port USB cable selected card on the camera as a disk drive (usually a removable disk). On Macintosh computers, the card appears as a new folder on the desktop. 3 To the camera's USB connector q The images on the card can then be handled as files by file manage- ment software such as Windows Explorer in the same way as files on a floppy disk or MO disk. q You must break off the connection to the computer to do the following: (P.198) - Switch the mode - Switch off the camera Downloading Images to a Computer • Images downloaded to your computer can be viewed using the enclosed CAMEDIA Master software. You can also view the images using any graphics software that supports JPEG images (Paint Shop Pro, Photoshop, etc.) or web browser software (Netscape Communicator, Microsoft Internet Explorer, 196 etc.). Refer to the manual for the respective software application for details.
-
 1
1 -
2
-
3
-
4
-
5
-
6
-
7
-
8
-
9
-
10
-
11
-
12
-
13
-
14
-
15
-
16
-
17
-
18
-
19
-
20
-
21
-
22
-
23
-
24
-
25
-
26
-
27
-
28
-
29
-
30
-
31
-
32
-
33
-
34
-
35
-
36
-
37
-
38
-
39
-
40
-
41
-
42
-
43
-
44
-
45
-
46
-
47
-
48
-
49
-
50
-
51
-
52
-
53
-
54
-
55
-
56
-
57
-
58
-
59
-
60
-
61
-
62
-
63
-
64
-
65
-
66
-
67
-
68
-
69
-
70
-
71
-
72
-
73
-
74
-
75
-
76
-
77
-
78
-
79
-
80
-
81
-
82
-
83
-
84
-
85
-
86
-
87
-
88
-
89
-
90
-
91
-
92
-
93
-
94
-
95
-
96
-
97
-
98
-
99
-
100
-
101
-
102
-
103
-
104
-
105
-
106
-
107
-
108
-
109
-
110
-
111
-
112
-
113
-
114
-
115
-
116
-
117
-
118
-
119
-
120
-
121
-
122
-
123
-
124
-
125
-
126
-
127
-
128
-
129
-
130
-
131
-
132
-
133
-
134
-
135
-
136
-
137
-
138
-
139
-
140
-
141
-
142
-
143
-
144
-
145
-
146
-
147
-
148
-
149
-
150
-
151
-
152
-
153
-
154
-
155
-
156
-
157
-
158
-
159
-
160
-
161
-
162
-
163
-
164
-
165
-
166
-
167
-
168
-
169
-
170
-
171
-
172
-
173
-
174
-
175
-
176
-
177
-
178
-
179
-
180
-
181
-
182
-
183
-
184
-
185
-
186
-
187
-
188
-
189
-
190
-
 191
191 -
 192
192 -
 193
193 -
 194
194 -
 195
195 -
 196
196 -
 197
197 -
 198
198 -
 199
199 -
 200
200 -
 201
201 -
202
-
203
-
204
-
205
-
206
-
207
-
208
-
209
-
210
-
211
-
212
-
213
-
214
-
215
-
216
-
217
-
218
-
219
-
220
-
221
-
222
-
223
-
224
 |
 |
