Panasonic BL-C111A Operating Instructions - Page 134
KB 28 Kbit, 3 Configuring Your Camera for IPv6
 |
UPC - 037988845149
View all Panasonic BL-C111A manuals
Add to My Manuals
Save this manual to your list of manuals |
Page 134 highlights
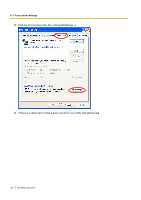
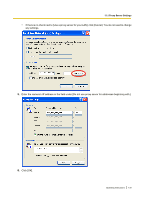
10.3 Configuring Your Camera for IPv6 [Static] 1. Under [Internet Connection], enter the port number to be assigned to the camera. • The default port number is 80, however, note that some ISPs do not allow access from the Internet using port 80. Ask your ISP or network administrator about which port numbers are available for access over the Internet. 2. Enter the IP address to be assigned to the camera. • Ask your ISP or network administrator for the correct settings. 3. Under [Default Gateway], enter the IP address of your router or the default gateway IP address provided by your ISP. 4. Under [DNS], enter the IP addresses of the primary and secondary DNS servers provided by your ISP. 5. Under [Max. Bandwidth Usage], select the maximum bandwidth you want to allow the camera to use. • This setting is effective for both IPv4 and IPv6 connections. • Refer to the following file size information when restricting the maximum bandwidth. Note that these are estimated file sizes; the actual file size may vary depending on image quality, image brightness, etc. - 192 ´ 144: 3.5 KB (28 Kbit) - 320 ´ 240: 10 KB (80 Kbit) - 640 ´ 480: 18 KB (144 Kbit) 6. Under [Connection Type], select the appropriate connection type. • Normally you can leave this setting at [Auto Negotiation]. • This setting is effective for both IPv4 and IPv6 connections. • BL-C131A only: If using the camera in wireless mode, [Auto Negotiation] must be selected. 7. Click [Save]. 8. When the [New settings are saved.] message is displayed, click [Restart]. 134 Operating Instructions
-
 1
1 -
2
-
3
-
4
-
5
-
6
-
7
-
8
-
9
-
10
-
11
-
12
-
13
-
14
-
15
-
16
-
17
-
18
-
19
-
20
-
21
-
22
-
23
-
24
-
25
-
26
-
27
-
28
-
29
-
30
-
31
-
32
-
33
-
34
-
35
-
36
-
37
-
38
-
39
-
40
-
41
-
42
-
43
-
44
-
45
-
46
-
47
-
48
-
49
-
50
-
51
-
52
-
53
-
54
-
55
-
56
-
57
-
58
-
59
-
60
-
61
-
62
-
63
-
64
-
65
-
66
-
67
-
68
-
69
-
70
-
71
-
72
-
73
-
74
-
75
-
76
-
77
-
78
-
79
-
80
-
81
-
82
-
83
-
84
-
85
-
86
-
87
-
88
-
89
-
90
-
91
-
92
-
93
-
94
-
95
-
96
-
97
-
98
-
99
-
100
-
101
-
102
-
103
-
104
-
105
-
106
-
107
-
108
-
109
-
110
-
111
-
112
-
113
-
114
-
115
-
116
-
117
-
118
-
119
-
120
-
121
-
122
-
123
-
124
-
125
-
126
-
127
-
128
-
 129
129 -
 130
130 -
 131
131 -
 132
132 -
 133
133 -
 134
134 -
 135
135 -
 136
136 -
 137
137 -
 138
138 -
 139
139 -
140
-
141
-
142
-
143
-
144
-
145
-
146
-
147
-
148
-
149
-
150
-
151
-
152
-
153
-
154
 |
 |
