Panasonic BL-C111A Operating Instructions - Page 42
Transferring Images by HTTP
 |
UPC - 037988845149
View all Panasonic BL-C111A manuals
Add to My Manuals
Save this manual to your list of manuals |
Page 42 highlights
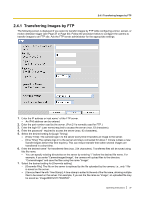
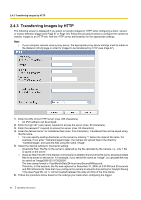
2.4.3 Transferring Images by HTTP 2.4.3 Transferring Images by HTTP The following screen is displayed if you select to transfer images by HTTP while configuring a timer, sensor, or motion detection trigger (see Page 27 or Page 30). Follow the procedure below to configure the camera to transfer images to an HTTP site. Ask the HTTP server administrator for the appropriate settings. Note • If your computer network uses a proxy server, the appropriate proxy server settings must be made on the [Network (IPv4)] page in order for images to be transferred by HTTP (see Page 87). 1. Enter the URL of the HTTP server (max. 255 characters). • An IPv6 address can be entered. 2. Enter the login ID*1 (user name) required to access the server (max. 63 characters). 3. Enter the password*1 required to access the server (max. 63 characters). 4. Enter the desired name*2 for transferred files (max. 234 characters). Transferred files will be saved using this file name. • You can specify existing directories on the server by entering "\" before the desired file name. For example, if you enter "CameraImages\Image", the camera will upload files to the directory "CameraImages" and save the files using the name "Image". 5. Select the desired setting for [Overwrite setting]. - [Overwrite File]: The file on the server is replaced by the file uploaded by the camera, i.e., only 1 file is saved on the server. - [Save as New File with Time Stamp]: A time stamp is added to the end of the file name, allowing multiple files to be saved on the server. For example, if you set the file name as "Image", an uploaded file may be saved as "Image20061231173020500". The time stamp format is Year/Month/Date/24-hour time/Second/Millisecond. Therefore, in this example, the file was captured on December 31, 2006, at 5:30 PM and 20 seconds and 500 milliseconds. Note that if you configure the camera to adjust its time setting for Daylight Saving Time (see Page 95), an "s" will be inserted between the date and time of the time stamp. 6. Follow the procedure below based on the settings you made when configuring the trigger. 42 Operating Instructions
-
 1
1 -
2
-
3
-
4
-
5
-
6
-
7
-
8
-
9
-
10
-
11
-
12
-
13
-
14
-
15
-
16
-
17
-
18
-
19
-
20
-
21
-
22
-
23
-
24
-
25
-
26
-
27
-
28
-
29
-
30
-
31
-
32
-
33
-
34
-
35
-
36
-
 37
37 -
 38
38 -
 39
39 -
 40
40 -
 41
41 -
 42
42 -
 43
43 -
 44
44 -
 45
45 -
 46
46 -
 47
47 -
48
-
49
-
50
-
51
-
52
-
53
-
54
-
55
-
56
-
57
-
58
-
59
-
60
-
61
-
62
-
63
-
64
-
65
-
66
-
67
-
68
-
69
-
70
-
71
-
72
-
73
-
74
-
75
-
76
-
77
-
78
-
79
-
80
-
81
-
82
-
83
-
84
-
85
-
86
-
87
-
88
-
89
-
90
-
91
-
92
-
93
-
94
-
95
-
96
-
97
-
98
-
99
-
100
-
101
-
102
-
103
-
104
-
105
-
106
-
107
-
108
-
109
-
110
-
111
-
112
-
113
-
114
-
115
-
116
-
117
-
118
-
119
-
120
-
121
-
122
-
123
-
124
-
125
-
126
-
127
-
128
-
129
-
130
-
131
-
132
-
133
-
134
-
135
-
136
-
137
-
138
-
139
-
140
-
141
-
142
-
143
-
144
-
145
-
146
-
147
-
148
-
149
-
150
-
151
-
152
-
153
-
154
 |
 |
