Panasonic BL-C111A Operating Instructions - Page 41
For E-mail notification, see of the POP3 server incoming mail server. - support
 |
UPC - 037988845149
View all Panasonic BL-C111A manuals
Add to My Manuals
Save this manual to your list of manuals |
Page 41 highlights
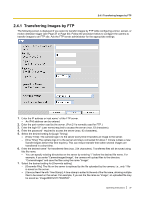
2.4.2 Transferring Images by E-mail 1. Under [E-mail Transfer], enter the IP address or the host name*1 of the SMTP server (outgoing mail server). • An IPv6 address can be entered. • This feature cannot transfer images to web-based mail servers, such as Hotmail®. 2. Enter the port number used by the server. (Port 25 is normally used for sending E-mail.) 3. Enter the reply E-mail address*2 that will be shown to the recipient as the sender of the E-mail. • In an effort to reduce spam, many ISPs block E-mail sent through the SMTP server from an E-mail address that is not associated with the SMTP server, therefore, we recommend entering the E-mail assigned to you by your ISP. 4. Enter the destination E-mail address*2. Up to 3 addresses can be entered. 5. Enter the subject*2 that will be displayed in E-mail messages sent by the camera (max. 44 characters). • The date and time (24-hour format) is automatically attached to the subject. For example, if you enter "Camera" as the subject, an E-mail may be sent with the subject "Camera: 20061231173020500". The time stamp format is Year/Month/Date/24-hour time/Second/Millisecond. Therefore, in this example, the file was captured on December 31, 2006, at 5:30 PM and 20 seconds and 500 milliseconds. Note that if you configure the camera to adjust its time setting for Daylight Saving Time (see Page 95), an "s" will be inserted between the date and time of the time stamp. • The date and time is also used as the sent file name (i.e., 20061231173020500.jpg). 6. Enter the text*2 that will be displayed in the body of E-mail messages sent by the camera (max. 63 characters). • Line breaks cannot be entered. 7. Under [How to authenticate], select the authentication method your ISP requires for sending E-mail, and enter the appropriate settings if necessary. - [No authentication]: Select this option if the outgoing E-mail server does not require authentication when sending E-mail messages. - [POP before SMTP authentication]: Select this option if the outgoing E-mail server requires POP before SMTP authentication when sending E-mail messages.The following settings are also necessary. Enter the settings as you would for receiving E-mail. a. Enter the IP address or the host name*1 of the POP3 server (incoming mail server). • An IPv6 address can be entered. b. Enter the port number used by the server. (Port 110 is normally used for POP3.) c. Enter the login ID*2 (user name) required to access the server (max. 63 characters). d. Enter the password*2 required to access the server (max. 63 characters). - [SMTP authentication]: Select this option if the outgoing E-mail server requires SMTP authentication when sending E-mail messages.The following settings are also necessary. Enter the settings as you would for sending E-mail. a. Enter the login ID*2 (user name) required to access the server (max. 63 characters). b. Enter the password*2 required to access the server (max. 63 characters). • The camera supports LOGIN, PLAIN, and CRAM-MD5 authentication. 8. Follow the procedure below based on the settings you made when configuring the trigger. a. If you selected to not send notification when the camera is triggered, click [Save], then click [Go to Trigger page]. • All buffered images for the selected trigger are deleted when you click [Save]. b. If you selected to send notification when the camera is triggered, click [Next]. • The appropriate notification settings page is displayed. - For E-mail notification, see Page 45. - For HTTP notification, see Page 48. *1 [Space and [>] cannot be entered. *2 ["] cannot be entered. Operating Instructions 41
-
 1
1 -
2
-
3
-
4
-
5
-
6
-
7
-
8
-
9
-
10
-
11
-
12
-
13
-
14
-
15
-
16
-
17
-
18
-
19
-
20
-
21
-
22
-
23
-
24
-
25
-
26
-
27
-
28
-
29
-
30
-
31
-
32
-
33
-
34
-
35
-
 36
36 -
 37
37 -
 38
38 -
 39
39 -
 40
40 -
 41
41 -
 42
42 -
 43
43 -
 44
44 -
 45
45 -
 46
46 -
47
-
48
-
49
-
50
-
51
-
52
-
53
-
54
-
55
-
56
-
57
-
58
-
59
-
60
-
61
-
62
-
63
-
64
-
65
-
66
-
67
-
68
-
69
-
70
-
71
-
72
-
73
-
74
-
75
-
76
-
77
-
78
-
79
-
80
-
81
-
82
-
83
-
84
-
85
-
86
-
87
-
88
-
89
-
90
-
91
-
92
-
93
-
94
-
95
-
96
-
97
-
98
-
99
-
100
-
101
-
102
-
103
-
104
-
105
-
106
-
107
-
108
-
109
-
110
-
111
-
112
-
113
-
114
-
115
-
116
-
117
-
118
-
119
-
120
-
121
-
122
-
123
-
124
-
125
-
126
-
127
-
128
-
129
-
130
-
131
-
132
-
133
-
134
-
135
-
136
-
137
-
138
-
139
-
140
-
141
-
142
-
143
-
144
-
145
-
146
-
147
-
148
-
149
-
150
-
151
-
152
-
153
-
154
 |
 |
