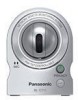
Panasonic BL-C111A Operating Instructions - Page 95
Setting the Date and Time
 |
UPC - 037988845149
View all Panasonic BL-C111A manuals
Add to My Manuals
Save this manual to your list of manuals |
Page 95 highlights
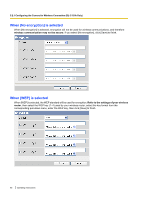
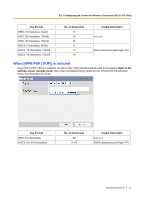
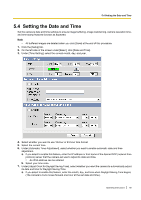
5.4 Setting the Date and Time 5.4 Setting the Date and Time Set the camera's date and time settings to ensure image buffering, image transferring, camera operation time, and time stamp features function as expected. Note • All buffered images are deleted when you click [Save] at the end of this procedure. 1. Click the [Setup] tab. 2. On the left side of the screen under [Basic], click [Date and Time]. 3. Under [Time Setting], select the current month, day, and year. 4. Select whether you want to use 12-hour or 24-hour time format. 5. Select the current time. 6. Under [Automatic Time Adjustment], select whether you want to enable automatic date and time adjustment. a. If you select to enable this feature, enter the IP address or host name of the desired NTP (network time protocol) server that the camera will use to adjust its date and time. • An IPv6 address can be entered. b. Select your time zone. 7. Under [Adjust Clock for Daylight Saving Time], select whether you want the camera to automatically adjust its date and time for Daylight Saving Time. a. If you select to enable this feature, enter the month, day, and time when Daylight Saving Time begins. (The camera's clock moves forward one hour at the set date and time.) Operating Instructions 95
-
 1
1 -
2
-
3
-
4
-
5
-
6
-
7
-
8
-
9
-
10
-
11
-
12
-
13
-
14
-
15
-
16
-
17
-
18
-
19
-
20
-
21
-
22
-
23
-
24
-
25
-
26
-
27
-
28
-
29
-
30
-
31
-
32
-
33
-
34
-
35
-
36
-
37
-
38
-
39
-
40
-
41
-
42
-
43
-
44
-
45
-
46
-
47
-
48
-
49
-
50
-
51
-
52
-
53
-
54
-
55
-
56
-
57
-
58
-
59
-
60
-
61
-
62
-
63
-
64
-
65
-
66
-
67
-
68
-
69
-
70
-
71
-
72
-
73
-
74
-
75
-
76
-
77
-
78
-
79
-
80
-
81
-
82
-
83
-
84
-
85
-
86
-
87
-
88
-
89
-
 90
90 -
 91
91 -
 92
92 -
 93
93 -
 94
94 -
 95
95 -
 96
96 -
 97
97 -
 98
98 -
 99
99 -
 100
100 -
101
-
102
-
103
-
104
-
105
-
106
-
107
-
108
-
109
-
110
-
111
-
112
-
113
-
114
-
115
-
116
-
117
-
118
-
119
-
120
-
121
-
122
-
123
-
124
-
125
-
126
-
127
-
128
-
129
-
130
-
131
-
132
-
133
-
134
-
135
-
136
-
137
-
138
-
139
-
140
-
141
-
142
-
143
-
144
-
145
-
146
-
147
-
148
-
149
-
150
-
151
-
152
-
153
-
154
 |
 |
