Panasonic BL-C111A Operating Instructions - Page 83
Static], 1.1 Network IPv4 Settings - setup cd
 |
UPC - 037988845149
View all Panasonic BL-C111A manuals
Add to My Manuals
Save this manual to your list of manuals |
Page 83 highlights
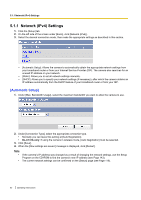
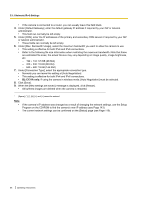
5.1.1 Network (IPv4) Settings [Static] 1. Under [Network Configuration from Setup Program], select whether or not you want to allow the camera to be configured using the Setup Program on the CD-ROM. 2. Under [Internet Connection], enter the port number to be assigned to the camera. • The default port number is 80, however, note that some ISPs do not allow access from the Internet using port 80. Ask your ISP or network administrator about which port numbers are available for access over the Internet. • Do not use the following port numbers: - 20 and 21: used for FTP - 23: used for Telnet - 25: used for SMTP - 53: used for DNS - 110: used for POP3 - 443: used for HTTPS - 4000: used for ICQ - 6661-6667: used for IRC • If you are connecting multiple cameras and plan on using port forwarding to allow Internet access to the cameras, assign a different port number to each camera. We recommend using port numbers in the 50000-50050 range. 3. Enter the IP address to be assigned to the camera. Operating Instructions 83
-
 1
1 -
2
-
3
-
4
-
5
-
6
-
7
-
8
-
9
-
10
-
11
-
12
-
13
-
14
-
15
-
16
-
17
-
18
-
19
-
20
-
21
-
22
-
23
-
24
-
25
-
26
-
27
-
28
-
29
-
30
-
31
-
32
-
33
-
34
-
35
-
36
-
37
-
38
-
39
-
40
-
41
-
42
-
43
-
44
-
45
-
46
-
47
-
48
-
49
-
50
-
51
-
52
-
53
-
54
-
55
-
56
-
57
-
58
-
59
-
60
-
61
-
62
-
63
-
64
-
65
-
66
-
67
-
68
-
69
-
70
-
71
-
72
-
73
-
74
-
75
-
76
-
77
-
 78
78 -
 79
79 -
 80
80 -
 81
81 -
 82
82 -
 83
83 -
 84
84 -
 85
85 -
 86
86 -
 87
87 -
 88
88 -
89
-
90
-
91
-
92
-
93
-
94
-
95
-
96
-
97
-
98
-
99
-
100
-
101
-
102
-
103
-
104
-
105
-
106
-
107
-
108
-
109
-
110
-
111
-
112
-
113
-
114
-
115
-
116
-
117
-
118
-
119
-
120
-
121
-
122
-
123
-
124
-
125
-
126
-
127
-
128
-
129
-
130
-
131
-
132
-
133
-
134
-
135
-
136
-
137
-
138
-
139
-
140
-
141
-
142
-
143
-
144
-
145
-
146
-
147
-
148
-
149
-
150
-
151
-
152
-
153
-
154
 |
 |
