Panasonic BL-C111A Operating Instructions - Page 32
from the next detection may not be buffered or transferred. For example - help
 |
UPC - 037988845149
View all Panasonic BL-C111A manuals
Add to My Manuals
Save this manual to your list of manuals |
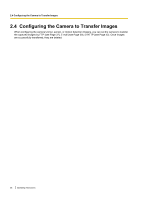
Page 32 highlights
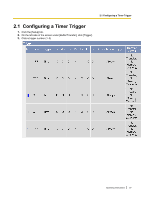
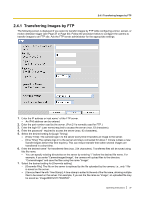
2.2 Configuring a Sensor or Motion Detection Trigger 10. Under [Image Buffer Frequency], select the desired buffer or transfer rate. When [MPEG-4] is selected To configure the camera to save video from after the camera was triggered, click [Enable Post-trigger Image Buffer] and select how many seconds of video you would like to save. This setting allows you to see camera images beginning from when the camera was triggered. When [JPEG] is selected To configure the camera to buffer or transfer images from before the camera was triggered, click [Enable Pre-trigger Image Buffer] and select the image buffer or transfer rate and the total number of images to be buffered or transferred. This setting allows you to see camera images leading up to the moment when the camera was triggered. To configure the camera to buffer or transfer images from after the camera was triggered, click [Enable Post-trigger Image Buffer] and select the image buffer or transfer rate and the total number of images to be buffered or transferred. This setting allows you to see camera images beginning from when the camera was triggered. 11. Under [Sensor deactivation time setting], select the amount of time that must pass after a detection before this trigger can make another detection. • If the camera is triggered often, many images will be buffered or transferred. If those images are transferred to a mobile phone by E-mail, for example, many messages will be sent and mobile phone charges may become expensive. It is therefore recommended to use this setting to help reduce the number of images that are buffered or transferred. • Images will not be buffered or transferred during the deactivation time. As a result, pre-buffer images from the next detection may not be buffered or transferred. For example, if this parameter is set to [10 s], and if the camera is configured to buffer 1 image per second and store 10 images before detection (i.e., buffer images for 10 seconds), the camera will not buffer or transfer images if the sensor is triggered within 10 seconds of the previous trigger. Images can only be buffered or transferred 10 seconds after the previous trigger. The camera can be triggered. The camera is buffering or transferring images and cannot be triggered during this time. Deactivation time; the camera cannot be triggered. A B C A The camera is triggered. Buffering or transferring begins. No new images will be buffered or transferred. 32 Operating Instructions
-
 1
1 -
2
-
3
-
4
-
5
-
6
-
7
-
8
-
9
-
10
-
11
-
12
-
13
-
14
-
15
-
16
-
17
-
18
-
19
-
20
-
21
-
22
-
23
-
24
-
25
-
26
-
 27
27 -
 28
28 -
 29
29 -
 30
30 -
 31
31 -
 32
32 -
 33
33 -
 34
34 -
 35
35 -
 36
36 -
 37
37 -
38
-
39
-
40
-
41
-
42
-
43
-
44
-
45
-
46
-
47
-
48
-
49
-
50
-
51
-
52
-
53
-
54
-
55
-
56
-
57
-
58
-
59
-
60
-
61
-
62
-
63
-
64
-
65
-
66
-
67
-
68
-
69
-
70
-
71
-
72
-
73
-
74
-
75
-
76
-
77
-
78
-
79
-
80
-
81
-
82
-
83
-
84
-
85
-
86
-
87
-
88
-
89
-
90
-
91
-
92
-
93
-
94
-
95
-
96
-
97
-
98
-
99
-
100
-
101
-
102
-
103
-
104
-
105
-
106
-
107
-
108
-
109
-
110
-
111
-
112
-
113
-
114
-
115
-
116
-
117
-
118
-
119
-
120
-
121
-
122
-
123
-
124
-
125
-
126
-
127
-
128
-
129
-
130
-
131
-
132
-
133
-
134
-
135
-
136
-
137
-
138
-
139
-
140
-
141
-
142
-
143
-
144
-
145
-
146
-
147
-
148
-
149
-
150
-
151
-
152
-
153
-
154
 |
 |
