Panasonic BL-C111A Operating Instructions - Page 78
Configuring the Camera to Use a Third-party Dynamic DNS Service
 |
UPC - 037988845149
View all Panasonic BL-C111A manuals
Add to My Manuals
Save this manual to your list of manuals |
Page 78 highlights
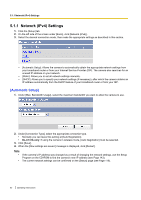
4.2.2 Configuring the Camera to Use a Third-party Dynamic DNS Service 4.2.2 Configuring the Camera to Use a Third-party Dynamic DNS Service Before configuring the camera to use a third-party Dynamic DNS service, you will first need to subscribe to the desired service. Ask the Dynamic DNS service provider for the settings required to use that service. Note • Certain third-party Dynamic DNS services may not be compatible with your camera. We cannot guarantee that your camera will be compatible with third-party Dynamic DNS services, and therefore we cannot take responsibility for any damage or performance issues that may occur when using a Dynamic DNS service other than Viewnetcam.com (see Page 75). • Please direct any questions you may have regarding the settings required to use a third-party Dynamic DNS service to the Dynamic DNS service provider. • After configuring the camera to use a third-party Dynamic DNS service, it may take several minutes before the camera can be accessed over the Internet. 1. Click the [Setup] tab. 2. On the left side of the screen under [Basic], click [DynamicDNS]. 3. Select [User-specified DynamicDNS], then click [Next]. 4. Enter the URL (including http://)*1 provided or required by your Dynamic DNS service provider (max. 255 characters). 5. Select how often the camera notifies the Dynamic DNS service of its current address. 6. Enter the user name*2 provided by the Dynamic DNS service provider (max. 63 characters). 7. Enter the password*2 provided by the Dynamic DNS service provider (max. 63 characters). 78 Operating Instructions
-
 1
1 -
2
-
3
-
4
-
5
-
6
-
7
-
8
-
9
-
10
-
11
-
12
-
13
-
14
-
15
-
16
-
17
-
18
-
19
-
20
-
21
-
22
-
23
-
24
-
25
-
26
-
27
-
28
-
29
-
30
-
31
-
32
-
33
-
34
-
35
-
36
-
37
-
38
-
39
-
40
-
41
-
42
-
43
-
44
-
45
-
46
-
47
-
48
-
49
-
50
-
51
-
52
-
53
-
54
-
55
-
56
-
57
-
58
-
59
-
60
-
61
-
62
-
63
-
64
-
65
-
66
-
67
-
68
-
69
-
70
-
71
-
72
-
 73
73 -
 74
74 -
 75
75 -
 76
76 -
 77
77 -
 78
78 -
 79
79 -
 80
80 -
 81
81 -
 82
82 -
 83
83 -
84
-
85
-
86
-
87
-
88
-
89
-
90
-
91
-
92
-
93
-
94
-
95
-
96
-
97
-
98
-
99
-
100
-
101
-
102
-
103
-
104
-
105
-
106
-
107
-
108
-
109
-
110
-
111
-
112
-
113
-
114
-
115
-
116
-
117
-
118
-
119
-
120
-
121
-
122
-
123
-
124
-
125
-
126
-
127
-
128
-
129
-
130
-
131
-
132
-
133
-
134
-
135
-
136
-
137
-
138
-
139
-
140
-
141
-
142
-
143
-
144
-
145
-
146
-
147
-
148
-
149
-
150
-
151
-
152
-
153
-
154
 |
 |
