Panasonic WJRT208 WJRT208 User Guide - Page 12
Fig. 6
 |
View all Panasonic WJRT208 manuals
Add to My Manuals
Save this manual to your list of manuals |
Page 12 highlights
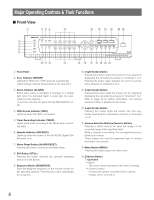
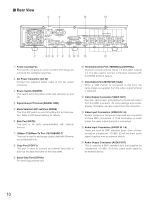
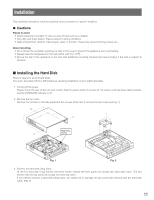
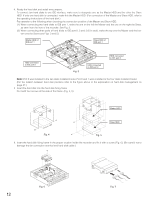
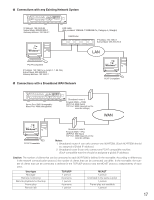
4. Ready the hard disk and install wire jumpers. To connect two hard disks to one IDE interface, make sure to designate one as the Master HDD and the other the Slave HDD. If only one hard disk is connected, make this the Master HDD. (For connection of the Master and Slave HDD, refer to the operating instructions of the hard disk.) Pay attention to the following when choosing the connection position of the Master and Slave HDD. (1) When connecting two hard disks to IDE port 1, make the one on the left the Master and the one on the right the Slave, as seen from the front of the recorder. See Fig. 3. (2) When connecting three pairs of hard disks to IDE port 0, 2 and 3 (6 in total), make the top one the Master and the bottom one the Slave (see Figs. 3 and 5). Master HDD of IDE port 1 Slave HDD of IDE port 1 HDD connected to IDE port 0 Fig. 3 HDD connected to IDE port 2 HDD connected to IDE port 3 Note: Port 0 was installed to the two disks installed model. Port 0 and 1 were installed to the four disks installed model. (For the relation between hard disk positions refer to the figure above or the explanation on hard disk management on page 47.) 5. Insert the hard disk into the hard disk fixing frame. Fix it with four screws at the side of the frame. (Fig. 4, 5) Master HDD Slave HDD Fig. 4 Fig. 5 6. Insert the hard disk fixing frame in the proper location inside the recorder and fix it with a screw (Fig. 6). (Be careful not to damage the fan connection terminal and hard disk cable.) Fig. 6 12 Fig. 7
-
 1
1 -
2
-
3
-
4
-
5
-
6
-
 7
7 -
 8
8 -
 9
9 -
 10
10 -
 11
11 -
 12
12 -
 13
13 -
 14
14 -
 15
15 -
 16
16 -
 17
17 -
18
-
19
-
20
-
21
-
22
-
23
-
24
-
25
-
26
-
27
-
28
-
29
-
30
-
31
-
32
-
33
-
34
-
35
-
36
-
37
-
38
-
39
-
40
-
41
-
42
-
43
-
44
-
45
-
46
-
47
-
48
-
49
-
50
-
51
-
52
-
53
-
54
-
55
-
56
-
57
-
58
-
59
-
60
-
61
-
62
 |
 |
