Panasonic WJRT208 WJRT208 User Guide - Page 8
Major Operating Controls & Their Functions, Front View, Rear View - digital camera
 |
View all Panasonic WJRT208 manuals
Add to My Manuals
Save this manual to your list of manuals |
Page 8 highlights
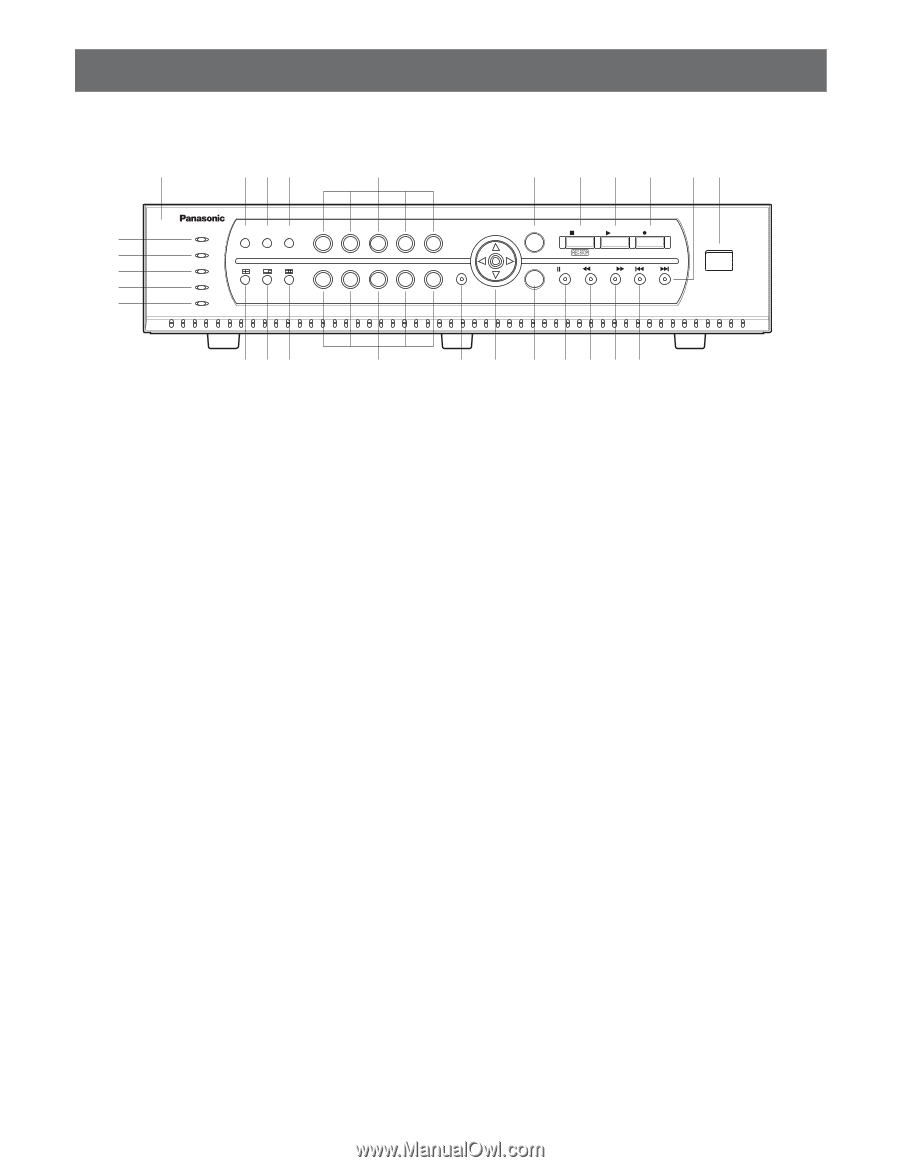
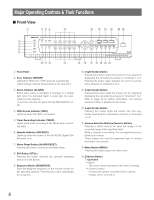
Major Operating Controls & Their Functions ■ Front View q uio !3 !6 !8 !9 @0 @5 @6 w e r t y ERROR ALARM HDD TIMER OPERATE ALARM RESET STILL SEQUENCE 12345 MENU 67890 STOP PLAY REC ESC COPY 2 PAUSE REV FWD SKIP SET 208 Digital Disk Recorder WJ-RT !0 !1 !2 !3 !4 !5 !7 @1 @2 @3 @4 q Front Panel w Error Indicator (ERROR) Lights Red: HDD error, HDD removed automatically. Lights Orange: Internal thermal error or fan stop error e Alarm Indicator (ALARM) Blinks when alarm is activated. It changes to a steady light when the activated alarm is reset after the autoreset time has elapsed. To turn the indicator off, press the [ALARM RESET] button. r HDD Access Indicator (HDD) Lights up when the HDD is accessed. t Timer Recording Indicator (TIMER) Lights when timer recording is set. Blinks when recording starts. y Operate Indicator (OPERATE) Lights up when the power of the WJ-RT208 Digital Disk Recorder is on. u Alarm Reset Button (ALARM RESET) Pressing this button cancels an activated alarm. i Still Button (STILL) Pressing this button switches the currently displayed picture to a still picture. o Sequence Button (SEQUENCE) Runs the assigned sequence on the monitor screen for the specified duration. Pressing this button starts/stops the sequence. !0 4-split Screen Button Pressing this button splits the screen into four segments displaying the surveillance pictures on Channels 1 to 4. Pressing the button again displays the next four surveillance pictures on Channels 5 to 8. !1 6-split Screen Button Pressing this button splits the screen into six segments displaying the surveillance pictures on Channels 1 to 6. Refer to page 26 for further information. The camera selection button is disabled in this mode. !2 9-split Screen Button Pressing this button splits the screen into nine segments displaying the surveillance pictures on Channels 1 to 8. !3 Camera Selection Buttons (Numeric Button) Pressing a button selects the input live image, or the recorded image of the specified input. While a channel is recording, the corresponding button lights up in orange. These buttons are used for password input to release the button lock function. !4 Menu Button (MENU) Pressing this button opens the main menu. !5 Direction Button ↑: Up button • Menu: The cursor moves upwards on the menu or dialog. • Camera control: Controls the upward movement of the camera. Images will be zoomed in. 8
-
 1
1 -
2
-
 3
3 -
 4
4 -
 5
5 -
 6
6 -
 7
7 -
 8
8 -
 9
9 -
 10
10 -
 11
11 -
 12
12 -
 13
13 -
14
-
15
-
16
-
17
-
18
-
19
-
20
-
21
-
22
-
23
-
24
-
25
-
26
-
27
-
28
-
29
-
30
-
31
-
32
-
33
-
34
-
35
-
36
-
37
-
38
-
39
-
40
-
41
-
42
-
43
-
44
-
45
-
46
-
47
-
48
-
49
-
50
-
51
-
52
-
53
-
54
-
55
-
56
-
57
-
58
-
59
-
60
-
61
-
62
 |
 |