Panasonic WJRT208 WJRT208 User Guide - Page 13
For formatting hard disks refer to of these Operating Instructions.
 |
View all Panasonic WJRT208 manuals
Add to My Manuals
Save this manual to your list of manuals |
Page 13 highlights
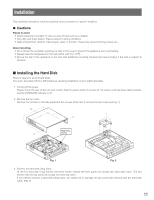
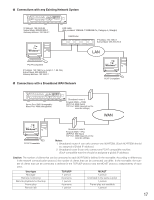
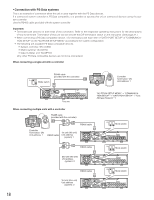
7. Connect the flat hard disk data cable and power cord (Fig. 7). Seen from the front of the recorder, the IDE interface is numbered 0, 1, 2, 3 from left to right. Connect the four power supply ports and four IDE data ports on the motherboard with the correspondingly numbered hard disk connectors. (For the relation between hard disk positions refer to the figure above or the explanation on hard disk management on page 47.) 8. Follow the same procedure to install other hard disks. Note: Up to eight hard disks can be installed. 9. Replace the top cover. (Refer to Fig. 1) 10. For formatting hard disks refer to page 47 of these Operating Instructions. 13
-
 1
1 -
2
-
3
-
4
-
5
-
6
-
7
-
 8
8 -
 9
9 -
 10
10 -
 11
11 -
 12
12 -
 13
13 -
 14
14 -
 15
15 -
 16
16 -
 17
17 -
 18
18 -
19
-
20
-
21
-
22
-
23
-
24
-
25
-
26
-
27
-
28
-
29
-
30
-
31
-
32
-
33
-
34
-
35
-
36
-
37
-
38
-
39
-
40
-
41
-
42
-
43
-
44
-
45
-
46
-
47
-
48
-
49
-
50
-
51
-
52
-
53
-
54
-
55
-
56
-
57
-
58
-
59
-
60
-
61
-
62
 |
 |

13
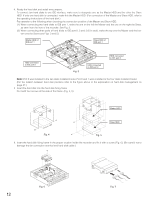
7.
Connect the flat hard disk data cable and power cord (Fig. 7).
Seen from the front of the recorder, the IDE interface is numbered 0, 1, 2, 3 from left to right. Connect the four power sup-
ply ports and four IDE data ports on the motherboard with the correspondingly numbered hard disk connectors.
(For the relation between hard disk positions refer to the figure above or the explanation on hard disk management on
page 47.)
8.
Follow the same procedure to install other hard disks.
Note:
Up to eight hard disks can be installed.
9.
Replace the top cover. (Refer to Fig. 1)
10. For formatting hard disks refer to page 47 of these Operating Instructions.