Panasonic WJRT208 WJRT208 User Guide - Page 45
Search and Playback, 3 Backup by External HDD, Caution, Notes
 |
View all Panasonic WJRT208 manuals
Add to My Manuals
Save this manual to your list of manuals |
Page 45 highlights
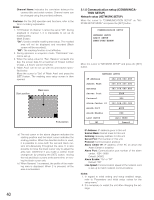
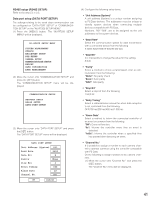
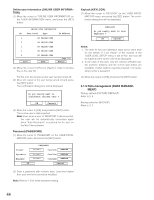
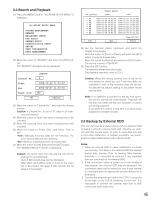
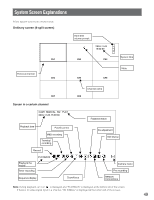
3.2 Search and Playback (1) Press the [MENU] button. "WJ-RT208 SETUP MENU" is displayed. WJ-RT208 SETUP MENU SYSTEM MANAGEMENT SEARCH REC&EVENT SETUP PTZ SETUP CAMERA SETUP COMMUNICATION SETUP REPORT USER INFORMATION DATA MANAGEMENT (2) Move the cursor to "SEARCH" and press the [SET] button. The "SEARCH" dialogbox will be displayed. Channel No. Start End Event Only OK SEARCH 5 2004-10-22 11:30:30 2004-10-27 11:30:30 No Cancel (3) Move the cursor to "Channel No.", and enter the desired number. Caution: If Channel No. is set at "0", data of all channels are checked. (4) Move the cursor to "Start" and enter a starting time to be checked. (5) Move the cursor to "End" and enter a ending time to be checked. (6) Move the cursor to "Event Only", and select "Yes" or "No". "Yes": Manually recorded data are not retrieved. The event record data only are retrieved. "No": Retrieval is attempted from all record data. (7) Move the cursor to [OK] and press the [SET] button. The "SEARCH RESULT" screen is displayed. Caution: All record data from the starting time till the ending time are displayed. Up to 5 000 record data can be displayed. When there are 5 000 records or more for the channel to be played, the latest 5 000 records will be subject to be played. SEARCH RESULT CH Quality Start End 1 SF 2 FQ 3 GQ 4 NQ 5 EX 6 SF 7 FQ 8 GQ 2005-01-24 10:43:22 2005-01-24 10:43:22 2005-01-24 10:43:22 2005-01-24 10:43:22 2005-01-24 10:43:22 2005-01-24 10:43:22 2005-01-24 10:43:22 2005-01-24 10:43:22 2005-01-24 10:53:22 2005-01-24 10:53:22 2005-01-24 10:53:22 2005-01-24 10:53:22 2005-01-24 10:53:22 2005-01-24 10:53:22 2005-01-24 10:53:22 2005-01-24 10:53:22 Prev Next Page 001/001 Return (8) Use the direction button (up/down) and select the images to be played. Move the cursor to [Prev] or [Next] and press the [SET] button in order to browse data. Move the cursor to [Return] and press the [SET] button. The screen returns to "SEARCH". (9) Press the [SET] button. The selected image data are played. For playback operation, refer to 2.3.2. Caution: When the record starting time is set at the time preset for checking, and if the time data are contained in part of the recorded data, the recorded data will be played starting at the preset record starting time. Note: If no operation is carried out, the key lock operation will be carried out automatically. Playback will not stop even when the key lock operation is carried out during playback. If you leave this unit for a long time, you should stop playback to maintain security. 3.3 Backup by External HDD This unit can record a data backup with an external HDD including a 2.5-inch external hard disk. (Usually, an external hard disk can be used.) In order to avoid data loss due to hard disk malfunction or sudden accidents, we recommend recorded data backup with external media. Notes: 1. When an external HDD is used, initialization is usually unnecessary. The data on the external HDD are deleted during data backup. Prior to starting data backup, therefore, it is necessary to examine if any important data are contained on the external HDD. 2. If the connection cable is pulled out in the middle of data backup, the external HDD may be damaged. The connection cable can be pulled out only if data backup is completed and the appropriate prompt dialog box is displayed. 3. Connect the external hard disk to the COPY1 connector at the back or the COPY2 connector on the front. It is impossible to connect the external hard disk to both connectors at the same time. 45
-
 1
1 -
2
-
3
-
4
-
5
-
6
-
7
-
8
-
9
-
10
-
11
-
12
-
13
-
14
-
15
-
16
-
17
-
18
-
19
-
20
-
21
-
22
-
23
-
24
-
25
-
26
-
27
-
28
-
29
-
30
-
31
-
32
-
33
-
34
-
35
-
36
-
37
-
38
-
39
-
 40
40 -
 41
41 -
 42
42 -
 43
43 -
 44
44 -
 45
45 -
 46
46 -
 47
47 -
 48
48 -
 49
49 -
 50
50 -
51
-
52
-
53
-
54
-
55
-
56
-
57
-
58
-
59
-
60
-
61
-
62
 |
 |
