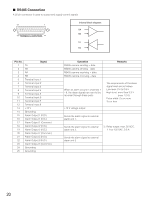
Panasonic WJRT208 WJRT208 User Guide - Page 21
DIP Switch Setting, Caution
 |
View all Panasonic WJRT208 manuals
Add to My Manuals
Save this manual to your list of manuals |
Page 21 highlights
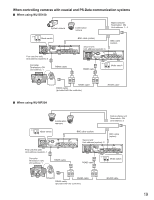
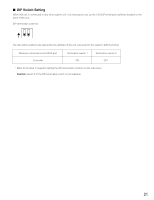
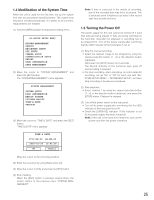
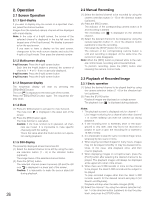
■ DIP Switch Setting When this unit is connected to any other system unit, it is necessary to set up the 2-bit DIP termination switches located on the back of this unit. DIP termination switches: 12 The dip switch positions are defined by the attribute of the unit connected to the system's DATA terminal. Machine connected to the DATA port Controller Termination switch 1 ON Termination switch 2 OFF * Refer to the label in regard to setting the DIP termination switches on the rear panel. Caution: Switch 2 of the DIP termination switch is not available. 21
-
 1
1 -
2
-
3
-
4
-
5
-
6
-
7
-
8
-
9
-
10
-
11
-
12
-
13
-
14
-
15
-
 16
16 -
 17
17 -
 18
18 -
 19
19 -
 20
20 -
 21
21 -
 22
22 -
 23
23 -
 24
24 -
 25
25 -
 26
26 -
27
-
28
-
29
-
30
-
31
-
32
-
33
-
34
-
35
-
36
-
37
-
38
-
39
-
40
-
41
-
42
-
43
-
44
-
45
-
46
-
47
-
48
-
49
-
50
-
51
-
52
-
53
-
54
-
55
-
56
-
57
-
58
-
59
-
60
-
61
-
62
 |
 |

21
■
DIP Switch Setting
When this unit is connected to any other system unit, it is necessary to set up the 2-bit DIP termination switches located on the
back of this unit.
DIP termination switches:
The dip switch positions are defined by the attribute of the unit connected to the system’s DATA terminal.
*
Refer to the label in regard to setting the DIP termination switches on the rear panel.
Caution:
Switch 2 of the DIP termination switch is not available.
1
2
Machine connected to the DATA port
Controller
Termination switch 1
ON
Termination switch 2
OFF