Panasonic WJRT208 WJRT208 User Guide - Page 40
Communication setup COMMUNICA, TION SETUP, Network setup NETWORK SETUP
 |
View all Panasonic WJRT208 manuals
Add to My Manuals
Save this manual to your list of manuals |
Page 40 highlights
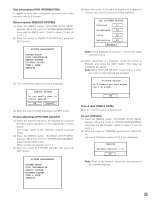
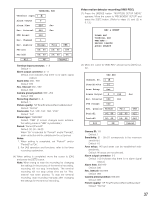
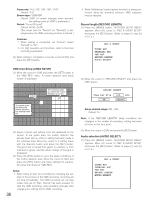
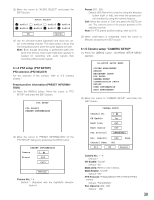
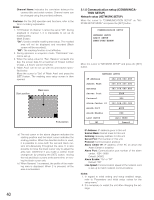
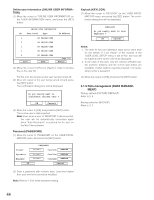
Channel Name: Indicates the correlation between the camera title and serial number. Channel name can be changed using the provided software. Cautions: For the [All] operation and functions, refer to the timer recording explanation. Notes: 1. "CH Enable" of channel 1 cannot be set at "Off". During playback in channel 1, it is impossible to set up its masking area. Mask Enable: "On": Used to enable masking area setup. The masked area will not be displayed and recorded (Black screen will be recorded.). "Off": The masking function is not effective. 2. During operation in sequence mode, "CH Enable" cannot be set up. 3. When the setup value for "Rec. Reserve" exceeds one day, the screen data for a maximum of "preset number of days + 4 hours" can be reserved. 4. "Mask Area" can be set up with the procedures specified below. Move the cursor to "Set" of "Mask Area" and press the [SET] button. The masking area setup screen is then opened. Start position Mask area End position a) The red cursor in the above diagram indicates the starting position and the black cursor indicates the ending position. When the direction button is used, it is possible to move both the red and black cursors simultaneously throughout the area. It is also possible to move the black cursor only to adjust the area size. Determine if you make a control mode changeover by pressing the [SET] button, moving the red and black cursors at the same time, or moving the black cursor only. b) When Numeral 1 is pressed, the profile of the masking area is displayed. When 2 is pressed, all the area is embedded. 40 3.1.6 Communication setup (COMMUNICATION SETUP) Network setup (NETWORK SETUP) Move the cursor to "COMMUNICATION SETUP" on "WJRT208 SETUP MENU" and press the [SET] button. COMMUNICATION SETUP NETWORK SETUP RS485 SETUP DATA PORT SETUP Move the cursor to "NETWORK SETUP" and press the [SET] button. NETWORK SETUP IP Address 192.168.000.088 Subnet Mask 255.255.255.000 Gateway 192.168.000.088 Server Port 2000 Protocol TCP Alarm Center IP 192.168.000.188 Alarm Port 4000 Alarm Enable Off Line Speed Auto Mode OK Cancel IP Address: IP address given to this unit Subnet Mask: Subnet mask for this unit Gateway: Gateway address for this unit Server Port: Port number of this unit Protocol: Communication protocol Alarm Center IP: IP address of the PC on which the Alarm Center is installed Alarm Port: Communication port number of the alarm center, 1024 - 9999 Default: [4000] Alarm Enable: "On" or "Off" Default: "Off" Line Speed: Communication speed of the network card is set up to match network communications. Notes: 1. In regard to initial setting and setup enabled range, refer to "Parameters and initial setup values for the setup menu." 2. It is necessary to restart the unit after changing the settings.
-
 1
1 -
2
-
3
-
4
-
5
-
6
-
7
-
8
-
9
-
10
-
11
-
12
-
13
-
14
-
15
-
16
-
17
-
18
-
19
-
20
-
21
-
22
-
23
-
24
-
25
-
26
-
27
-
28
-
29
-
30
-
31
-
32
-
33
-
34
-
 35
35 -
 36
36 -
 37
37 -
 38
38 -
 39
39 -
 40
40 -
 41
41 -
 42
42 -
 43
43 -
 44
44 -
 45
45 -
46
-
47
-
48
-
49
-
50
-
51
-
52
-
53
-
54
-
55
-
56
-
57
-
58
-
59
-
60
-
61
-
62
 |
 |
