Pentax RS1000 RS1000 Optio RS1000 - Page 106
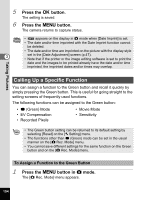
Calling Up a Specific Function, Press the, button., button in, mode. - note
 |
UPC - 027075172593
View all Pentax RS1000 manuals
Add to My Manuals
Save this manual to your list of manuals |
Page 106 highlights
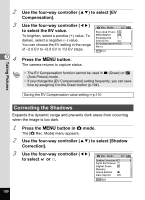
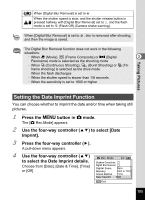
Taking Pictures 5 6 3 Press the 4 button. The setting is saved. Press the 3 button. The camera returns to capture status. • O appears on the display in A mode when [Date Imprint] is set. • The date and/or time imprinted with the Date Imprint function cannot be deleted. • The date and/or time are imprinted on the picture with the display style set in the [Date Adjustment] screen (p.47). • Note that if the printer or the image editing software is set to print the date and the images to be printed already have the date and/or time imprinted, the imprinted dates and/or times may overlap. Calling Up a Specific Function You can assign a function to the Green button and recall it quickly by simply pressing the Green button. This is useful for going straight to the setting screens of frequently used functions. The following functions can be assigned to the Green button: • 9 (Green) Mode • EV Compensation • Recorded Pixels • Movie Mode • Sensitivity • The Green button setting can be returned to its default setting by selecting [Reset] on the [W Setting] menu. • The functions other than 9 (Green) mode can be set in the usual manner on the [A Rec. Mode] menu. • You cannot save different settings for the same function on the Green button and on the [A Rec. Mode] menu. To Assign a Function to the Green Button 1 Press the 3 button in A mode. The [A Rec. Mode] menu appears. 104
-
 1
1 -
2
-
3
-
4
-
5
-
6
-
7
-
8
-
9
-
10
-
11
-
12
-
13
-
14
-
15
-
16
-
17
-
18
-
19
-
20
-
21
-
22
-
23
-
24
-
25
-
26
-
27
-
28
-
29
-
30
-
31
-
32
-
33
-
34
-
35
-
36
-
37
-
38
-
39
-
40
-
41
-
42
-
43
-
44
-
45
-
46
-
47
-
48
-
49
-
50
-
51
-
52
-
53
-
54
-
55
-
56
-
57
-
58
-
59
-
60
-
61
-
62
-
63
-
64
-
65
-
66
-
67
-
68
-
69
-
70
-
71
-
72
-
73
-
74
-
75
-
76
-
77
-
78
-
79
-
80
-
81
-
82
-
83
-
84
-
85
-
86
-
87
-
88
-
89
-
90
-
91
-
92
-
93
-
94
-
95
-
96
-
97
-
98
-
99
-
100
-
 101
101 -
 102
102 -
 103
103 -
 104
104 -
 105
105 -
 106
106 -
 107
107 -
 108
108 -
 109
109 -
 110
110 -
 111
111 -
112
-
113
-
114
-
115
-
116
-
117
-
118
-
119
-
120
-
121
-
122
-
123
-
124
-
125
-
126
-
127
-
128
-
129
-
130
-
131
-
132
-
133
-
134
-
135
-
136
-
137
-
138
-
139
-
140
-
141
-
142
-
143
-
144
-
145
-
146
-
147
-
148
-
149
-
150
-
151
-
152
-
153
-
154
-
155
-
156
-
157
-
158
-
159
-
160
-
161
-
162
-
163
-
164
-
165
-
166
-
167
-
168
-
169
-
170
-
171
-
172
-
173
-
174
-
175
-
176
-
177
-
178
-
179
-
180
-
181
-
182
-
183
-
184
-
185
-
186
-
187
-
188
-
189
-
190
-
191
-
192
-
193
-
194
-
195
-
196
-
197
-
198
-
199
-
200
-
201
-
202
-
203
-
204
-
205
-
206
-
207
-
208
-
209
-
210
-
211
-
212
-
213
-
214
-
215
-
216
-
217
-
218
-
219
-
220
-
221
-
222
-
223
-
224
 |
 |