Pentax RS1000 RS1000 Optio RS1000 - Page 92
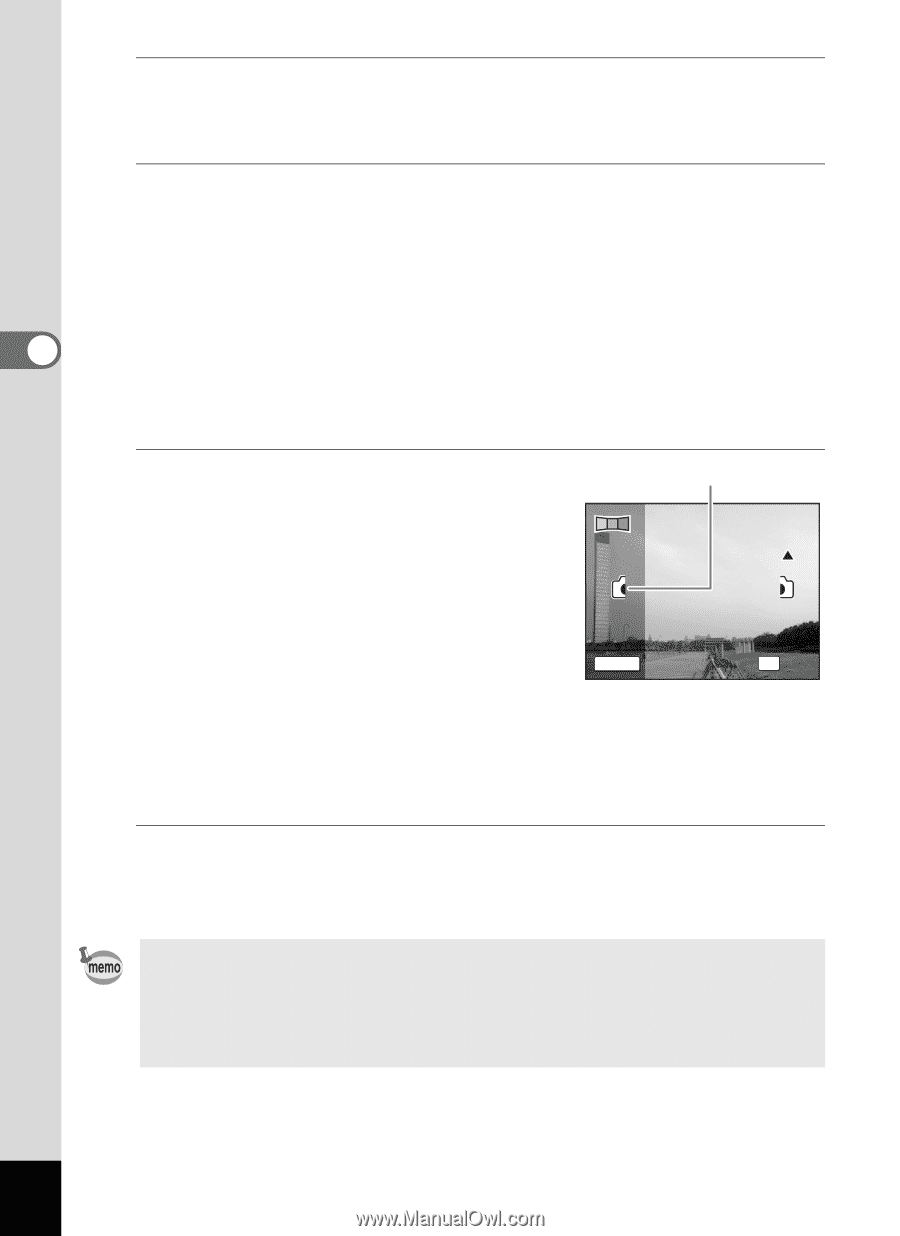
transparent image and the actual, view overlap.
 |
UPC - 027075172593
View all Pentax RS1000 manuals
Add to My Manuals
Save this manual to your list of manuals |
Page 92 highlights
Taking Pictures 5 6 3 7 8 Press the shutter release button halfway. The focus frame on the display turns green when the camera focuses on the subject at the correct distance. Press the shutter release button fully. The screen for taking the second frame is displayed after you take the first frame. If you select right (5) in Step 4: The right edge of the first frame appears in semi-transparent form on the left edge of the display. If you select left (4) in Step 4: The left edge of the first frame appears in semi-transparent form on the right edge of the display. Move the camera so that the Alignment icon alignment icons for the semi- transparent image and the actual 1 2 view overlap. The shutter is automatically released when the icons overlap. If the actual view is not aligned with the semi-transparent image, an arrow SHUTTER 2nd Frame OK Exit indicating the direction the camera must be moved (either up or down) appears. If the shutter is not released automatically, press the shutter release button to take the picture. Take the third frame. Repeat Step 7 to take the third frame. The panorama stitching starts and a stitched image appears. • Some distortion may result from moving objects, repeating patterns, or if nothing exists when overlapping the first and second frames or the second and third frames on the preview guide. • When the Face Detection is activated (p.67), it works only when taking the first frame. The Smile Capture function cannot be set. 90
-
 1
1 -
2
-
3
-
4
-
5
-
6
-
7
-
8
-
9
-
10
-
11
-
12
-
13
-
14
-
15
-
16
-
17
-
18
-
19
-
20
-
21
-
22
-
23
-
24
-
25
-
26
-
27
-
28
-
29
-
30
-
31
-
32
-
33
-
34
-
35
-
36
-
37
-
38
-
39
-
40
-
41
-
42
-
43
-
44
-
45
-
46
-
47
-
48
-
49
-
50
-
51
-
52
-
53
-
54
-
55
-
56
-
57
-
58
-
59
-
60
-
61
-
62
-
63
-
64
-
65
-
66
-
67
-
68
-
69
-
70
-
71
-
72
-
73
-
74
-
75
-
76
-
77
-
78
-
79
-
80
-
81
-
82
-
83
-
84
-
85
-
86
-
 87
87 -
 88
88 -
 89
89 -
 90
90 -
 91
91 -
 92
92 -
 93
93 -
 94
94 -
 95
95 -
 96
96 -
 97
97 -
98
-
99
-
100
-
101
-
102
-
103
-
104
-
105
-
106
-
107
-
108
-
109
-
110
-
111
-
112
-
113
-
114
-
115
-
116
-
117
-
118
-
119
-
120
-
121
-
122
-
123
-
124
-
125
-
126
-
127
-
128
-
129
-
130
-
131
-
132
-
133
-
134
-
135
-
136
-
137
-
138
-
139
-
140
-
141
-
142
-
143
-
144
-
145
-
146
-
147
-
148
-
149
-
150
-
151
-
152
-
153
-
154
-
155
-
156
-
157
-
158
-
159
-
160
-
161
-
162
-
163
-
164
-
165
-
166
-
167
-
168
-
169
-
170
-
171
-
172
-
173
-
174
-
175
-
176
-
177
-
178
-
179
-
180
-
181
-
182
-
183
-
184
-
185
-
186
-
187
-
188
-
189
-
190
-
191
-
192
-
193
-
194
-
195
-
196
-
197
-
198
-
199
-
200
-
201
-
202
-
203
-
204
-
205
-
206
-
207
-
208
-
209
-
210
-
211
-
212
-
213
-
214
-
215
-
216
-
217
-
218
-
219
-
220
-
221
-
222
-
223
-
224
 |
 |