Pioneer AVH P3100DVD Owner's Manual - Page 51
Changing languages for, CAUTION, Switching the sound, muting/attenuation, Entering PIN code for, - bluetooth adapter
 |
UPC - 012562944050
View all Pioneer AVH P3100DVD manuals
Add to My Manuals
Save this manual to your list of manuals |
Page 51 highlights
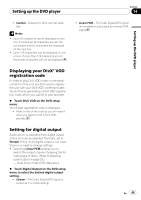
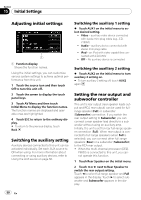
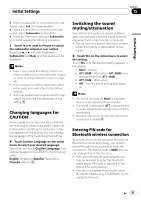
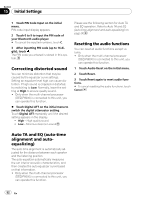
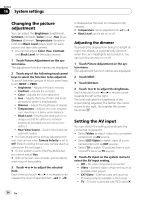
Initial Settings Section 15 Initial Settings # When no subwoofer is connected to the rear output, select Full (full-range speaker). # When a subwoofer is connected to the rear output, select Subwoofer (subwoofer). # When the rear output setting is Subwoofer, you cannot operate the following procedure. 3 Touch c or d next to Preout to switch the subwoofer output or rear output. Touching c or d will switch between Subwoofer and Rear and that status will be displayed. Notes ! Even if you change this setting, there is no output unless you turn the subwoofer output on (refer to Using subwoofer output on page 44). ! If you change this setting, subwoofer output in the audio menu will return to the factory settings. ! Both rear speaker lead outputs and RCA rear output are switched simultaneously in this setting. Changing languages for CAUTION Some operations on this unit are prohibited while driving or needs to be paid a careful attention when operating. In such case, a caution appears on the display. You can change the language of the cautions at this setting. % Touch Caution Language on the initial menu to select your desired language. Each time you touch Caution Language it selects languages for CAUTION in the following order: English (English)-Español (Spanish)- Français (French) Switching the sound muting/attenuation Sound from this system is muted or attenuated automatically when the signal from the equipment with mute function is received. ! Sound from this system returns to normal when the muting or attenuation is canceled. % Touch TEL on the initial menu to select the setting. Touch TEL until the desired setting appears in the display. ! Mute - Muting ! ATT -20dB - Attenuation (ATT -20dB has a stronger effect than ATT -10dB) ! ATT -10dB - Attenuation ! Off - Turn the sound muting/attenuation off Notes ! The sound is turned off, Mute is displayed and no audio adjustments are possible. ! The sound is attenuated, ATT is displayed and no audio adjustments, except volume control, are possible. ! Operation returns to normal when the phone connection is ended. Entering PIN code for Bluetooth wireless connection To connect your cellular phone to this unit via Bluetooth wireless technology, you need to enter PIN code on your phone to verify the connection. The default code is 0000, but you can change this in this function. ! With some Bluetooth audio players, you may be required to enter the Bluetooth audio player PIN code in advance to set this unit for a connection. ! You can only operate this function when Bluetooth adapter (e.g. CD-BTB200) is connected to this unit. En 51
-
 1
1 -
2
-
3
-
4
-
5
-
6
-
7
-
8
-
9
-
10
-
11
-
12
-
13
-
14
-
15
-
16
-
17
-
18
-
19
-
20
-
21
-
22
-
23
-
24
-
25
-
26
-
27
-
28
-
29
-
30
-
31
-
32
-
33
-
34
-
35
-
36
-
37
-
38
-
39
-
40
-
41
-
42
-
43
-
44
-
45
-
 46
46 -
 47
47 -
 48
48 -
 49
49 -
 50
50 -
 51
51 -
 52
52 -
 53
53 -
 54
54 -
 55
55 -
 56
56 -
57
-
58
-
59
-
60
-
61
-
62
-
63
-
64
-
65
-
66
-
67
-
68
-
69
-
70
-
71
-
72
-
73
-
74
-
75
-
76
-
77
-
78
-
79
-
80
-
81
-
82
-
83
-
84
-
85
-
86
-
87
-
88
-
89
-
90
-
91
-
92
-
93
-
94
-
95
-
96
-
97
-
98
-
99
-
100
-
101
-
102
-
103
-
104
-
105
-
106
-
107
-
108
-
109
-
110
-
111
-
112
-
113
-
114
-
115
-
116
 |
 |
