Pioneer HTZ-575DV Owner's Manual - Page 13
Getting started, Using the on-screen displays, Playing discs - manual
 |
UPC - 125629032550
View all Pioneer HTZ-575DV manuals
Add to My Manuals
Save this manual to your list of manuals |
Page 13 highlights
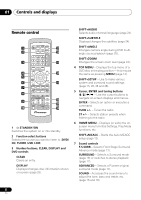
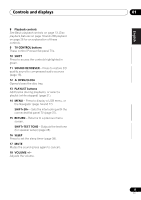
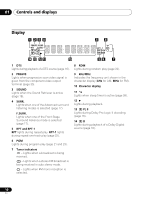
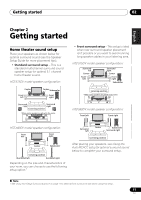
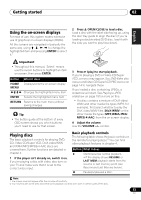
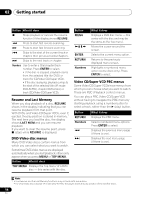
Getting started 02 English Deutsch Français Italiano Nederlands Español Using the on-screen displays For ease of use, this system makes extensive use of graphical on-screen displays (OSDs). All the screens are navigated in basically the same way, using to change the highlighted item and pressing ENTER to select it.1 2 Press OPEN/CLOSE to load a disc. Load a disc with the label side facing up, using the disc tray guide to align the disc (if you're loading a double-sided DVD disc, load it with the side you want to play face down). Important • Throughout this manual, 'Select' means use the cursor buttons to highlight an item on-screen, then press ENTER. Button What it does HOME Displays/exits the on-screen display MENU Changes the highlighted menu item ENTER Selects the highlighted menu item RETURN Returns to the main menu without saving changes Tip • The button guide at the bottom of every OSD screen shows you which buttons you'll need to use for that screen. 3 Press (play) to start playback. If you're playing a DVD or Video CD/Super VCD, a menu may appear. See DVD-Video disc menus and Video CD/Super VCD PBC menus on page 14 to navigate these. If you loaded a disc containing JPEGs, a slideshow will start. See Playing a JPEG slideshow on page 19 for more on this. • If a disc contains a mixture of DivX video/ WMV and other media file types (MP3, for example), first select whether to play the DivX video/WMV files (DivX/WMV) or the other media file types (MP3/WMA/JPEG/ MPEG-4 AAC) from the on-screen display. 4 Adjust the volume. Use the VOLUME +/- control. Playing discs The basic playback controls for playing DVD, CD, Video CD/Super VCD, DivX video/WMV and WMA/MP3/MPEG-4 AAC discs are covered here. Further functions are detailed in chapter 4. 1 If the player isn't already on, switch it on. If you're playing a disc with video, also turn on your TV and make sure that it is set to the correct video input. Basic playback controls The following table shows the basic controls on the remote for playing discs.2 You can find other playback features in chapter 4. Button What it does Starts/resumes normal playback. • If the display shows RESUME or LAST MEM playback starts from the resume or last memory point (see Resume and Last Memory below). Pauses/unpauses a disc. Note 1 The screen saver will appear after five minutes of inactivity. 2 You may find with some DVD discs that some playback controls don't work in certain parts of the disc. 13 En
-
 1
1 -
2
-
3
-
4
-
5
-
6
-
7
-
 8
8 -
 9
9 -
 10
10 -
 11
11 -
 12
12 -
 13
13 -
 14
14 -
 15
15 -
 16
16 -
 17
17 -
 18
18 -
19
-
20
-
21
-
22
-
23
-
24
-
25
-
26
-
27
-
28
-
29
-
30
-
31
-
32
-
33
-
34
-
35
-
36
-
37
-
38
-
39
-
40
-
41
-
42
-
43
-
44
-
45
-
46
-
47
-
48
-
49
-
50
-
51
-
52
-
53
-
54
-
55
-
56
-
57
-
58
-
59
-
60
-
61
-
62
-
63
-
64
-
65
-
66
-
67
-
68
-
69
-
70
-
71
-
72
-
73
-
74
-
75
-
76
-
77
-
78
-
79
-
80
-
81
-
82
-
83
-
84
-
85
-
86
-
87
-
88
-
89
-
90
-
91
-
92
-
93
-
94
-
95
-
96
-
97
-
98
-
99
-
100
-
101
-
102
 |
 |
