Pioneer HTZ-575DV Owner's Manual - Page 28
Surround sound settings
 |
UPC - 125629032550
View all Pioneer HTZ-575DV manuals
Add to My Manuals
Save this manual to your list of manuals |
Page 28 highlights
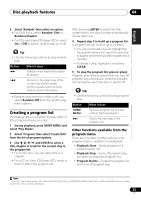
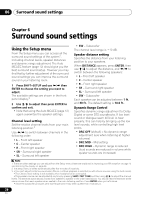
06 Surround sound settings Chapter 6 Surround sound settings Using the Setup menu From the Setup menu you can access all the surround sound settings of the system1, including channel levels, speaker distances and dynamic range adjustment. The Auto MCACC feature (page 12) should give you the best surround sound setup. However you may find that by further adjustment of the surround sound settings you can improve the surround sound in your listening room. 1 Press SHIFT+SETUP and use / then ENTER to choose the setting you want to adjust. The available settings are shown in the front panel display.2 2 Use / to adjust then press ENTER to confirm and exit. • Note that using the Auto MCACC (page 12) again overwrites the speaker settings. Channel level setting Set the relative channel levels from your main listening position.3 Use / to switch between channels in the following order: • L - Front left speaker • C - Center speaker • R - Front right speaker • SR - Surround right speaker • SL - Surround left speaker • SW - Subwoofer The channel level range is ±10 dB. Speaker distance setting Specifies the distance from your listening position to your speakers. When DISTANCE appears, press ENTER, then use / to adjust the distance, and / to switch between the following speakers: • L - Front left speaker • C - Center speaker • R - Front right speaker • SR - Surround right speaker • SL - Surround left speaker • SW - Subwoofer Each speaker can be adjusted between 1 ft. and 30 ft.. The default setting is 10.0 ft.. Dynamic Range Control Specifies dynamic range adjustment to Dolby Digital or some DTS soundtracks. If low level sound or dialogue seem difficult to hear properly, this can help by bringing up the low level sounds, while controlling high level peaks. • DRC OFF (default) - No dynamic range adjustment (use when listening at higher volumes) • DRC MID - Mid setting • DRC HIGH - Dynamic range is reduced (loud sounds are reduced in volume while quieter sounds are increased) Note 1 There are other settings you can adjust from the Setup menu; these are explained in Improving poor FM reception on page 15 and Dimming the display on page 38. 2 The setup menu is exited automatically after five minutes of inactivity. 3 • You can't adjust center/surround when Stereo or Virtual playback is selected (or with stereo sources using the Auto mode). • The Channel level setting is not available when headphones are connected. • The speaker volume can be adjusted at any time by pressing SHIFT+TEST TONE and then using / to adjust the channel levels. The test tone automatically moves from speaker to speaker in the order listed above. You should hear the test tone at the same volume from each speaker when seated in the main listening position. Press ENTER when you're finished. • Since the subwoofer produces ultra-low frequencies it may seem quieter than it actually is. 28 En
-
 1
1 -
2
-
3
-
4
-
5
-
6
-
7
-
8
-
9
-
10
-
11
-
12
-
13
-
14
-
15
-
16
-
17
-
18
-
19
-
20
-
21
-
22
-
 23
23 -
 24
24 -
 25
25 -
 26
26 -
 27
27 -
 28
28 -
 29
29 -
 30
30 -
 31
31 -
 32
32 -
 33
33 -
34
-
35
-
36
-
37
-
38
-
39
-
40
-
41
-
42
-
43
-
44
-
45
-
46
-
47
-
48
-
49
-
50
-
51
-
52
-
53
-
54
-
55
-
56
-
57
-
58
-
59
-
60
-
61
-
62
-
63
-
64
-
65
-
66
-
67
-
68
-
69
-
70
-
71
-
72
-
73
-
74
-
75
-
76
-
77
-
78
-
79
-
80
-
81
-
82
-
83
-
84
-
85
-
86
-
87
-
88
-
89
-
90
-
91
-
92
-
93
-
94
-
95
-
96
-
97
-
98
-
99
-
100
-
101
-
102
 |
 |