Pioneer HTZ-575DV Owner's Manual - Page 37
LN1 PDP3 or LN2 PDP3
 |
UPC - 125629032550
View all Pioneer HTZ-575DV manuals
Add to My Manuals
Save this manual to your list of manuals |
Page 37 highlights
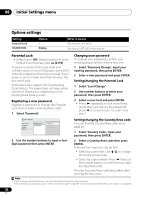
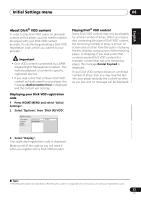
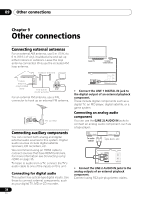
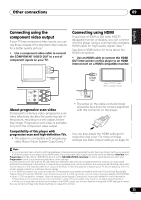
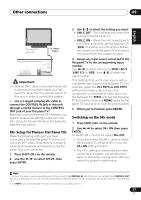
Other connections 09 English Deutsch Français Italiano Nederlands Español Pioneer flat panel TV To control output OPTICAL LINE 1 DIGITAL IN MCACC SETUP MIC COMPONENT PR VIDEO VIDEO PB IN Y CONTROL VIDEO OUT Important • With an SR+ cable connected, the remote must now be pointed towards your flat panel TV rather than the remote sensor of this unit in order to control this system. • Use a 3-ringed miniplug SR+ cable to connect the CONTROL IN jack of this unit through a media receiver to the CONTROL OUT jack of your flat panel TV.1 Before you can use the extra SR+ features, you need to make a few settings in the unit. See SR+ Setup for Pioneer Flat Panel TVs below for detailed instructions. SR+ Setup for Pioneer Flat Panel TVs Make the following settings if you have connected a Pioneer flat panel TV to this unit using an SR+ cable. Note that the number of video inputs available will depend on the flat panel TV you've connected. 1 Press SHIFT+SR+ on the remote. 2 Use the / to select SETUP, then press ENTER. 3 Use / to select the setting you want. • VOL.C OFF - This unit does not control the volume of the flat panel TV. • VOL.C ON - When this unit is switched to one of the inputs that use the flat panel TV (DVD, or another one of functions below), the volume on the flat panel TV is muted so only sound from this system is heard. 4 Assign any input source connected to the flat panel TV to the corresponding input number. Use / to select the source (DVD, LN1/2 (LINE 1/2) or USB), then / to select the input number. This matches this unit's input source with a numbered video input on the flat panel TV.2 For example, select the LN1 PDP3 or LN2 PDP3 setting if the video output of your line component is connected to video input 3 on the flat panel TV. TVTN switches the flat panel TV to its built-in tuner and NONE leaves the flat panel TV input as is (no switching takes place). 5 When you're finished, press ENTER. Switching on the SR+ mode 1 Press SHIFT+SR+ on the remote. 2 Use / to select SR+ ON then press ENTER. To switch SR+ control off, select SR+ OFF. • If you disconnect the SR+ cable or switch the flat panel TV off while SR+ is on, the SR+ ON setting remains. • The SR+ setting is maintained even after switching this system into standby then back on. Automatic muting will be effective when this system is switched on. Note 1 You won't be able to use the remote sensor of this unit with the CONTROL IN jack of this unit connected to the CONTROL OUT jack of your flat panel TV. You can use the remote sensor of the flat panel TV (even in standby) as long as the power isn't switched off. 2 The PDP5 input may be called 'PC Input' (or similar) on your flat panel TV. 37 En
-
 1
1 -
2
-
3
-
4
-
5
-
6
-
7
-
8
-
9
-
10
-
11
-
12
-
13
-
14
-
15
-
16
-
17
-
18
-
19
-
20
-
21
-
22
-
23
-
24
-
25
-
26
-
27
-
28
-
29
-
30
-
31
-
 32
32 -
 33
33 -
 34
34 -
 35
35 -
 36
36 -
 37
37 -
 38
38 -
 39
39 -
 40
40 -
 41
41 -
 42
42 -
43
-
44
-
45
-
46
-
47
-
48
-
49
-
50
-
51
-
52
-
53
-
54
-
55
-
56
-
57
-
58
-
59
-
60
-
61
-
62
-
63
-
64
-
65
-
66
-
67
-
68
-
69
-
70
-
71
-
72
-
73
-
74
-
75
-
76
-
77
-
78
-
79
-
80
-
81
-
82
-
83
-
84
-
85
-
86
-
87
-
88
-
89
-
90
-
91
-
92
-
93
-
94
-
95
-
96
-
97
-
98
-
99
-
100
-
101
-
102
 |
 |
