Pioneer VSX-830-K Owner's Manual - Page 35
front panel of this receiver.
 |
View all Pioneer VSX-830-K manuals
Add to My Manuals
Save this manual to your list of manuals |
Page 35 highlights
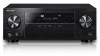
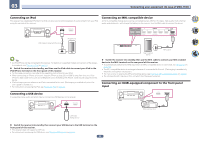
03 Connecting your equipment (In case of VSX-1130) Connecting an iPod This receiver has a dedicated iPod terminal that will allow you to control playback of audio content from your iPod using the controls of this receiver. Connecting an MHL-compatible device An MHL-compatible mobile device can be connected to enjoy 3D/Full-HD videos, high quality multi-channel audio, and photos etc., with charge the battery on the receiver. Use the MHL cable to connect the device. 5V 1A HDMI 5 INPUT USB cable included with the iPod iPod/iPhone HDMI OUT 2 1 1 1 BD HDZONE/MAIN MAIN SELECTABLE ARC CONTROL (DVD) HDMI IN 2 3 (SAT/CBL) ASSIGNABLE 1 - 6 4 6 /MHL (OUTPUT 5 V 0.9 A MAX) HDMI OUT 2 1 1 1 BD HDZONE/MAIN MAIN SELECTABLE ARC CONTROL (DVD) HDMI IN 2 3 (SAT/CBL) ASSIGNABLE 1 - 6 4 6 /MHL (OUTPUT 5 V 0.9 A MAX) MHL enabled device MHL cable Tip ! An iPod/iPhone can be connected to the receiver. For details on supported models and versions of the respec- tive products, see Playing an iPod on page 64 . % Switch the receiver into standby, and then use the iPod cable to connect your iPod to the iPod/iPhone terminal on the front panel of this receiver. ! For the cable connection, also refer to the operating instructions for your iPod. ! When connecting an iPhone to this unit, keep the iPhone at least 20 cm (0.66 ft) away from this unit. If the iPhone is kept closer to this unit and a telephone call is received by the iPhone, noise may be output from this device. ! iPod recharging occurs whenever an iPod is connected to this unit. (Recharging is enabled only when the unit's power is turned on.) ! For instructions on playing the iPod, see Playing an iPod on page 64. % Switch the receiver into standby then use the MHL cable to connect your MHL enabled device to the MHL terminal on the rear panel of this receiver. ! To automatically switch to the MHL input when an MHL-compatible device is connected, see MHL Setup on page 108. ! The MHL-compatible device is recharged whenever it is connected to this unit. (Recharging is enabled only when the unit's power is turned on.) ! For instructions on playing the MHL-compatible device, see Playing an MHL-compatible device on page 66 . ! Do not place the MHL device on this unit which has the power turned on. Connecting an HDMI-equipped component to the front panel input Connecting a USB device It is possible to play audio and photo files by connecting USB devices to this receiver. 5V 1A HDMI 5 INPUT 5V 1A HDMI 5 INPUT Video camera (etc.) USB mass storage device % Switch the receiver into standby then connect your USB device to the USB terminal on the front panel of this receiver. ! This receiver does not support a USB hub. ! For instructions on playing the USB device, see Playing a USB device on page 65 . 35
-
 1
1 -
2
-
3
-
4
-
5
-
6
-
7
-
8
-
9
-
10
-
11
-
12
-
13
-
14
-
15
-
16
-
17
-
18
-
19
-
20
-
21
-
22
-
23
-
24
-
25
-
26
-
27
-
28
-
29
-
 30
30 -
 31
31 -
 32
32 -
 33
33 -
 34
34 -
 35
35 -
 36
36 -
 37
37 -
 38
38 -
 39
39 -
 40
40 -
41
-
42
-
43
-
44
-
45
-
46
-
47
-
48
-
49
-
50
-
51
-
52
-
53
-
54
-
55
-
56
-
57
-
58
-
59
-
60
-
61
-
62
-
63
-
64
-
65
-
66
-
67
-
68
-
69
-
70
-
71
-
72
-
73
-
74
-
75
-
76
-
77
-
78
-
79
-
80
-
81
-
82
-
83
-
84
-
85
-
86
-
87
-
88
-
89
-
90
-
91
-
92
-
93
-
94
-
95
-
96
-
97
-
98
-
99
-
100
-
101
-
102
-
103
-
104
-
105
-
106
-
107
-
108
-
109
-
110
-
111
-
112
-
113
-
114
-
115
-
116
-
117
-
118
-
119
-
120
-
121
-
122
-
123
-
124
-
125
-
126
-
127
-
128
-
129
-
130
-
131
-
132
-
133
-
134
-
135
-
136
-
137
 |
 |
