Pioneer VSX-830-K Owner's Manual - Page 52
Select 'Network, Bluetooth' from the HOME MENU.
 |
View all Pioneer VSX-830-K manuals
Add to My Manuals
Save this manual to your list of manuals |
Page 52 highlights
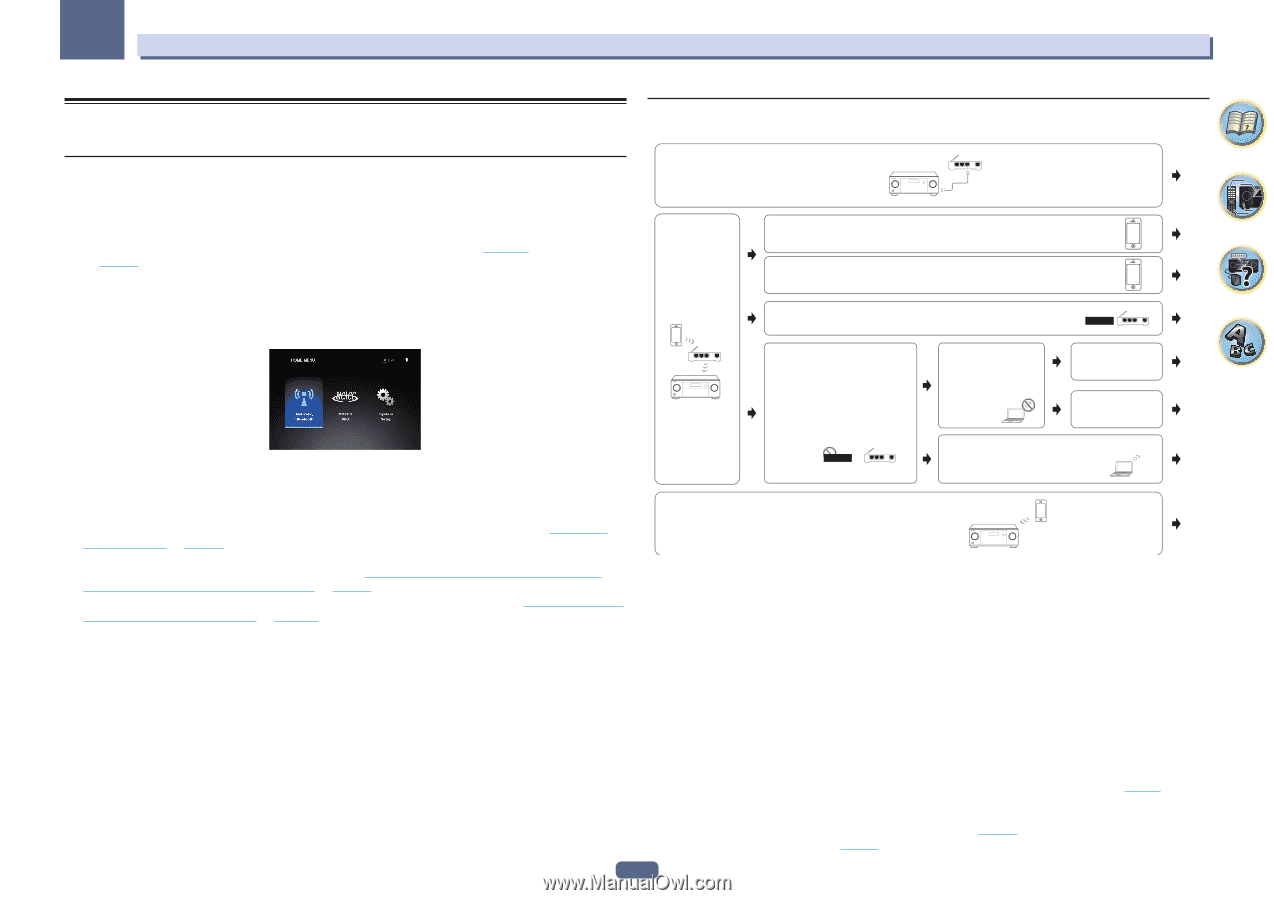
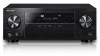
05 Basic Setup Setting by referring to the operating instructions Use HOME MENU when referring to the operating instructions for various settings. About the Home Menu This receiver's Home Menu (HOME MENU) can be used to make various settings and to check and adjust items that have been set. ! With factory default settings, the Home Menu screen will be output from all HDMI output terminals and dis- played on any TV connected via HDMI cable. VSX-1130 only: You can change where the screen is output in the MAIN/HDZONE (page 110 ) and HDMI output (page 89) settings. ! HOME MENU may not start immediately after turning the main power of this receiver on or when settings have been changed. In such case, operate after a while. 1 Press MAIN RECEIVER to switch the remote control to the receiver operation mode. 2 To display the Home Menu screen, press HOME MENU on the remote control. A Graphical User Interface (GUI) screen appears on your TV. Use i/j/k/l and ENTER to navigate through the screens and select menu items. Press RETURN to exit the current menu. The top level in the Home Menu is as shown below. Refer to the respective explanations to set, check and adjust as necessary. ! Network, Bluetooth - Conducts the setup necessary to connect this unit to the network (see Setting network connection on page 52 ). ! MCACC PRO (VSX-1130)/Advanced MCACC (VSX-830) - Use this to make automatic settings and detailed manual settings for the surround sound. For details, see Making receiver settings from the MCACC PRO (VSX-1130)/Advanced MCACC (VSX-830) menu on page 99 . ! System Setup - Use this to make various settings related to this system. For details, see Making receiver settings from the System Setup menu on page 106 . Setting network connection This part explains the connection settings for all networks. Connecting this receiver and router with a wired LAN LAN 3 2 1 WAN Connecting this receiver and router with a wireless LAN LAN 3 2 1 WAN Connecting the router with this receiver with your iPhone, iPod touch, or iPad (iOS version 5.0 or later) The wireless LAN settings for iPhone, iPod touch, or iPad can be applied to this receiver. Connecting the router with this receiver with your iPhone, iPod touch, or iPad (iOS version 7.1 or later) The wireless LAN settings for iPhone, iPod touch, or iPad can be applied to this receiver. Connecting a router with a WPS-PBC function with this receiver WPS-PBC LAN 3 2 1 WAN Connecting a router without a WPS-PBC function with this receiver Directly connect this receiver with your computer or smart phone. Configure the settings of this receiver via a Web browser from a computer or smart phone. WPS-PBC LAN 3 2 1 WAN There is no wireless LAN function on your computer or smart phone (wired LAN only) Automatically setting the connection Manually setting the connection Your computer or smart phone has a wireless LAN function A B C D E F G If you do not have a router Directly connecting your smart phone to this receiver H (Wireless Direct) ! When connection method B, C, D, E, F, or G is selected, check that the LAN cable is not connected to this receiver. ! Warning when connecting a wireless LAN router with this receiver SSID is compatible only with single-byte alphanumerical characters and some symbols such as the underbar. If characters other than these are used, change the SSID before executing network settings. Refer to the user's manual for your router for information on SSID. ! Some network functions may not be used with Wireless Direct. iControl AV5, AirPlay, and HTC connect can be used. When setting this receiver by A-H, first show the settings screen using the following procedures. 1 Press MAIN RECEIVER to switch the remote control to the receiver operation mode, and then press HOME MENU. A Graphical User Interface (GUI) screen appears on your TV. Use i/j/k/l and ENTER to navigate through the screens and select menu items. Press RETURN to exit the current menu. 2 Select 'Network, Bluetooth' from the HOME MENU. 3 Select the setting you want to adjust. If you are doing this for the first time, you may want to adjust these settings in order: ! Network Information - The setting status of the following network-related items can be checked (page 57 ). ! Network Type - Select the network connection method. ! Network Connection - Connect to the network. ! Network Option - Set the network other than for connection (page 57 ). ! Bluetooth Setup - Set Bluetooth (page 57) . 52
-
 1
1 -
2
-
3
-
4
-
5
-
6
-
7
-
8
-
9
-
10
-
11
-
12
-
13
-
14
-
15
-
16
-
17
-
18
-
19
-
20
-
21
-
22
-
23
-
24
-
25
-
26
-
27
-
28
-
29
-
30
-
31
-
32
-
33
-
34
-
35
-
36
-
37
-
38
-
39
-
40
-
41
-
42
-
43
-
44
-
45
-
46
-
 47
47 -
 48
48 -
 49
49 -
 50
50 -
 51
51 -
 52
52 -
 53
53 -
 54
54 -
 55
55 -
 56
56 -
 57
57 -
58
-
59
-
60
-
61
-
62
-
63
-
64
-
65
-
66
-
67
-
68
-
69
-
70
-
71
-
72
-
73
-
74
-
75
-
76
-
77
-
78
-
79
-
80
-
81
-
82
-
83
-
84
-
85
-
86
-
87
-
88
-
89
-
90
-
91
-
92
-
93
-
94
-
95
-
96
-
97
-
98
-
99
-
100
-
101
-
102
-
103
-
104
-
105
-
106
-
107
-
108
-
109
-
110
-
111
-
112
-
113
-
114
-
115
-
116
-
117
-
118
-
119
-
120
-
121
-
122
-
123
-
124
-
125
-
126
-
127
-
128
-
129
-
130
-
131
-
132
-
133
-
134
-
135
-
136
-
137
 |
 |