Pioneer VSX-830-K Owner's Manual - Page 95
Using All Zone Standby, Setting the switching time for the receiver operation mode, Resetting
 |
View all Pioneer VSX-830-K manuals
Add to My Manuals
Save this manual to your list of manuals |
Page 95 highlights
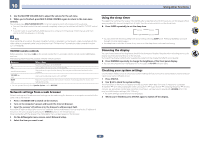
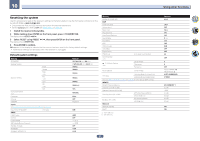
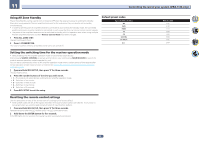
11 Controlling the rest of your system (VSX-1130 only) Using All Zone Standby The All Zone Standby can be used to turn all zones to OFF when the receiver's power is switched to standby. Also, when using separate Pioneer amplifiers/receivers for the sub zones, they can also be set to standby simultaneously. ! In order to set the power of amplifiers/receivers connected to sub zones to the standby mode, the connected amplifiers/receivers must be installed or connected in such a way that they can receive remote control signals. ! The power of the amplifiers/receivers can be switched to standby with this operation even when using multiple Pioneer amplifiers/receivers and their Remote Control Mode have been changed. 1 Press ALL ZONE STBY. The LED continues to flash. 2 Press u STANDBY/ON. The receiver's power switches to standby and all zones are turned off. Default preset codes Input function button BD DVD HDMI TV CD SAT/CBL TV (INPUT) ALL Setting the switching time for the receiver operation mode ! Default setting: The AV amplifier operation mode is not switched automatically. After pressing SOURCE CONTROL to operate another device, you need to press MAIN RECEIVER to switch the mode to receiver operation mode to operate this unit. You can set to automatically switch to AV amplifier operation mode when a certain period of time elapses after remote operation of each input function is finished. See Setting the switching time for the receiver operation mode on page 95. 1 Press and hold RCU SETUP, then press '5' for three seconds. The LED flashes once. 2 Press the number buttons of the time you wish to set. ! 1 - The mode is not automatically switched to AV amplifier operation mode. ! 2 - Switches in five minute. ! 3 - Switches in three minute. ! 4 - Switches in one minute. ! 5 - Switches in 30 seconds. 3 Press RCU SETUP to exit the setup. Resetting the remote control settings Use this procedure to reset all the remote control's settings to the factory default. ! When preset codes are set, all the signals learned in the input function buttons are cleared. This function is convenient when you want to reset some but not all of input function buttons. 1 Press and hold RCU SETUP, then press '0' for three seconds. Release the button after the LED flashes once. The LED continues to flash. 2 Hold down the ENTER button for five seconds. If the LED lights for one second, the erasing has been successfully completed. Preset code 2255 2197 2144 0305 5000 6329 0305 2034 95
-
 1
1 -
2
-
3
-
4
-
5
-
6
-
7
-
8
-
9
-
10
-
11
-
12
-
13
-
14
-
15
-
16
-
17
-
18
-
19
-
20
-
21
-
22
-
23
-
24
-
25
-
26
-
27
-
28
-
29
-
30
-
31
-
32
-
33
-
34
-
35
-
36
-
37
-
38
-
39
-
40
-
41
-
42
-
43
-
44
-
45
-
46
-
47
-
48
-
49
-
50
-
51
-
52
-
53
-
54
-
55
-
56
-
57
-
58
-
59
-
60
-
61
-
62
-
63
-
64
-
65
-
66
-
67
-
68
-
69
-
70
-
71
-
72
-
73
-
74
-
75
-
76
-
77
-
78
-
79
-
80
-
81
-
82
-
83
-
84
-
85
-
86
-
87
-
88
-
89
-
 90
90 -
 91
91 -
 92
92 -
 93
93 -
 94
94 -
 95
95 -
 96
96 -
 97
97 -
 98
98 -
 99
99 -
 100
100 -
101
-
102
-
103
-
104
-
105
-
106
-
107
-
108
-
109
-
110
-
111
-
112
-
113
-
114
-
115
-
116
-
117
-
118
-
119
-
120
-
121
-
122
-
123
-
124
-
125
-
126
-
127
-
128
-
129
-
130
-
131
-
132
-
133
-
134
-
135
-
136
-
137
 |
 |
