Ricoh Aficio SP 1000SF Operating Instructions - Page 16
Command panel, Presentation, Entering Characters Using the Alpanumerical keypad
 |
View all Ricoh Aficio SP 1000SF manuals
Add to My Manuals
Save this manual to your list of manuals |
Page 16 highlights
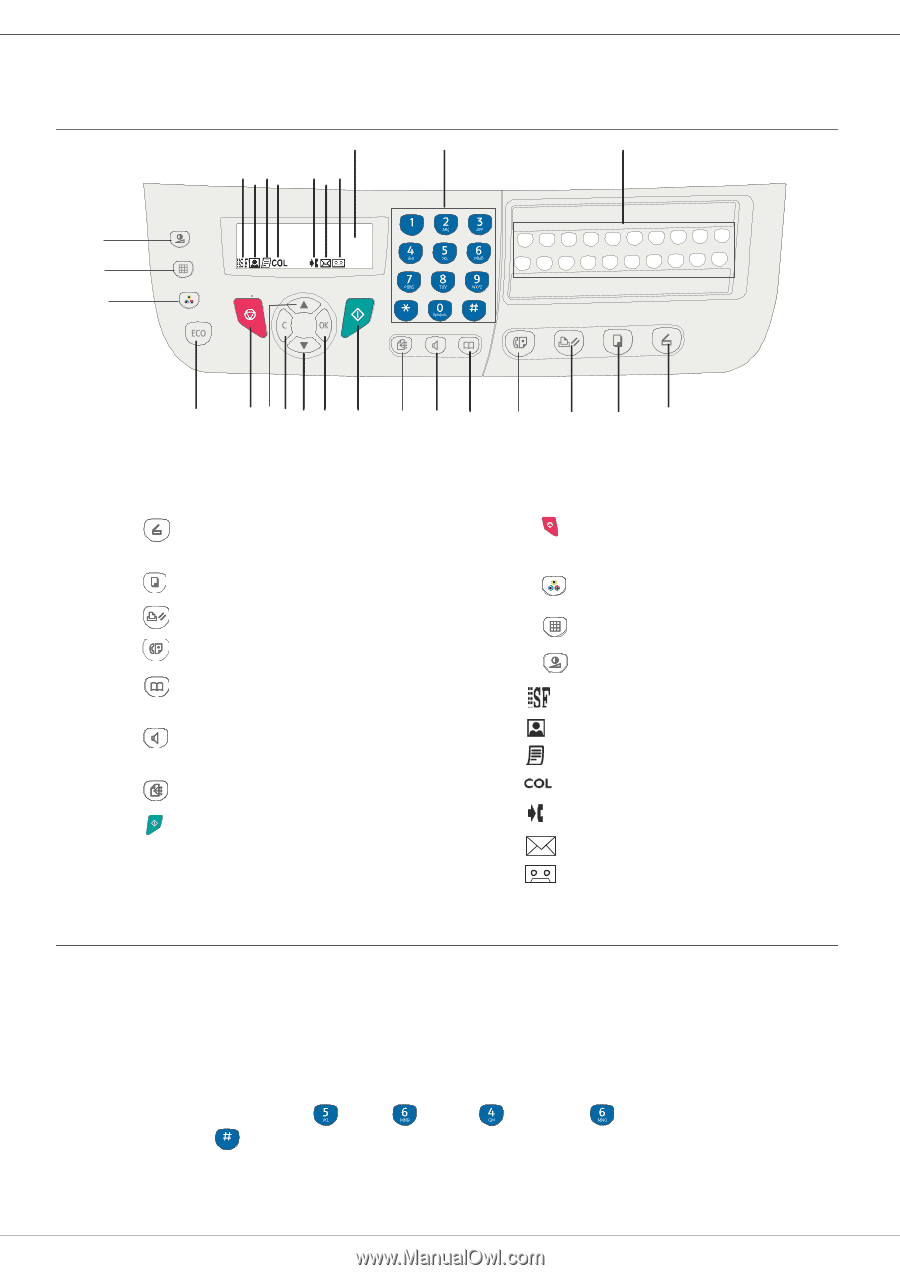
2 - Installation SP 1000SF Command panel Presentation 1 2 3 21 23 22 24 25 27 26 20 19 18 17 16 15 14 13 12 11 10 9 1. Screen. 2. Alphanumerical keypad. 3. One-Touch keypad (buttons 1 to 20). 4. Button : document analysis to the PC or a media (USB key). 5. Button : local copy. 6. Button : stops the current PC printing. 7. Button : sending a fax. 8. Button : access to directory and quick dial numbers. 9. Button : line manual connection, listen for tone during fax sending. 10. Button : multiple contact sending (fax). 11. Button : Validation. 12. Button OK: confirms the displayed selection. 13. Button : menu access and navigation down the menus. 8 7 6 5 4 14. Button C: back to the previous menu and input correction. 15. Button : navigation up the menus. 16. Button : stops the current operation. 17. Button ECO: sets up the activation delay. 18. Button : colour analysis mode selection. 19. Button : analysis resolution setup. 20. Button : contrast setup. 21. Icon 22. Icon 23. Icon 24. Icon 25. Icon 26. Icon 27. Icon : resolution "Copy : Quality text / Fax : Sfine". : resolution "Photo". : resolution "Copy : Auto / Fax : Fine". : color mode. : activity on the telephone line. : Fax mode. : external answering device mode Entering Characters Using the Alpanumerical keypad As you perform various tasks, you need to enter names and numbers. For example, when you set up your machine, you enter your name (or your company's name) and telephone number. When you store one-, two-, or three-digit speed dial or group dial numbers, you may also enter the corresponding names. To enter alphanumeric characters when you are prompted to enter a letter, locate the button labeled with the character you want. Press the button until the correct letter appears on the display. Examples : - to enter the name "John", press : - to enter "!", press : 17 times. 1 time, 6 times, 5 times and 5 times. If you make a mistake while entering a number or name, press the C button to delete the last digit or character. Then enter the correct number or character. - 13 -
-
 1
1 -
2
-
3
-
4
-
5
-
6
-
7
-
8
-
9
-
10
-
 11
11 -
 12
12 -
 13
13 -
 14
14 -
 15
15 -
 16
16 -
 17
17 -
 18
18 -
 19
19 -
 20
20 -
 21
21 -
22
-
23
-
24
-
25
-
26
-
27
-
28
-
29
-
30
-
31
-
32
-
33
-
34
-
35
-
36
-
37
-
38
-
39
-
40
-
41
-
42
-
43
-
44
-
45
-
46
-
47
-
48
-
49
-
50
-
51
-
52
-
53
-
54
-
55
-
56
-
57
-
58
-
59
 |
 |