Ricoh SP 4510SF User Guide - Page 148
Envelopes, Select [Thick Paper 1] or [Thick Paper 2] as the paper thickness in [Tray Paper Settings].
 |
View all Ricoh SP 4510SF manuals
Add to My Manuals
Save this manual to your list of manuals |
Page 148 highlights
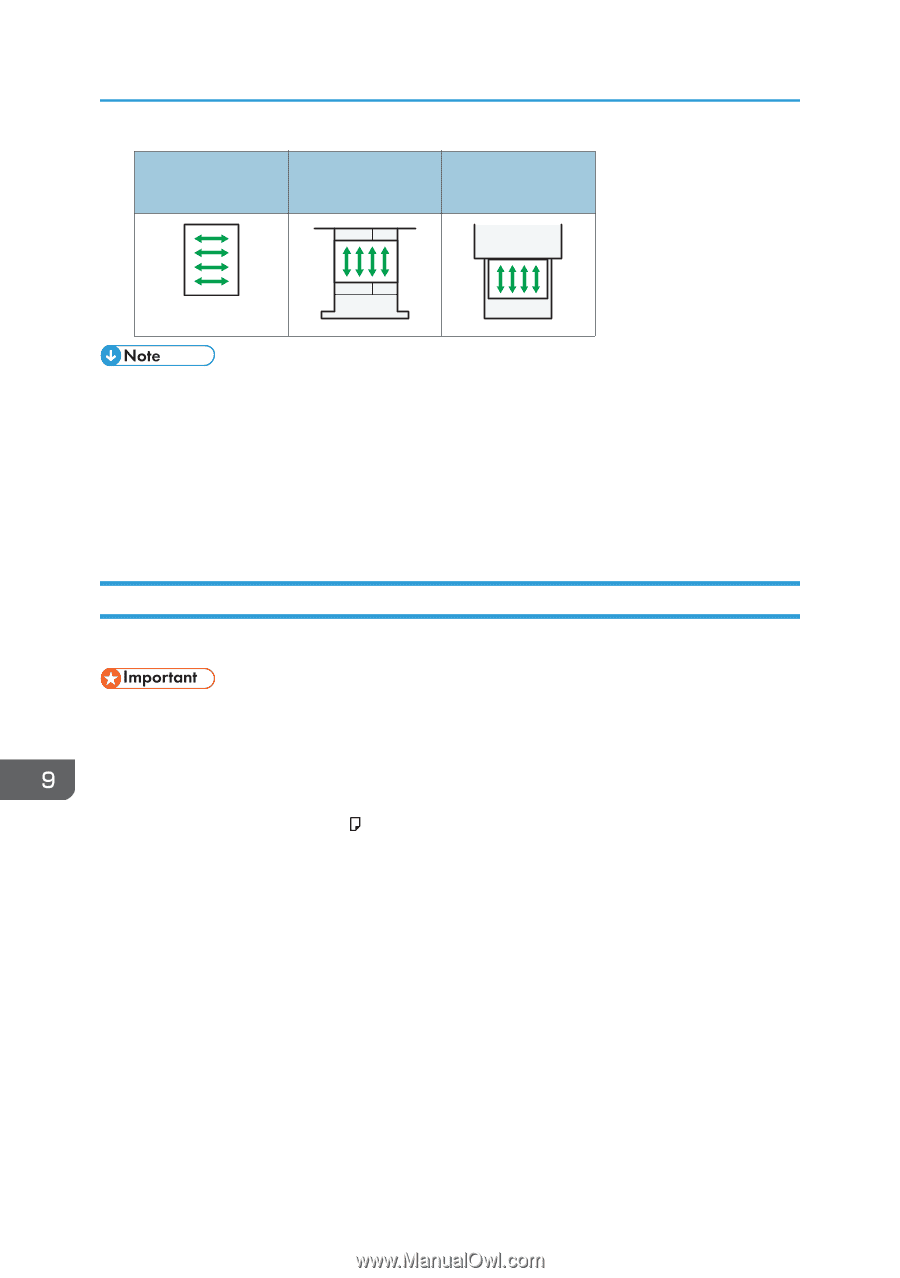
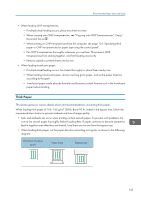
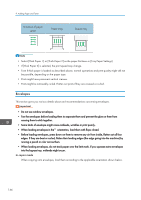
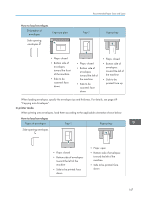
9. Adding Paper and Toner Direction of paper grain Paper trays Bypass tray • Select [Thick Paper 1] or [Thick Paper 2] as the paper thickness in [Tray Paper Settings]. • If [Thick Paper 2] is selected, the print speed may change. • Even if thick paper is loaded as described above, normal operations and print quality might still not be possible, depending on the paper type. • Prints might have prominent vertical creases. • Prints might be noticeably curled. Flatten out prints if they are creased or curled. Envelopes This section gives you various details about and recommendations concerning envelopes. • Do not use window envelopes. • Fan the envelopes before loading them to separate them and prevent the glue on them from causing them to stick together. • Some kinds of envelope might cause misfeeds, wrinkles or print poorly. • When loading envelopes in the orientation, load them with flaps closed. • Before loading envelopes, press down on them to remove any air from inside, flatten out all four edges. If they are bent or curled, flatten their leading edges (the edge going into the machine) by running a pencil or ruler across them. • When loading envelopes, do not stack paper over the limit mark. If you squeeze extra envelopes into the bypass tray, misfeeds might occur. In copier mode When copying onto envelopes, load them according to the applicable orientation shown below. 146
-
 1
1 -
2
-
3
-
4
-
5
-
6
-
7
-
8
-
9
-
10
-
11
-
12
-
13
-
14
-
15
-
16
-
17
-
18
-
19
-
20
-
21
-
22
-
23
-
24
-
25
-
26
-
27
-
28
-
29
-
30
-
31
-
32
-
33
-
34
-
35
-
36
-
37
-
38
-
39
-
40
-
41
-
42
-
43
-
44
-
45
-
46
-
47
-
48
-
49
-
50
-
51
-
52
-
53
-
54
-
55
-
56
-
57
-
58
-
59
-
60
-
61
-
62
-
63
-
64
-
65
-
66
-
67
-
68
-
69
-
70
-
71
-
72
-
73
-
74
-
75
-
76
-
77
-
78
-
79
-
80
-
81
-
82
-
83
-
84
-
85
-
86
-
87
-
88
-
89
-
90
-
91
-
92
-
93
-
94
-
95
-
96
-
97
-
98
-
99
-
100
-
101
-
102
-
103
-
104
-
105
-
106
-
107
-
108
-
109
-
110
-
111
-
112
-
113
-
114
-
115
-
116
-
117
-
118
-
119
-
120
-
121
-
122
-
123
-
124
-
125
-
126
-
127
-
128
-
129
-
130
-
131
-
132
-
133
-
134
-
135
-
136
-
137
-
138
-
139
-
140
-
141
-
142
-
 143
143 -
 144
144 -
 145
145 -
 146
146 -
 147
147 -
 148
148 -
 149
149 -
 150
150 -
 151
151 -
 152
152 -
 153
153 -
154
-
155
-
156
-
157
-
158
-
159
-
160
-
161
-
162
-
163
-
164
-
165
-
166
-
167
-
168
-
169
-
170
-
171
-
172
-
173
-
174
-
175
-
176
-
177
-
178
-
179
-
180
-
181
-
182
-
183
-
184
-
185
-
186
-
187
-
188
-
189
-
190
-
191
-
192
-
193
-
194
-
195
-
196
-
197
-
198
-
199
-
200
-
201
-
202
-
203
-
204
-
205
-
206
-
207
-
208
-
209
-
210
-
211
-
212
-
213
-
214
-
215
-
216
-
217
-
218
-
219
-
220
-
221
-
222
-
223
-
224
 |
 |