Ricoh SP 4510SF User Guide - Page 28
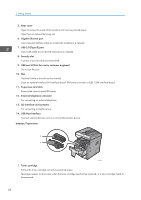
See Guide to the Names and Functions of the Machine's Control Panel., Ventilation holes - toner
 |
View all Ricoh SP 4510SF manuals
Add to My Manuals
Save this manual to your list of manuals |
Page 28 highlights
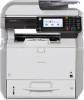
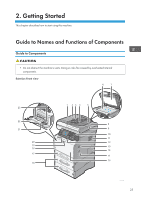
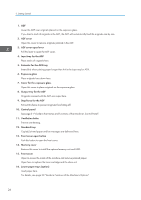
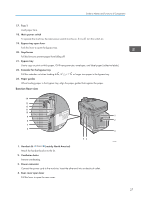
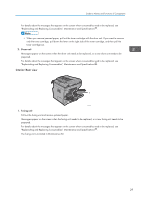
2. Getting Started 1. ADF Lower the ADF over originals placed on the exposure glass. If you load a stack of originals in the ADF, the ADF will automatically feed the originals one by one. 2. ADF cover Open this cover to remove originals jammed in the ADF. 3. ADF cover open lever Pull this lever to open the ADF cover. 4. Input tray for the ADF Place stacks of originals here. 5. Extender for the ADF tray Extend this when placing paper longer than A4 in the input tray for ADF. 6. Exposure glass Place originals face down here. 7. Cover for the exposure glass Open this cover to place originals on the exposure glass. 8. Output tray for the ADF Originals scanned with the ADF are output here. 9. Stop fence for the ADF Pull out this fence to prevent originals from falling off. 10. Control panel See page 31 "Guide to the Names and Functions of the Machine's Control Panel". 11. Ventilation holes Prevent overheating. 12. Standard tray Copied/printed paper and fax messages are delivered here. 13. Front cover open button Push this button to open the front cover. 14. Memory cover Remove this cover to install the optional memory unit and HDD. 15. Front cover Open to access the inside of the machine and remove jammed paper. Open here to replace the toner cartridge and the drum unit. 16. Lower paper trays (option) Load paper here. For details, see page 30 "Guide to Functions of the Machine's Options". 26
-
 1
1 -
2
-
3
-
4
-
5
-
6
-
7
-
8
-
9
-
10
-
11
-
12
-
13
-
14
-
15
-
16
-
17
-
18
-
19
-
20
-
21
-
22
-
 23
23 -
 24
24 -
 25
25 -
 26
26 -
 27
27 -
 28
28 -
 29
29 -
 30
30 -
 31
31 -
 32
32 -
 33
33 -
34
-
35
-
36
-
37
-
38
-
39
-
40
-
41
-
42
-
43
-
44
-
45
-
46
-
47
-
48
-
49
-
50
-
51
-
52
-
53
-
54
-
55
-
56
-
57
-
58
-
59
-
60
-
61
-
62
-
63
-
64
-
65
-
66
-
67
-
68
-
69
-
70
-
71
-
72
-
73
-
74
-
75
-
76
-
77
-
78
-
79
-
80
-
81
-
82
-
83
-
84
-
85
-
86
-
87
-
88
-
89
-
90
-
91
-
92
-
93
-
94
-
95
-
96
-
97
-
98
-
99
-
100
-
101
-
102
-
103
-
104
-
105
-
106
-
107
-
108
-
109
-
110
-
111
-
112
-
113
-
114
-
115
-
116
-
117
-
118
-
119
-
120
-
121
-
122
-
123
-
124
-
125
-
126
-
127
-
128
-
129
-
130
-
131
-
132
-
133
-
134
-
135
-
136
-
137
-
138
-
139
-
140
-
141
-
142
-
143
-
144
-
145
-
146
-
147
-
148
-
149
-
150
-
151
-
152
-
153
-
154
-
155
-
156
-
157
-
158
-
159
-
160
-
161
-
162
-
163
-
164
-
165
-
166
-
167
-
168
-
169
-
170
-
171
-
172
-
173
-
174
-
175
-
176
-
177
-
178
-
179
-
180
-
181
-
182
-
183
-
184
-
185
-
186
-
187
-
188
-
189
-
190
-
191
-
192
-
193
-
194
-
195
-
196
-
197
-
198
-
199
-
200
-
201
-
202
-
203
-
204
-
205
-
206
-
207
-
208
-
209
-
210
-
211
-
212
-
213
-
214
-
215
-
216
-
217
-
218
-
219
-
220
-
221
-
222
-
223
-
224
 |
 |