Ricoh SP 4510SF User Guide - Page 29

Exterior: Rear view, mainly North America

Page 29 highlights

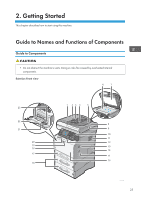
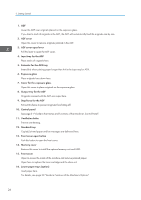
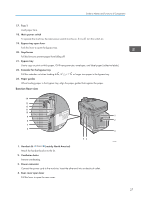
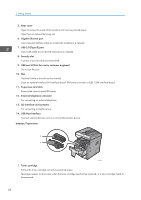
Guide to Names and Functions of Components 17. Tray 1 Load paper here. 18. Main power switch To operate the machine, the main power switch must be on. If it is off, turn the switch on. 19. Bypass tray open lever Push this lever to open the bypass tray. 20. Stop fences Pull this fence to prevent paper from falling off. 21. Bypass tray Use to copy or print on thick paper, OHP transparencies, envelopes, and label paper (adhesive labels). 22. Extender for the bypass tray Pull this extender out when loading A4 , 81/2 × 11 23. Paper guides or larger size paper in the bypass tray. When loading paper in the bypass tray, align the paper guides flush against the paper. Exterior: Rear view 14 13 12 11 10 9 1 8 2 7 6 3 54 CXC401 1. Handset slit (mainly North America) Attach the handset bracket to the slit. 2. Ventilation holes Prevent overheating. 3. Power connector Connect the power cord to the machine. Insert the other end into an electrical outlet. 4. Rear cover open lever Pull this lever to open the rear cover. 27

  • 1
  • 2
  • 3
  • 4
  • 5
  • 6
  • 7
  • 8
  • 9
  • 10
  • 11
  • 12
  • 13
  • 14
  • 15
  • 16
  • 17
  • 18
  • 19
  • 20
  • 21
  • 22
  • 23
  • 24
  • 25
  • 26
  • 27
  • 28
  • 29
  • 30
  • 31
  • 32
  • 33
  • 34
  • 35
  • 36
  • 37
  • 38
  • 39
  • 40
  • 41
  • 42
  • 43
  • 44
  • 45
  • 46
  • 47
  • 48
  • 49
  • 50
  • 51
  • 52
  • 53
  • 54
  • 55
  • 56
  • 57
  • 58
  • 59
  • 60
  • 61
  • 62
  • 63
  • 64
  • 65
  • 66
  • 67
  • 68
  • 69
  • 70
  • 71
  • 72
  • 73
  • 74
  • 75
  • 76
  • 77
  • 78
  • 79
  • 80
  • 81
  • 82
  • 83
  • 84
  • 85
  • 86
  • 87
  • 88
  • 89
  • 90
  • 91
  • 92
  • 93
  • 94
  • 95
  • 96
  • 97
  • 98
  • 99
  • 100
  • 101
  • 102
  • 103
  • 104
  • 105
  • 106
  • 107
  • 108
  • 109
  • 110
  • 111
  • 112
  • 113
  • 114
  • 115
  • 116
  • 117
  • 118
  • 119
  • 120
  • 121
  • 122
  • 123
  • 124
  • 125
  • 126
  • 127
  • 128
  • 129
  • 130
  • 131
  • 132
  • 133
  • 134
  • 135
  • 136
  • 137
  • 138
  • 139
  • 140
  • 141
  • 142
  • 143
  • 144
  • 145
  • 146
  • 147
  • 148
  • 149
  • 150
  • 151
  • 152
  • 153
  • 154
  • 155
  • 156
  • 157
  • 158
  • 159
  • 160
  • 161
  • 162
  • 163
  • 164
  • 165
  • 166
  • 167
  • 168
  • 169
  • 170
  • 171
  • 172
  • 173
  • 174
  • 175
  • 176
  • 177
  • 178
  • 179
  • 180
  • 181
  • 182
  • 183
  • 184
  • 185
  • 186
  • 187
  • 188
  • 189
  • 190
  • 191
  • 192
  • 193
  • 194
  • 195
  • 196
  • 197
  • 198
  • 199
  • 200
  • 201
  • 202
  • 203
  • 204
  • 205
  • 206
  • 207
  • 208
  • 209
  • 210
  • 211
  • 212
  • 213
  • 214
  • 215
  • 216
  • 217
  • 218
  • 219
  • 220
  • 221
  • 222
  • 223
  • 224

17.
Tray 1
Load paper here.
18.
Main power switch
To operate the machine, the main power switch must be on. If it is off, turn the switch on.
19.
Bypass tray open lever
Push this lever to open the bypass tray.
20.
Stop fences
Pull this fence to prevent paper from falling off.
21.
Bypass tray
Use to copy or print on thick paper, OHP transparencies, envelopes, and label paper (adhesive labels).
22.
Extender for the bypass tray
Pull this extender out when loading A4
, 8
1
/
2
× 11
or larger size paper in the bypass tray.
23.
Paper guides
When loading paper in the bypass tray, align the paper guides flush against the paper.
Exterior: Rear view
CXC401
2
4
5
6
7
8
9
10
11
12
13
14
1
3
1.
Handset slit
(mainly North America)
Attach the handset bracket to the slit.
2.
Ventilation holes
Prevent overheating.
3.
Power connector
Connect the power cord to the machine. Insert the other end into an electrical outlet.
4.
Rear cover open lever
Pull this lever to open the rear cover.
Guide to Names and Functions of Components
27