Samsung CLX-9251NA User Manual Ver.1.03 (English) - Page 109
Using direct printing utility, Printing
 |
View all Samsung CLX-9251NA manuals
Add to My Manuals
Save this manual to your list of manuals |
Page 109 highlights
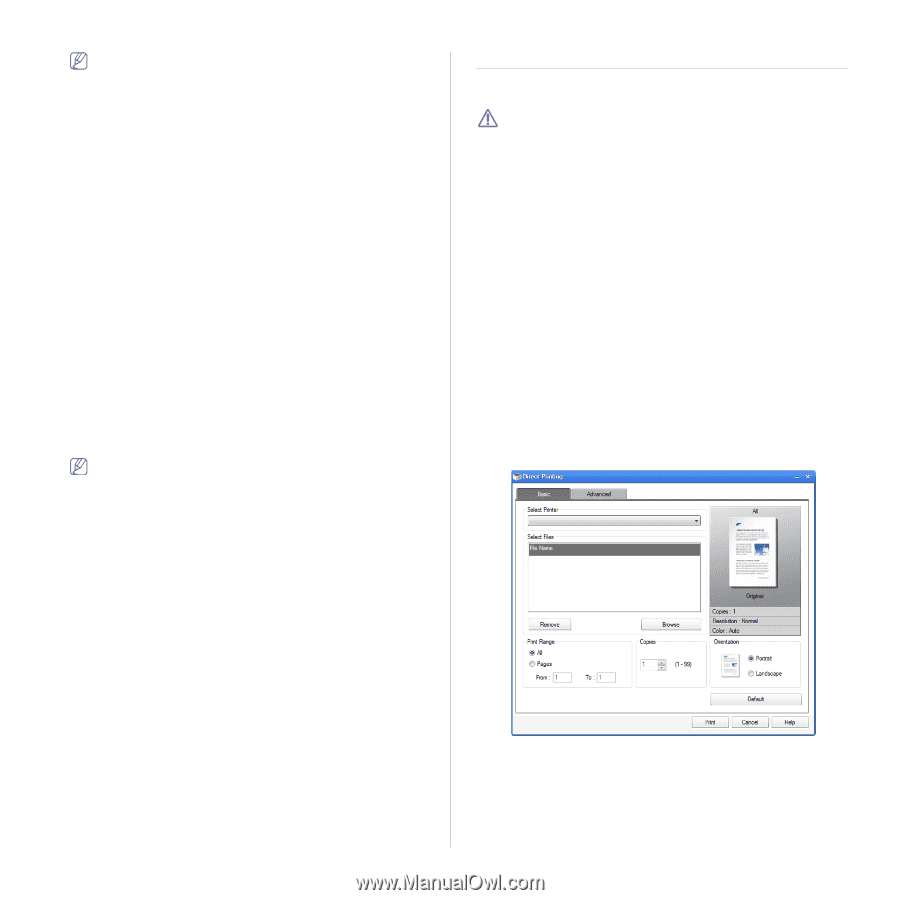
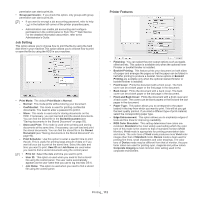
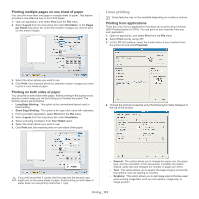
The overlay document size must be the same as the document you print with the overlay. Do not create an overlay with a watermark. Using a page overlay After an overlay has been created, it is ready to be printed with your document. To print an overlay with a document: 1. Create or open the document you want to print. 2. To change the print settings from your software application, access Printing Preferences (see "Opening printing preferences" on page 101). 3. Click the Advanced tab. 4. Select the desired overlay from the Text drop-down list. 5. If the overlay file you want does not appear in theText drop-down list, select Edit... from the list and click Load. Select the overlay file you want to use. If you have stored the overlay file you want to use in an external source, you can also load the file when you access the Load window. After you select the file, click Open. The file appears in the Overlay List box and is available for printing. Select the overlay from the Overlay List box. 6. If necessary, check the Confirm Page Overlay When Printing box. If this box is checked, a message window appears each time you submit a document for printing, asking you to confirm printing an overlay on your document. If this box is not checked and an overlay has been selected, the overlay automatically prints with your document. 7. Click OK or Print until you exit the Print window. The selected overlay prints on your document. The resolution of the overlay document must be the same as that of the document you will print with the overlay. Deleting a page overlay You can delete page overlays that you no longer use. 1. In the Printing Preferences window, click the Advanced tab. 2. Select Edit... in the Text drop down list. 3. Select the overlay you want to delete from the Overlay List box. 4. Click Delete. 5. When a confirmation message window appears, click Yes. 6. Click OK or Print until you exit the Print window. Using direct printing utility This chapter explains how to use the Direct Printing Utility to print PDF files without open the files. • A HDD should be installed on your machine, to print PDF files using this program. • You cannot print PDF files that are restricted to print. Deactivate the printing restriction feature, and retry printing. • You cannot print PDF files that are restricted by a password. Deactivate the password feature, and retry printing. • Whether or not a PDF file can be printed using the Direct Printing Utility program depends on how the PDF file was created. • The Direct Printing Utility program supports the PDF version 1.7 and below. For a higher version, you must open the file to print it. What is Direct Printing Utility? Direct Printing Utility is a program that sends a PDF file directly to your machine to print without having to open the file. It sends data through the Windows spooler using the port of the printer driver. It only supports PDF format. To install this program, select Advanced Installation -> Custom Installation and put a check mark for this program when you install the printer driver. Printing There are several ways you can print using the Direct Printing Utility. From the Direct Printing Utility window 1. From the Start menu select Programs or All Programs > Samsung Printers > Direct Printing Utility > Direct Printing Utility. 2. Select your machine from the Select Printer drop-down list and click Browse. 3. Select the PDF file you wish to print and click Open. The PDF file is added in the Select Files section. 4. Customize the machine settings for your needs. 5. Click Print. The selected PDF file is sent to the machine. Printing_ 109
-
 1
1 -
2
-
3
-
4
-
5
-
6
-
7
-
8
-
9
-
10
-
11
-
12
-
13
-
14
-
15
-
16
-
17
-
18
-
19
-
20
-
21
-
22
-
23
-
24
-
25
-
26
-
27
-
28
-
29
-
30
-
31
-
32
-
33
-
34
-
35
-
36
-
37
-
38
-
39
-
40
-
41
-
42
-
43
-
44
-
45
-
46
-
47
-
48
-
49
-
50
-
51
-
52
-
53
-
54
-
55
-
56
-
57
-
58
-
59
-
60
-
61
-
62
-
63
-
64
-
65
-
66
-
67
-
68
-
69
-
70
-
71
-
72
-
73
-
74
-
75
-
76
-
77
-
78
-
79
-
80
-
81
-
82
-
83
-
84
-
85
-
86
-
87
-
88
-
89
-
90
-
91
-
92
-
93
-
94
-
95
-
96
-
97
-
98
-
99
-
100
-
101
-
102
-
103
-
 104
104 -
 105
105 -
 106
106 -
 107
107 -
 108
108 -
 109
109 -
 110
110 -
 111
111 -
 112
112 -
 113
113 -
 114
114 -
115
-
116
-
117
-
118
-
119
-
120
-
121
-
122
-
123
-
124
-
125
-
126
-
127
-
128
-
129
-
130
-
131
-
132
-
133
-
134
-
135
-
136
-
137
-
138
-
139
-
140
-
141
-
142
-
143
-
144
-
145
-
146
-
147
-
148
-
149
-
150
-
151
-
152
-
153
-
154
-
155
-
156
-
157
-
158
-
159
-
160
-
161
-
162
-
163
-
164
-
165
-
166
-
167
-
168
-
169
-
170
-
171
-
172
-
173
-
174
-
175
-
176
-
177
-
178
 |
 |